Bathroom Mirror Cabinet Organization
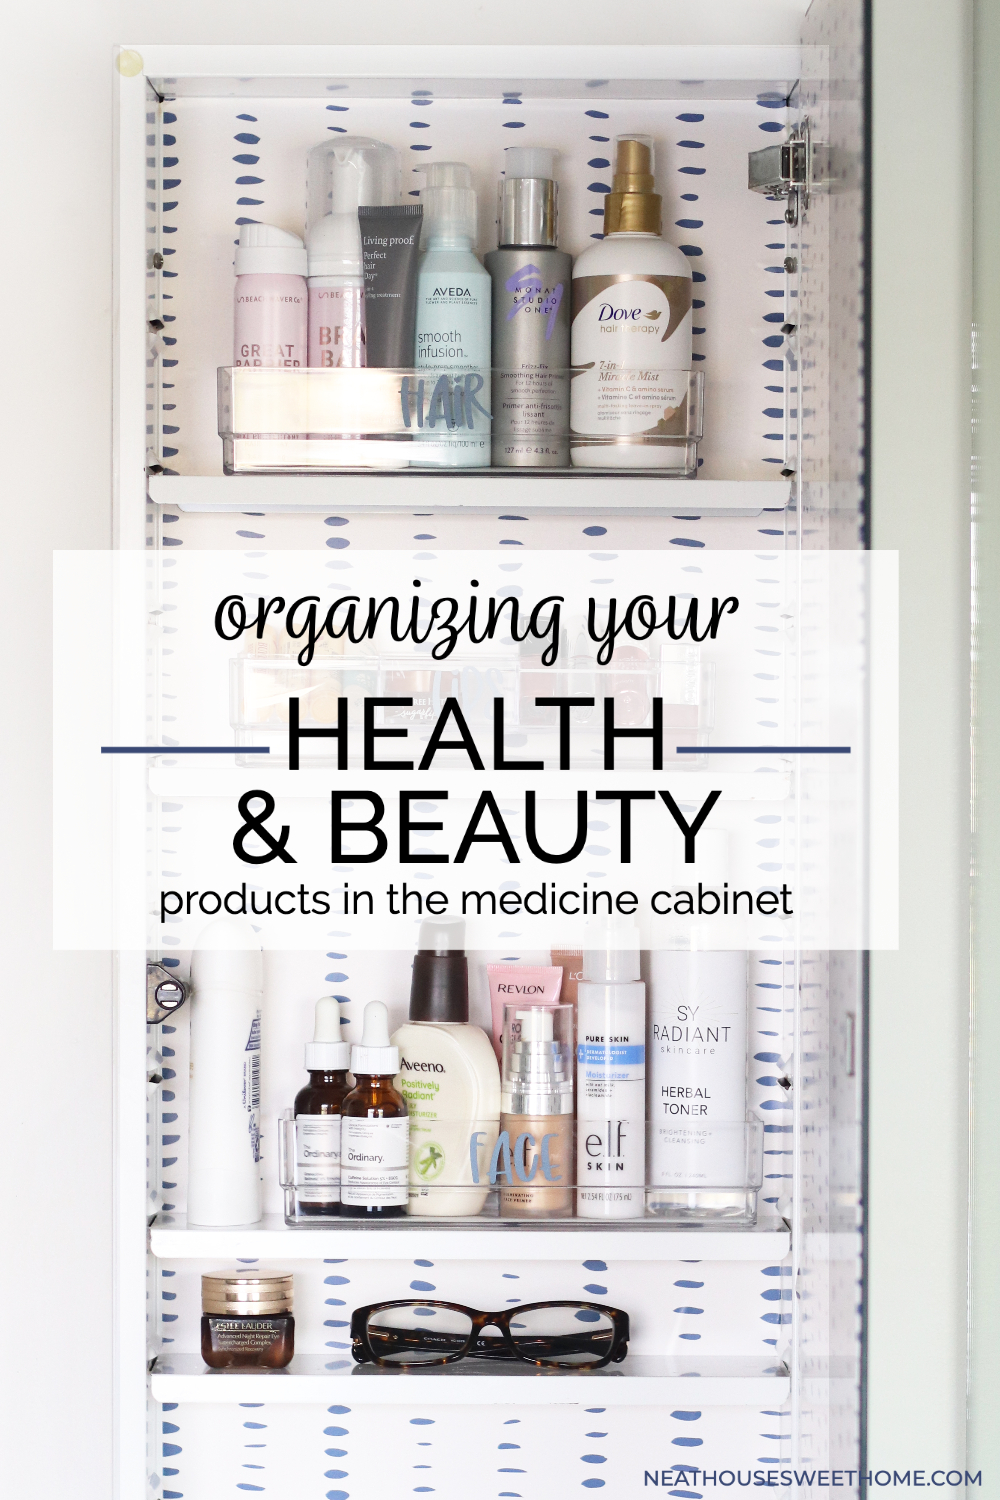
My first organization project of the year is in the books! Last week, I gave my old mirror cabinet a slight makeover and took the opportunity to clean, declutter, and organize the space. This organization project is for you if you have a builder-grade, recessed mirror cabinet in your bathroom.
When I am organizing, I always look for function first. However, to me, no organization project is complete without considering its form and how to make it look beautiful. For years, I kept the mirror cabinet organized using dollar store baskets to contain small items and prevent tall bottles from tipping. But it was time to give it a makeover and reorganize everything.
Would you like to save this?
In this post, I will show you how to efficiently organize those tiny and narrow shelves inside a medicine cabinet. I am also linking to the free Cricut file I used to cut out the vinyl labels!
Related: Medicine Cabinet Makeover
What Do You Keep In Your Medicine Cabinet?
In full disclosure, this mirror cabinet does not contain any medicine. We store medicine and first aid items in a cupboard in the kitchen. Because this mirror cabinet is in the primary bathroom and next to my vanity and makeup drawer, I use it to store personal health and beauty products.
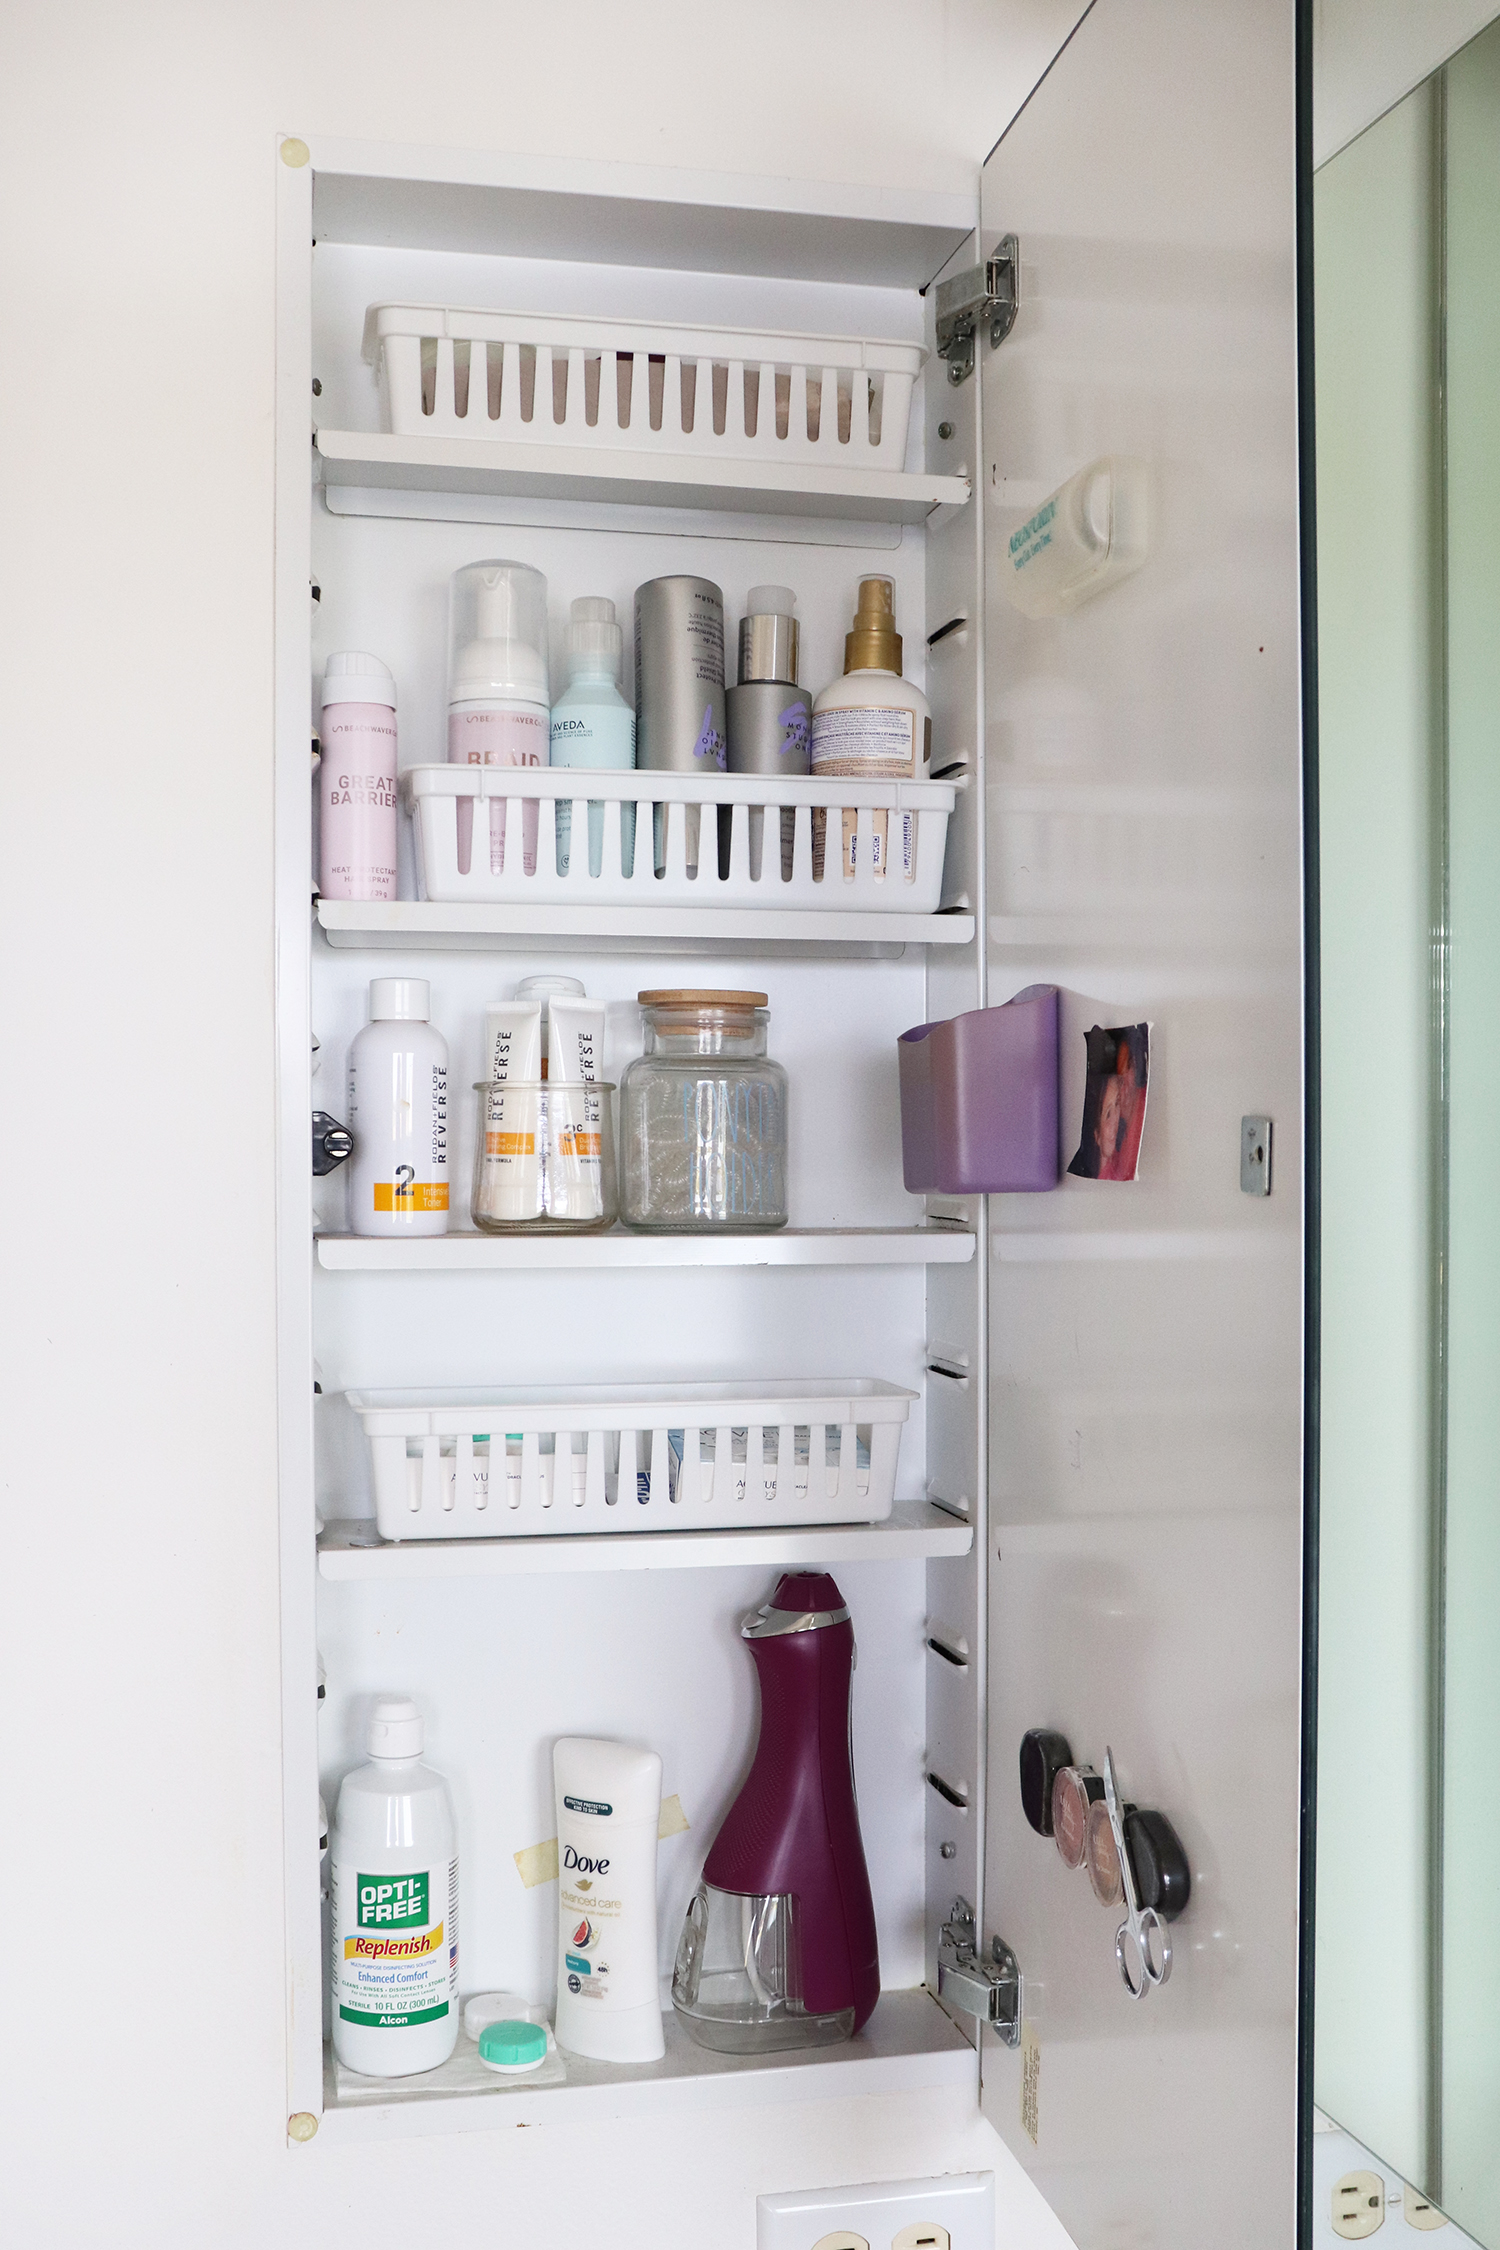
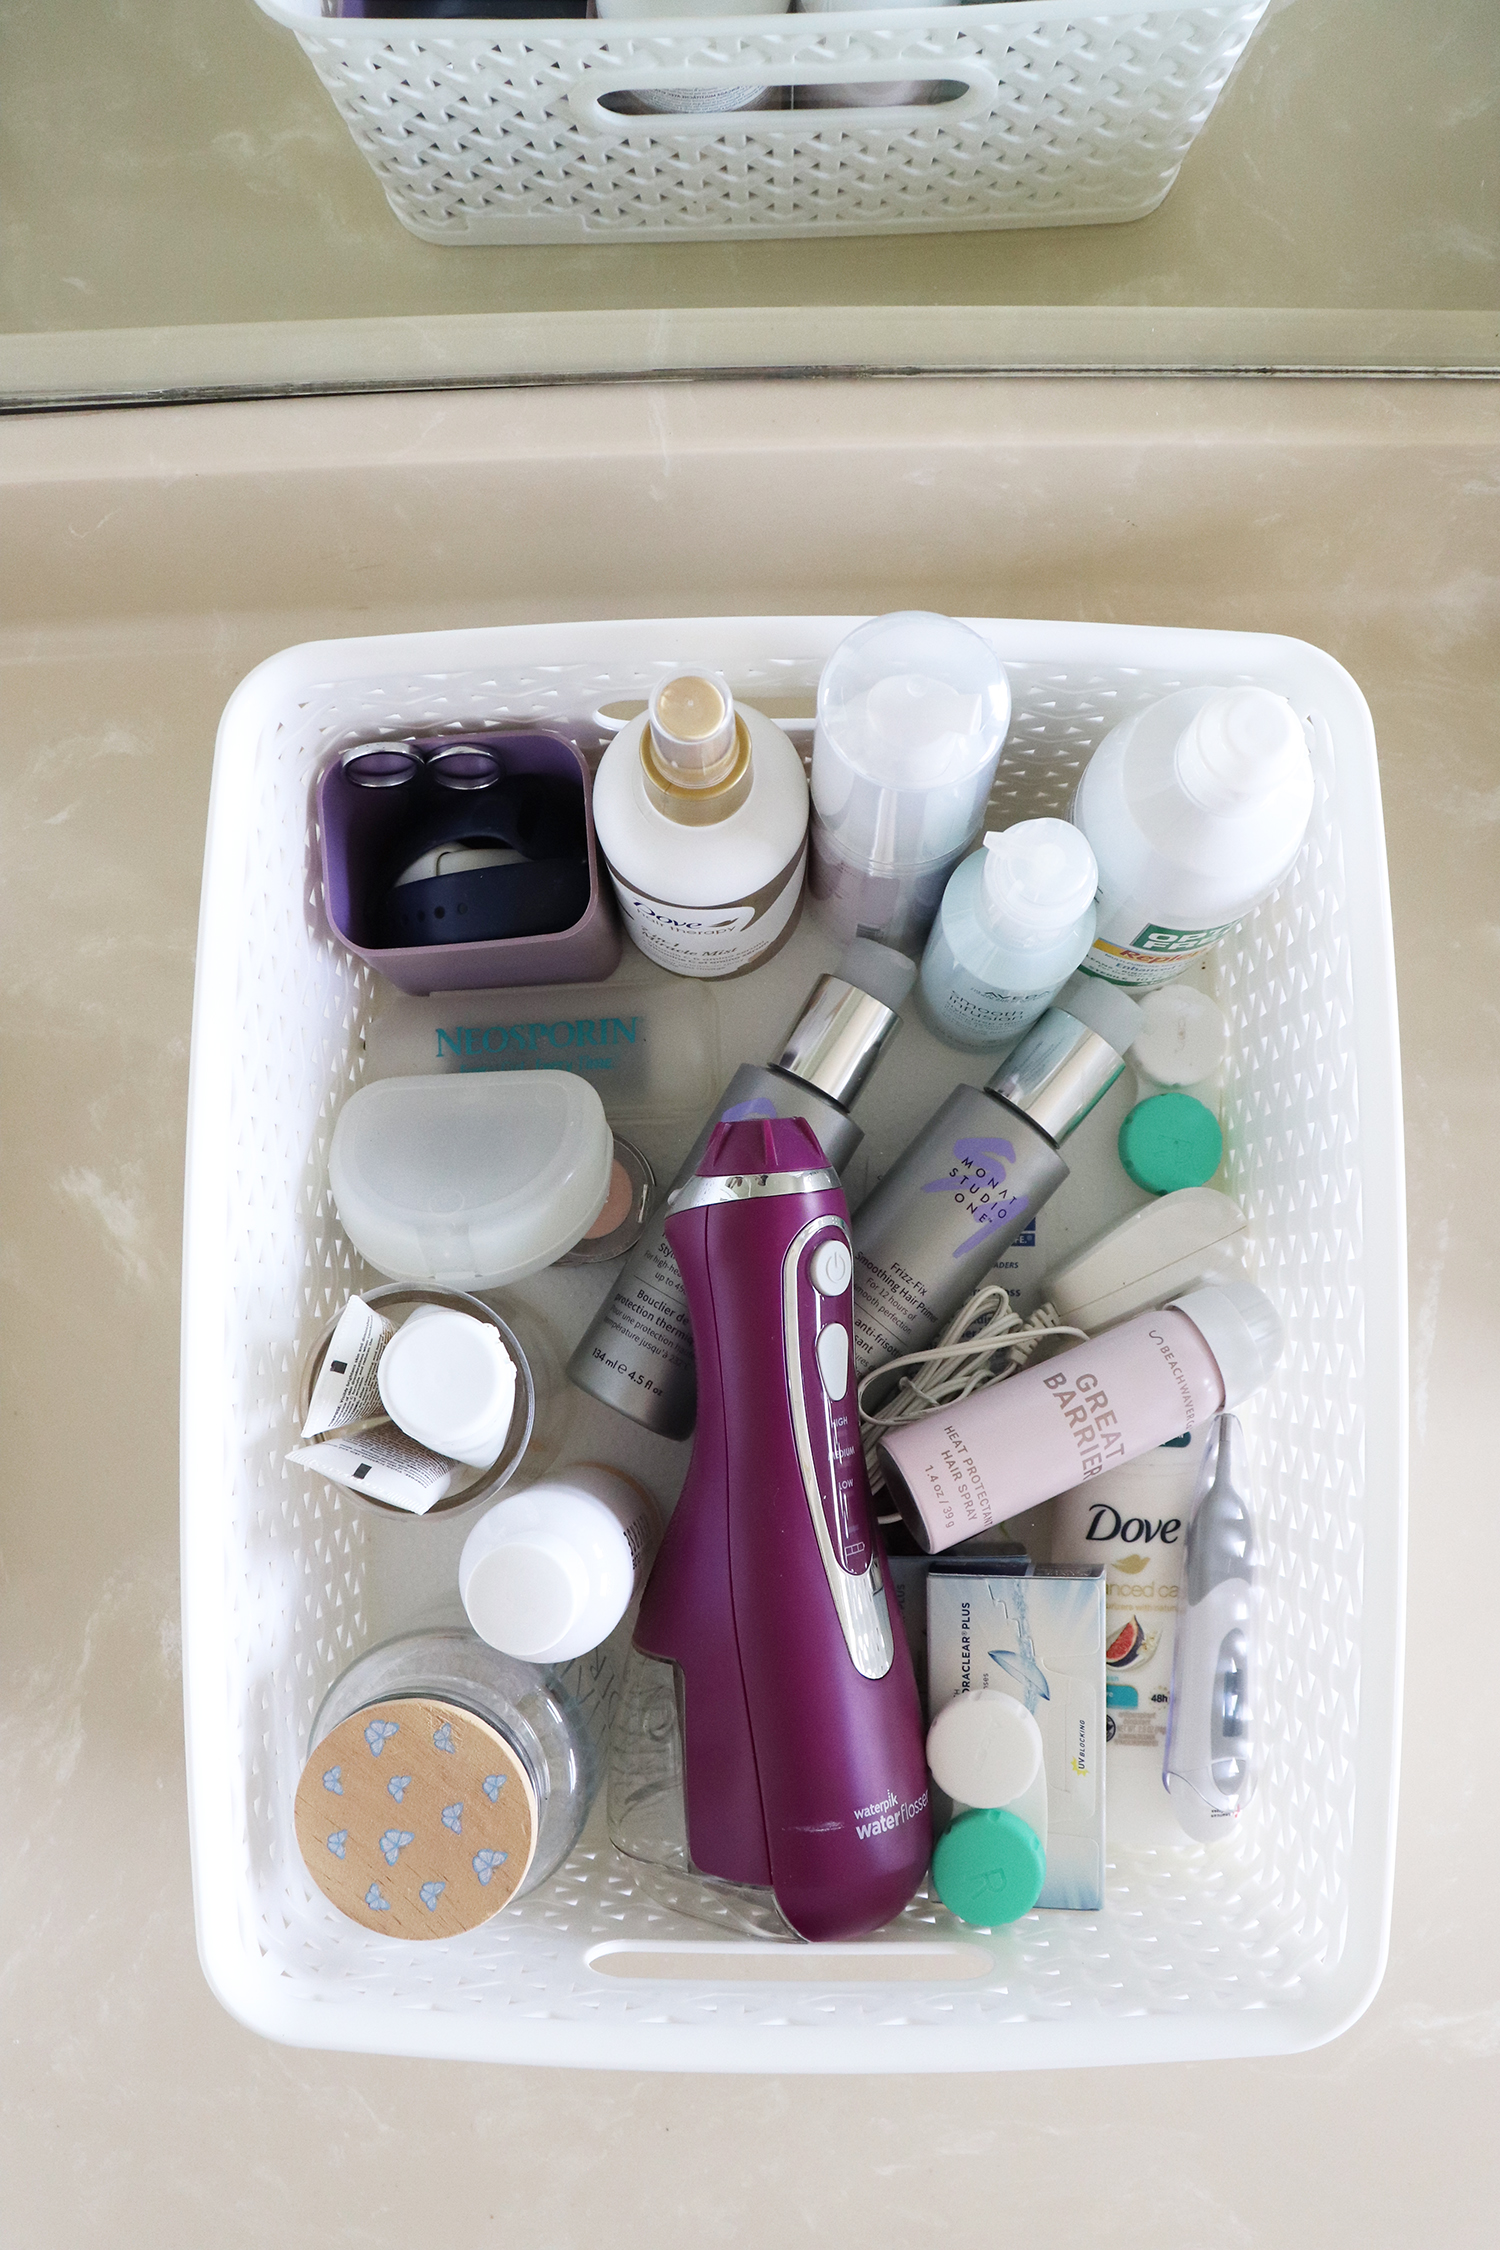
It was time to declutter, clean, and organize the mirror cabinet. The magnetic door helps hold tools and pictures, but it needed some TLC. I dropped all the products in a basket while I cleaned and updated the cabinet.
I tossed a few old products I wasn’t using (including an old retainer!) and relocated other things. As usual, I followed my 4-step process to organize any area.
- Declutter
- Keep
- Relocate
- Toss or Donate
So here’s what I did:
This post may contain affiliate links for your convenience. For more information, please read my Affiliate Disclosure.
How to Organize a Mirror Built-In Cabinet
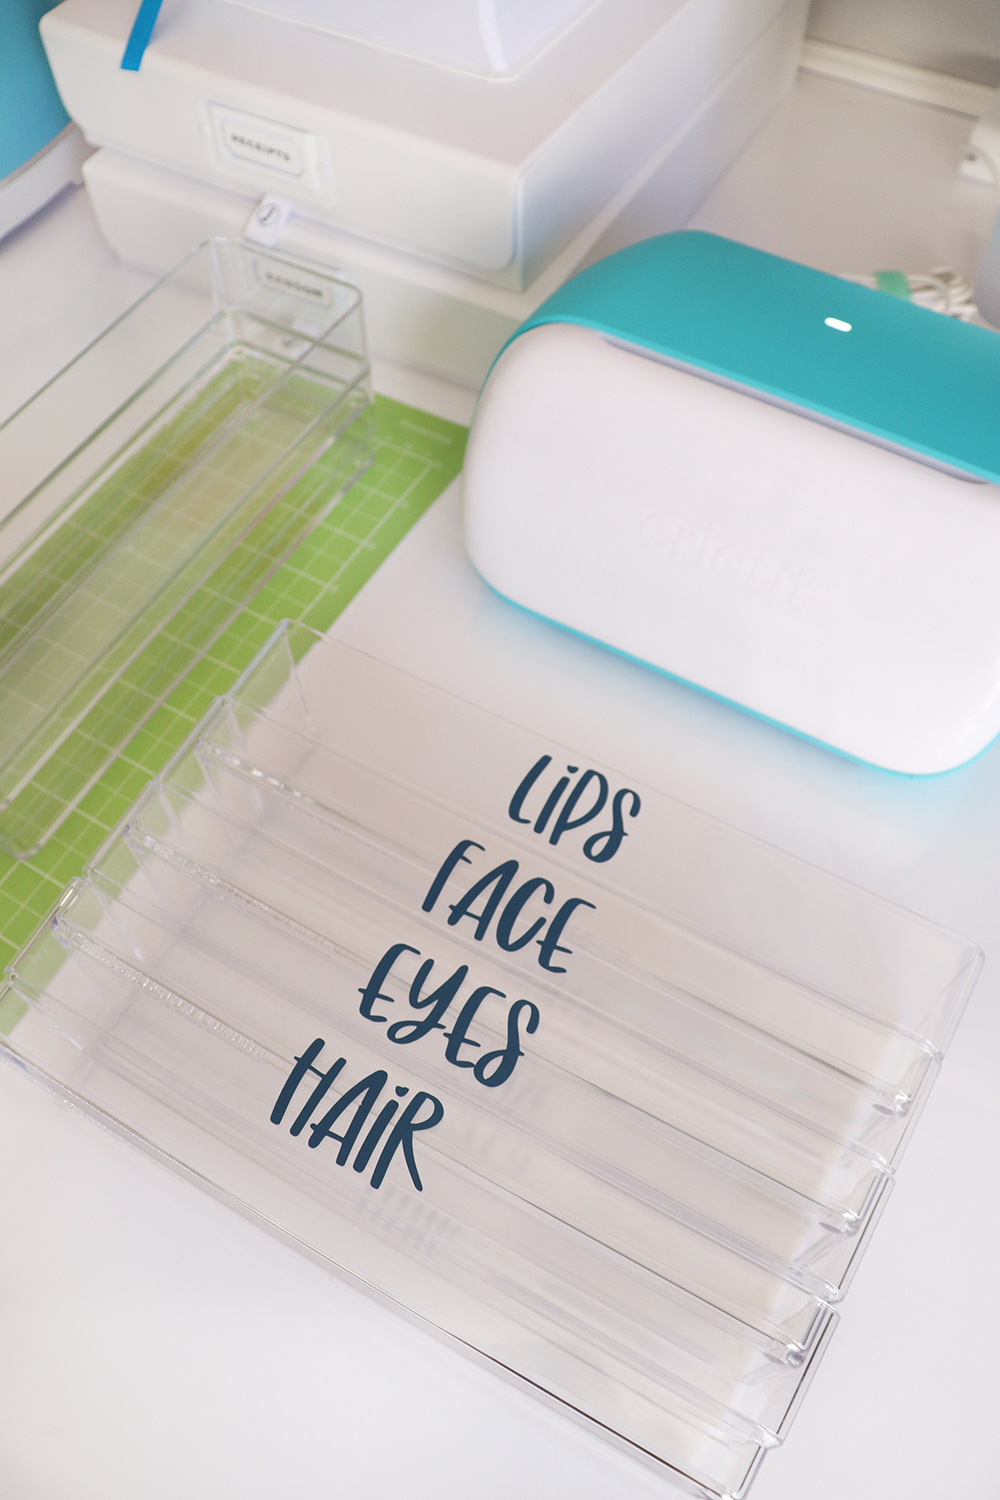
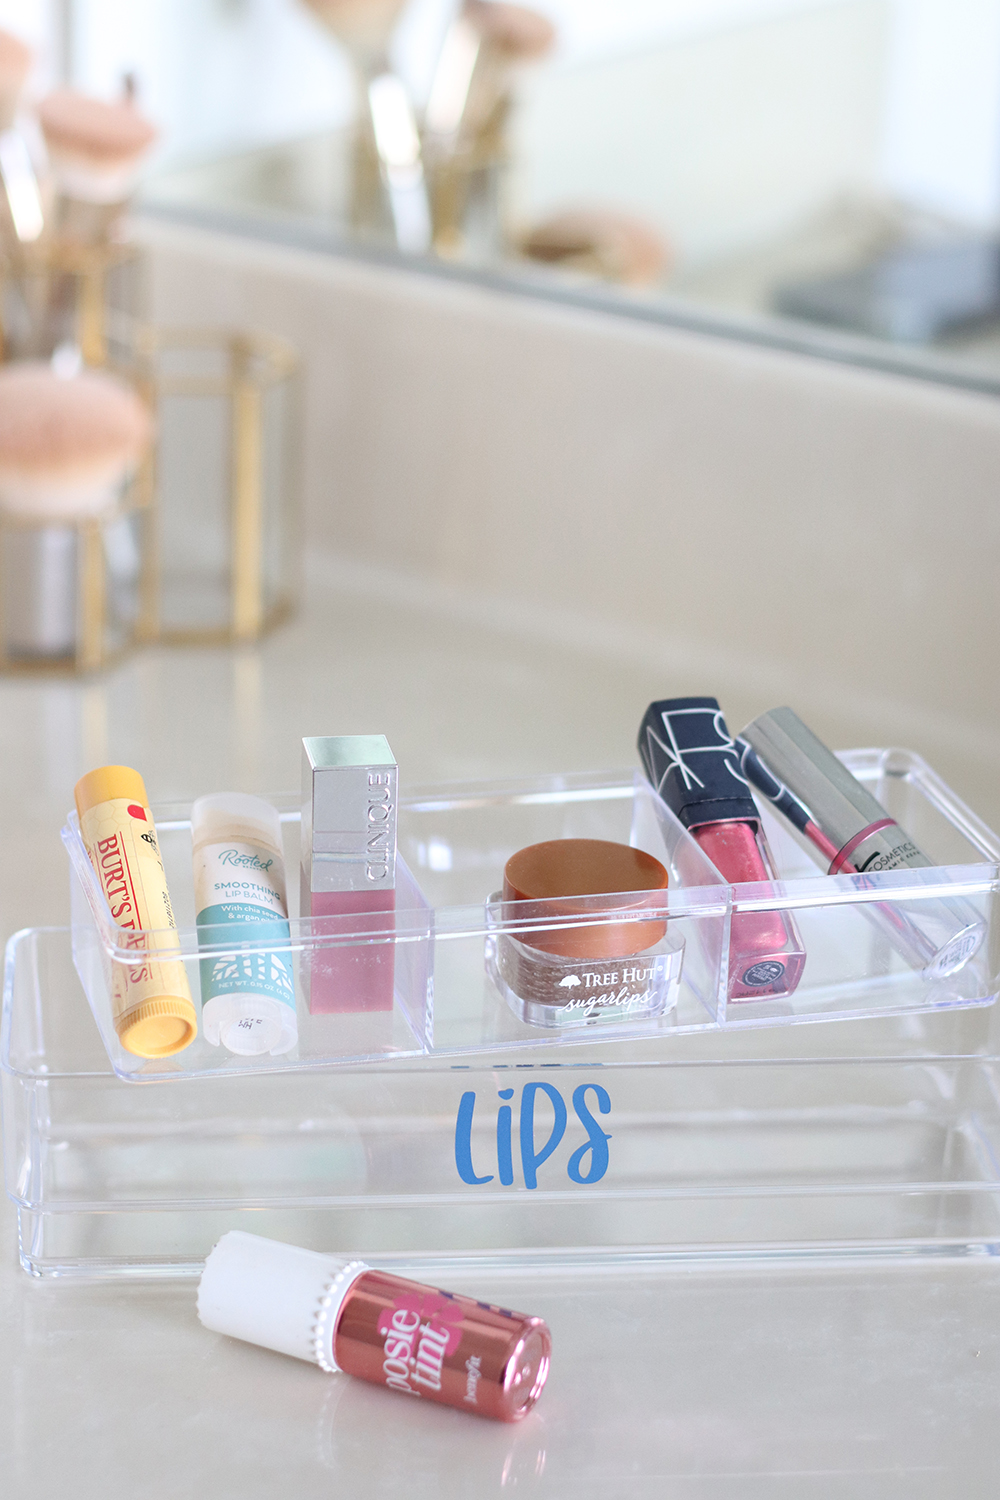
Whatever you decide to store in your medicine or mirror cabinet, you can use this method to organize it. All I did was apply decals with keywords to clear organizers. This is an excellent visual aid for knowing exactly where to look to find products quickly.
Here’s a list of tools and supplies I used to organize my medicine cabinet.
Tools and Supplies Needed
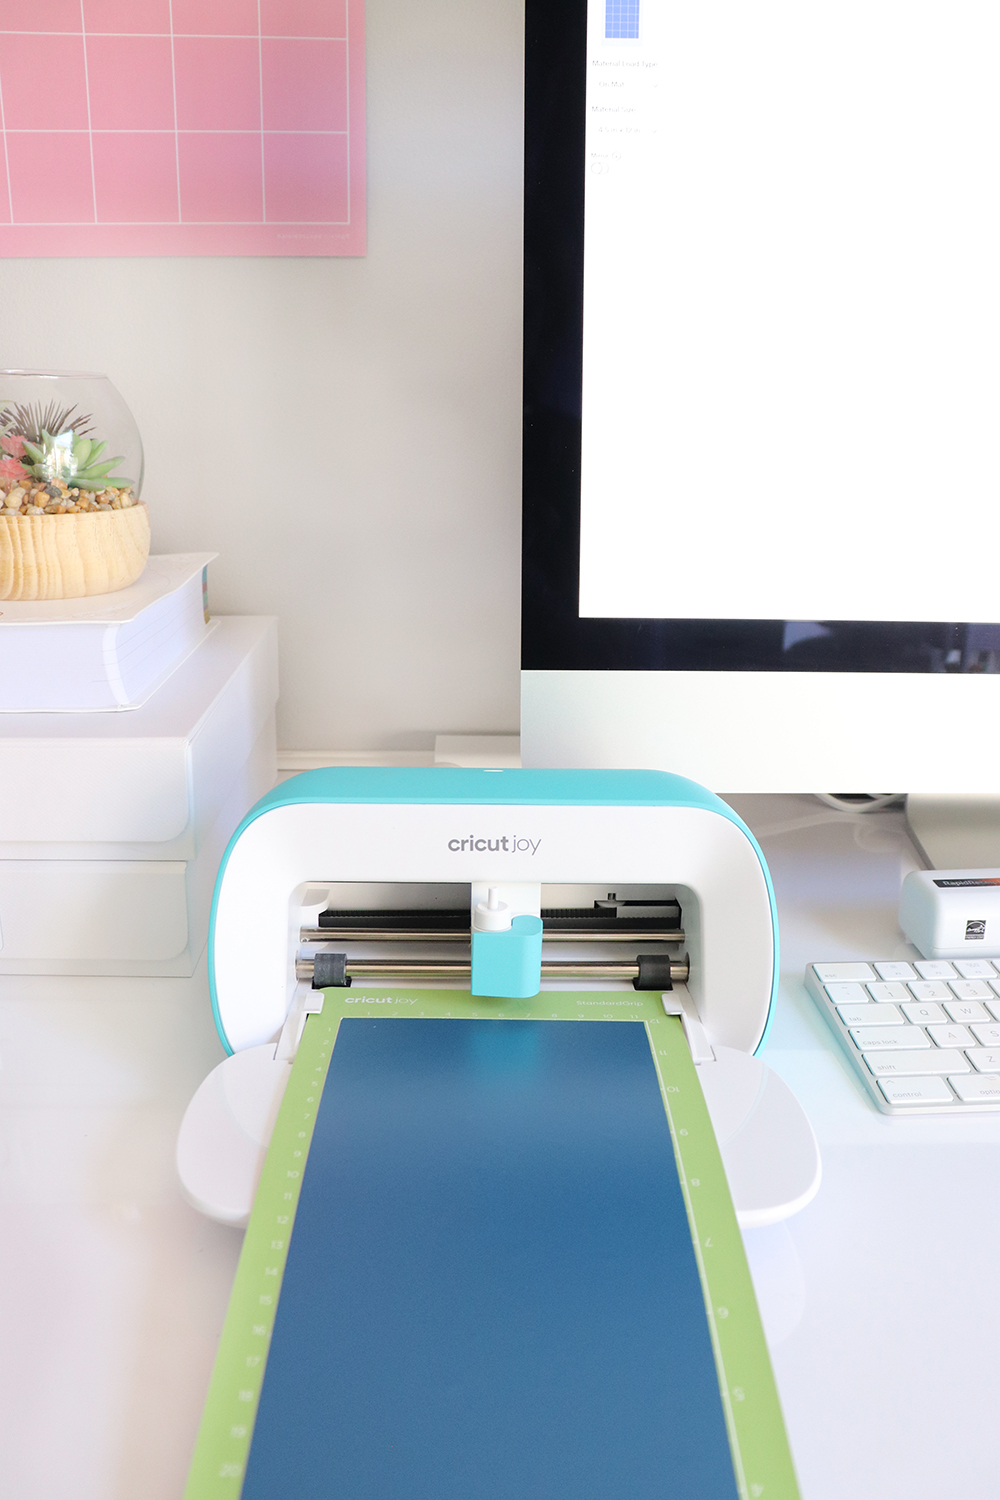
- Cricut machine – I used a Cricut Joy, but Cricut Explore or Maker also works.
- Removable vinyl in the color of your choice. I chose a deep blue from a sampler I had in my vinyl stash.
- Cricut Cutting Mat – for Cricut Joy, for Cricut Explore
- Transfer tape
- Cricut basic tool set
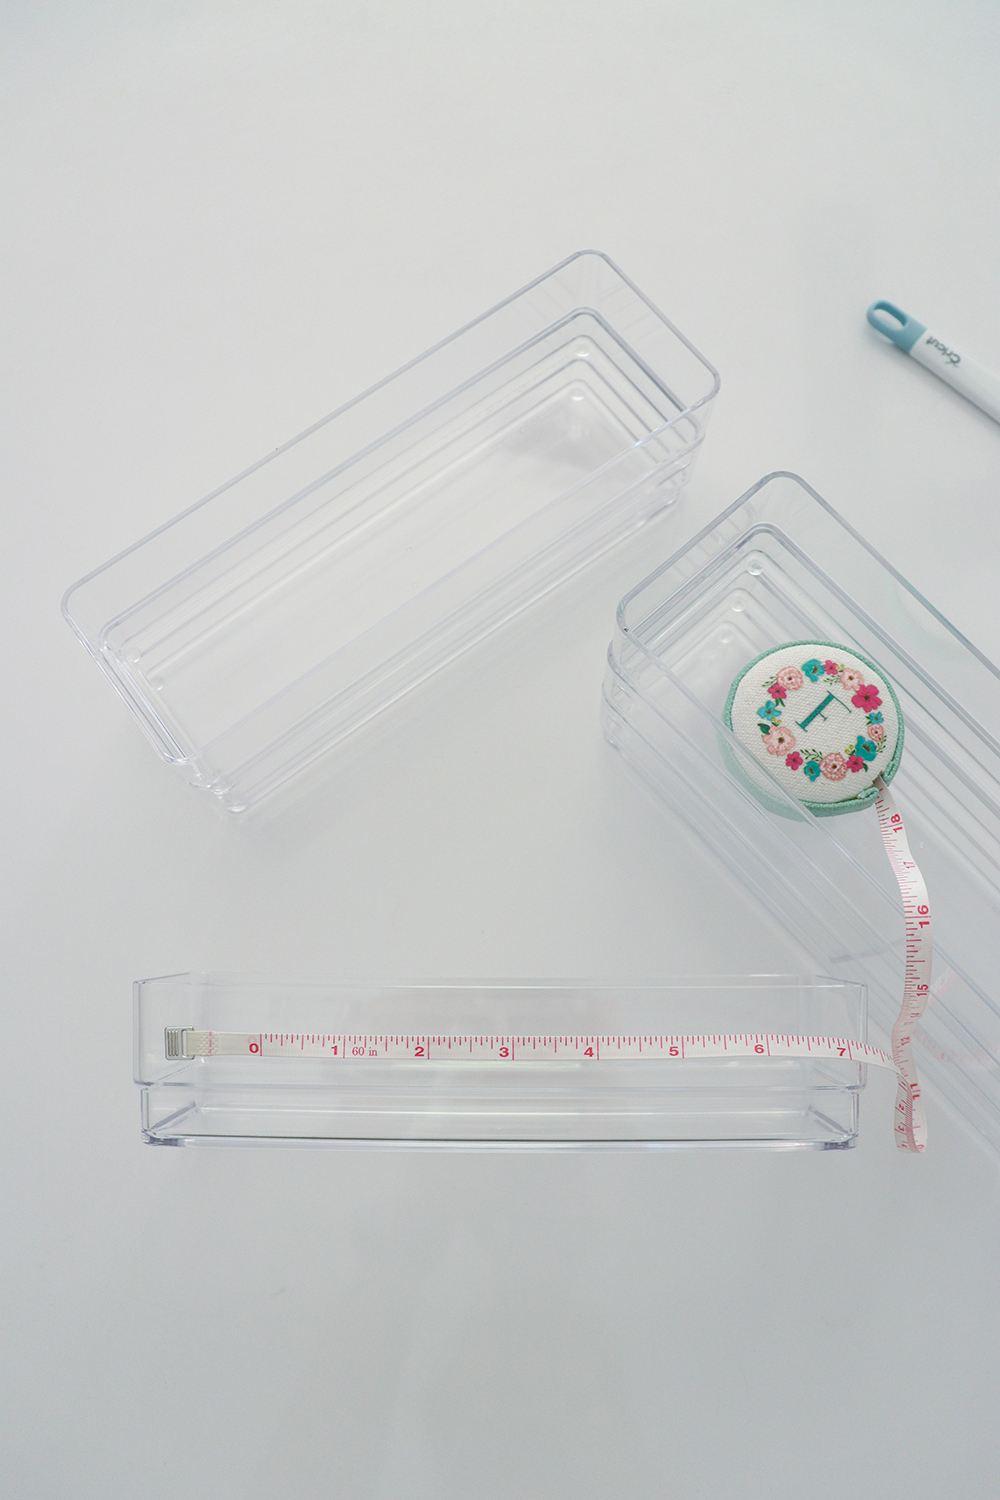
- Clear drawer organizers. I chose a set of six 9x3x2 trays from STORi. They offer a variety of sizes to fit your cabinet.
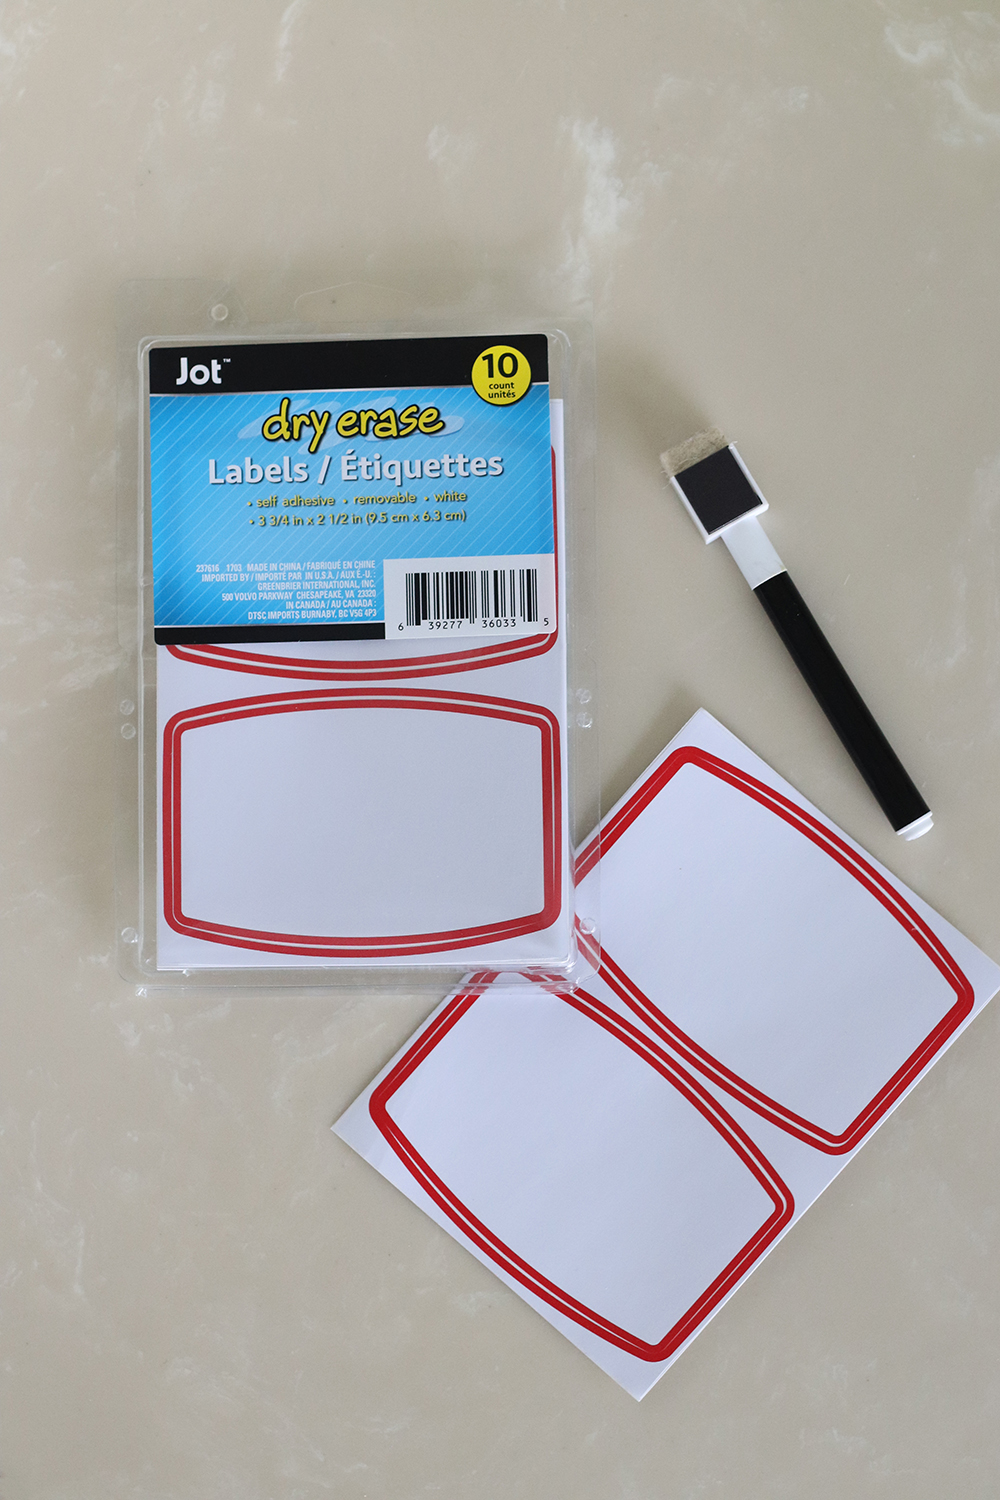
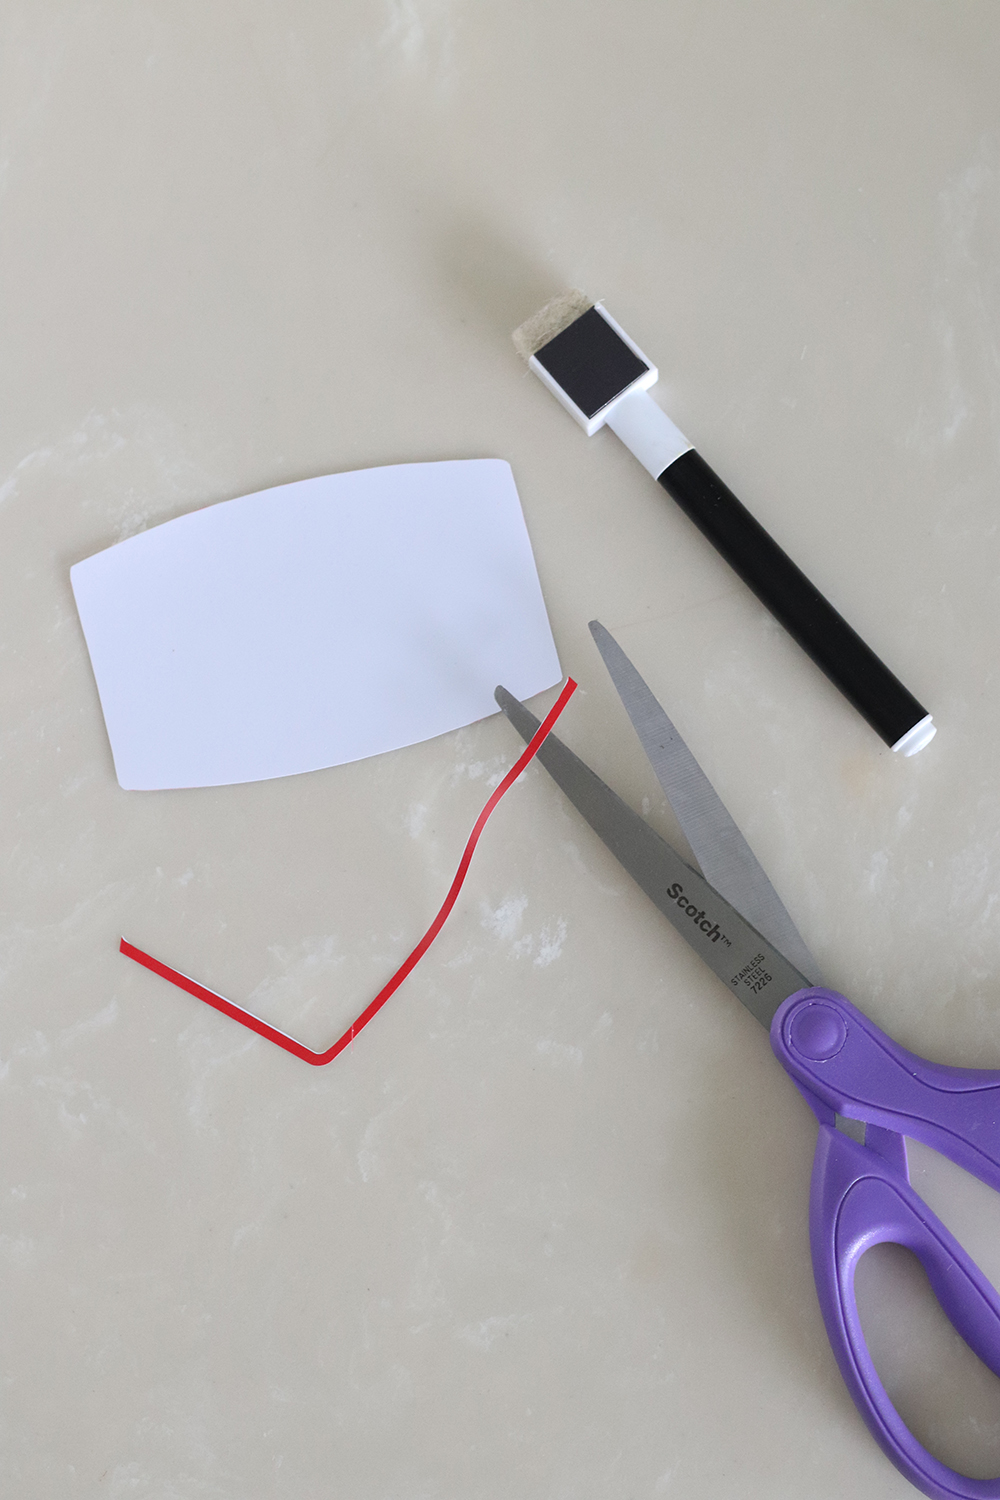
- Optional: removable dry-erase labels and magnetic dry-erase marker. Similar linked.
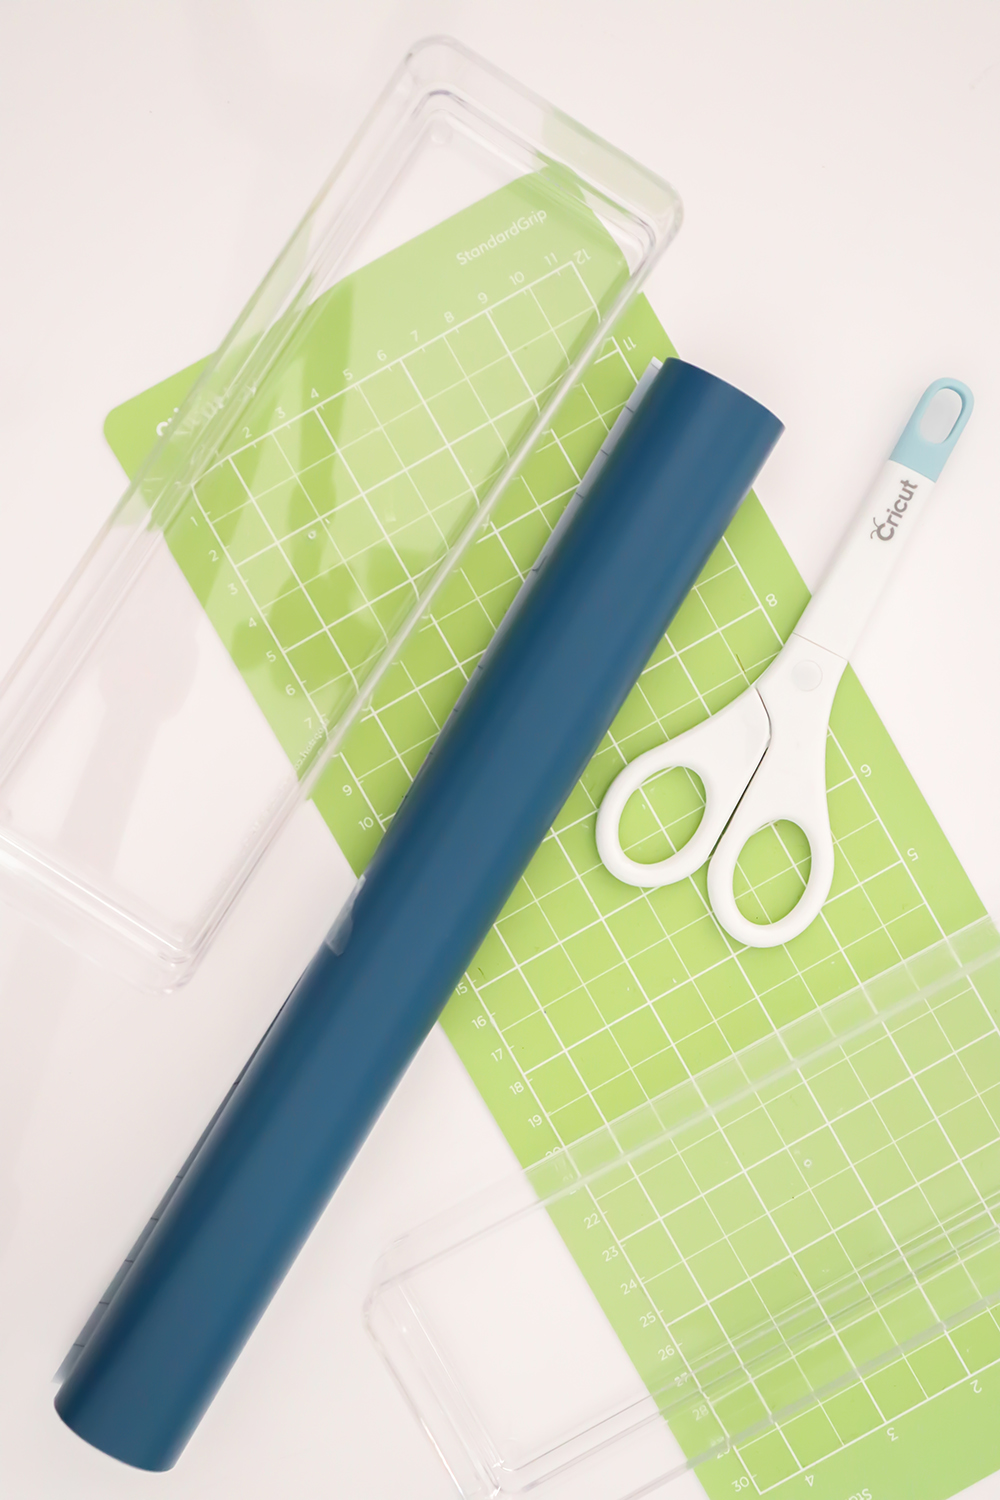
Pro Tip: If you are familiar with Cricut’s smart materials, you can use smart vinyl and skip using a mat. I happened to have a sheet of regular vinyl, so I cut it to size to fit on the mat for my Cricut Joy.
Shop the Supplies

How to Make the Labels
I chose the easiest and fastest way to make decals with a Cricut machine for a super quick organization of the mirror cabinet. These labels/decals are as simple as cutting out the words in vinyl and transferring them to the surface you want to label.
Step 1. Measure the Area
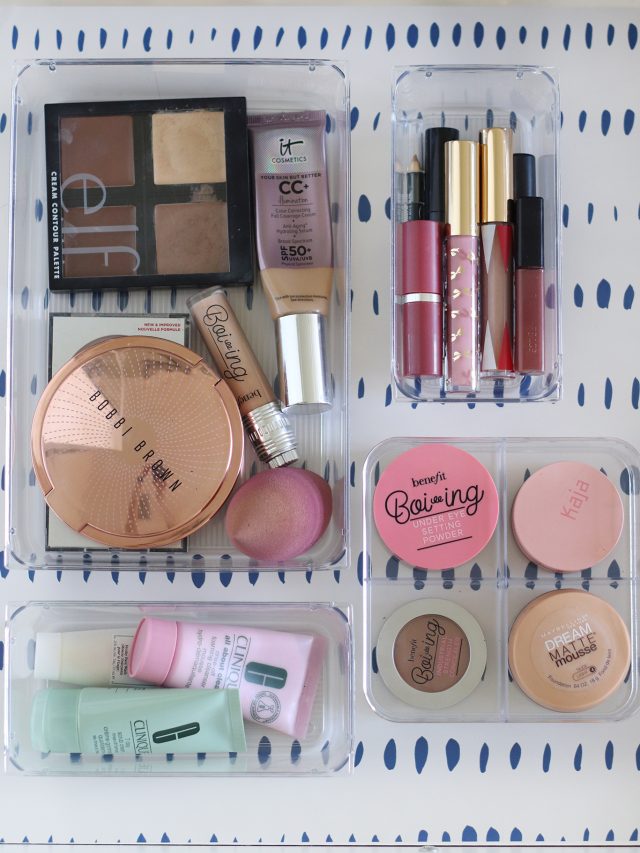
Because the shelves inside the mirror cabinet are very narrow, the best way to organize them is with narrow bins. My bins measure 9 inches wide and 2 inches tall. Therefore, the area where I wanted to place the decal had to be within (or just under those numbers).
I calculated to make the decals on average 1 inch tall. So, the length would be proportional to the height.
Step 2. Open the Cricut File
I created a Cricut file, and you can access and customize it to your fit your medicine cabinet’s organization needs. Here’s what you have to do:
Step 3. Customize the decals
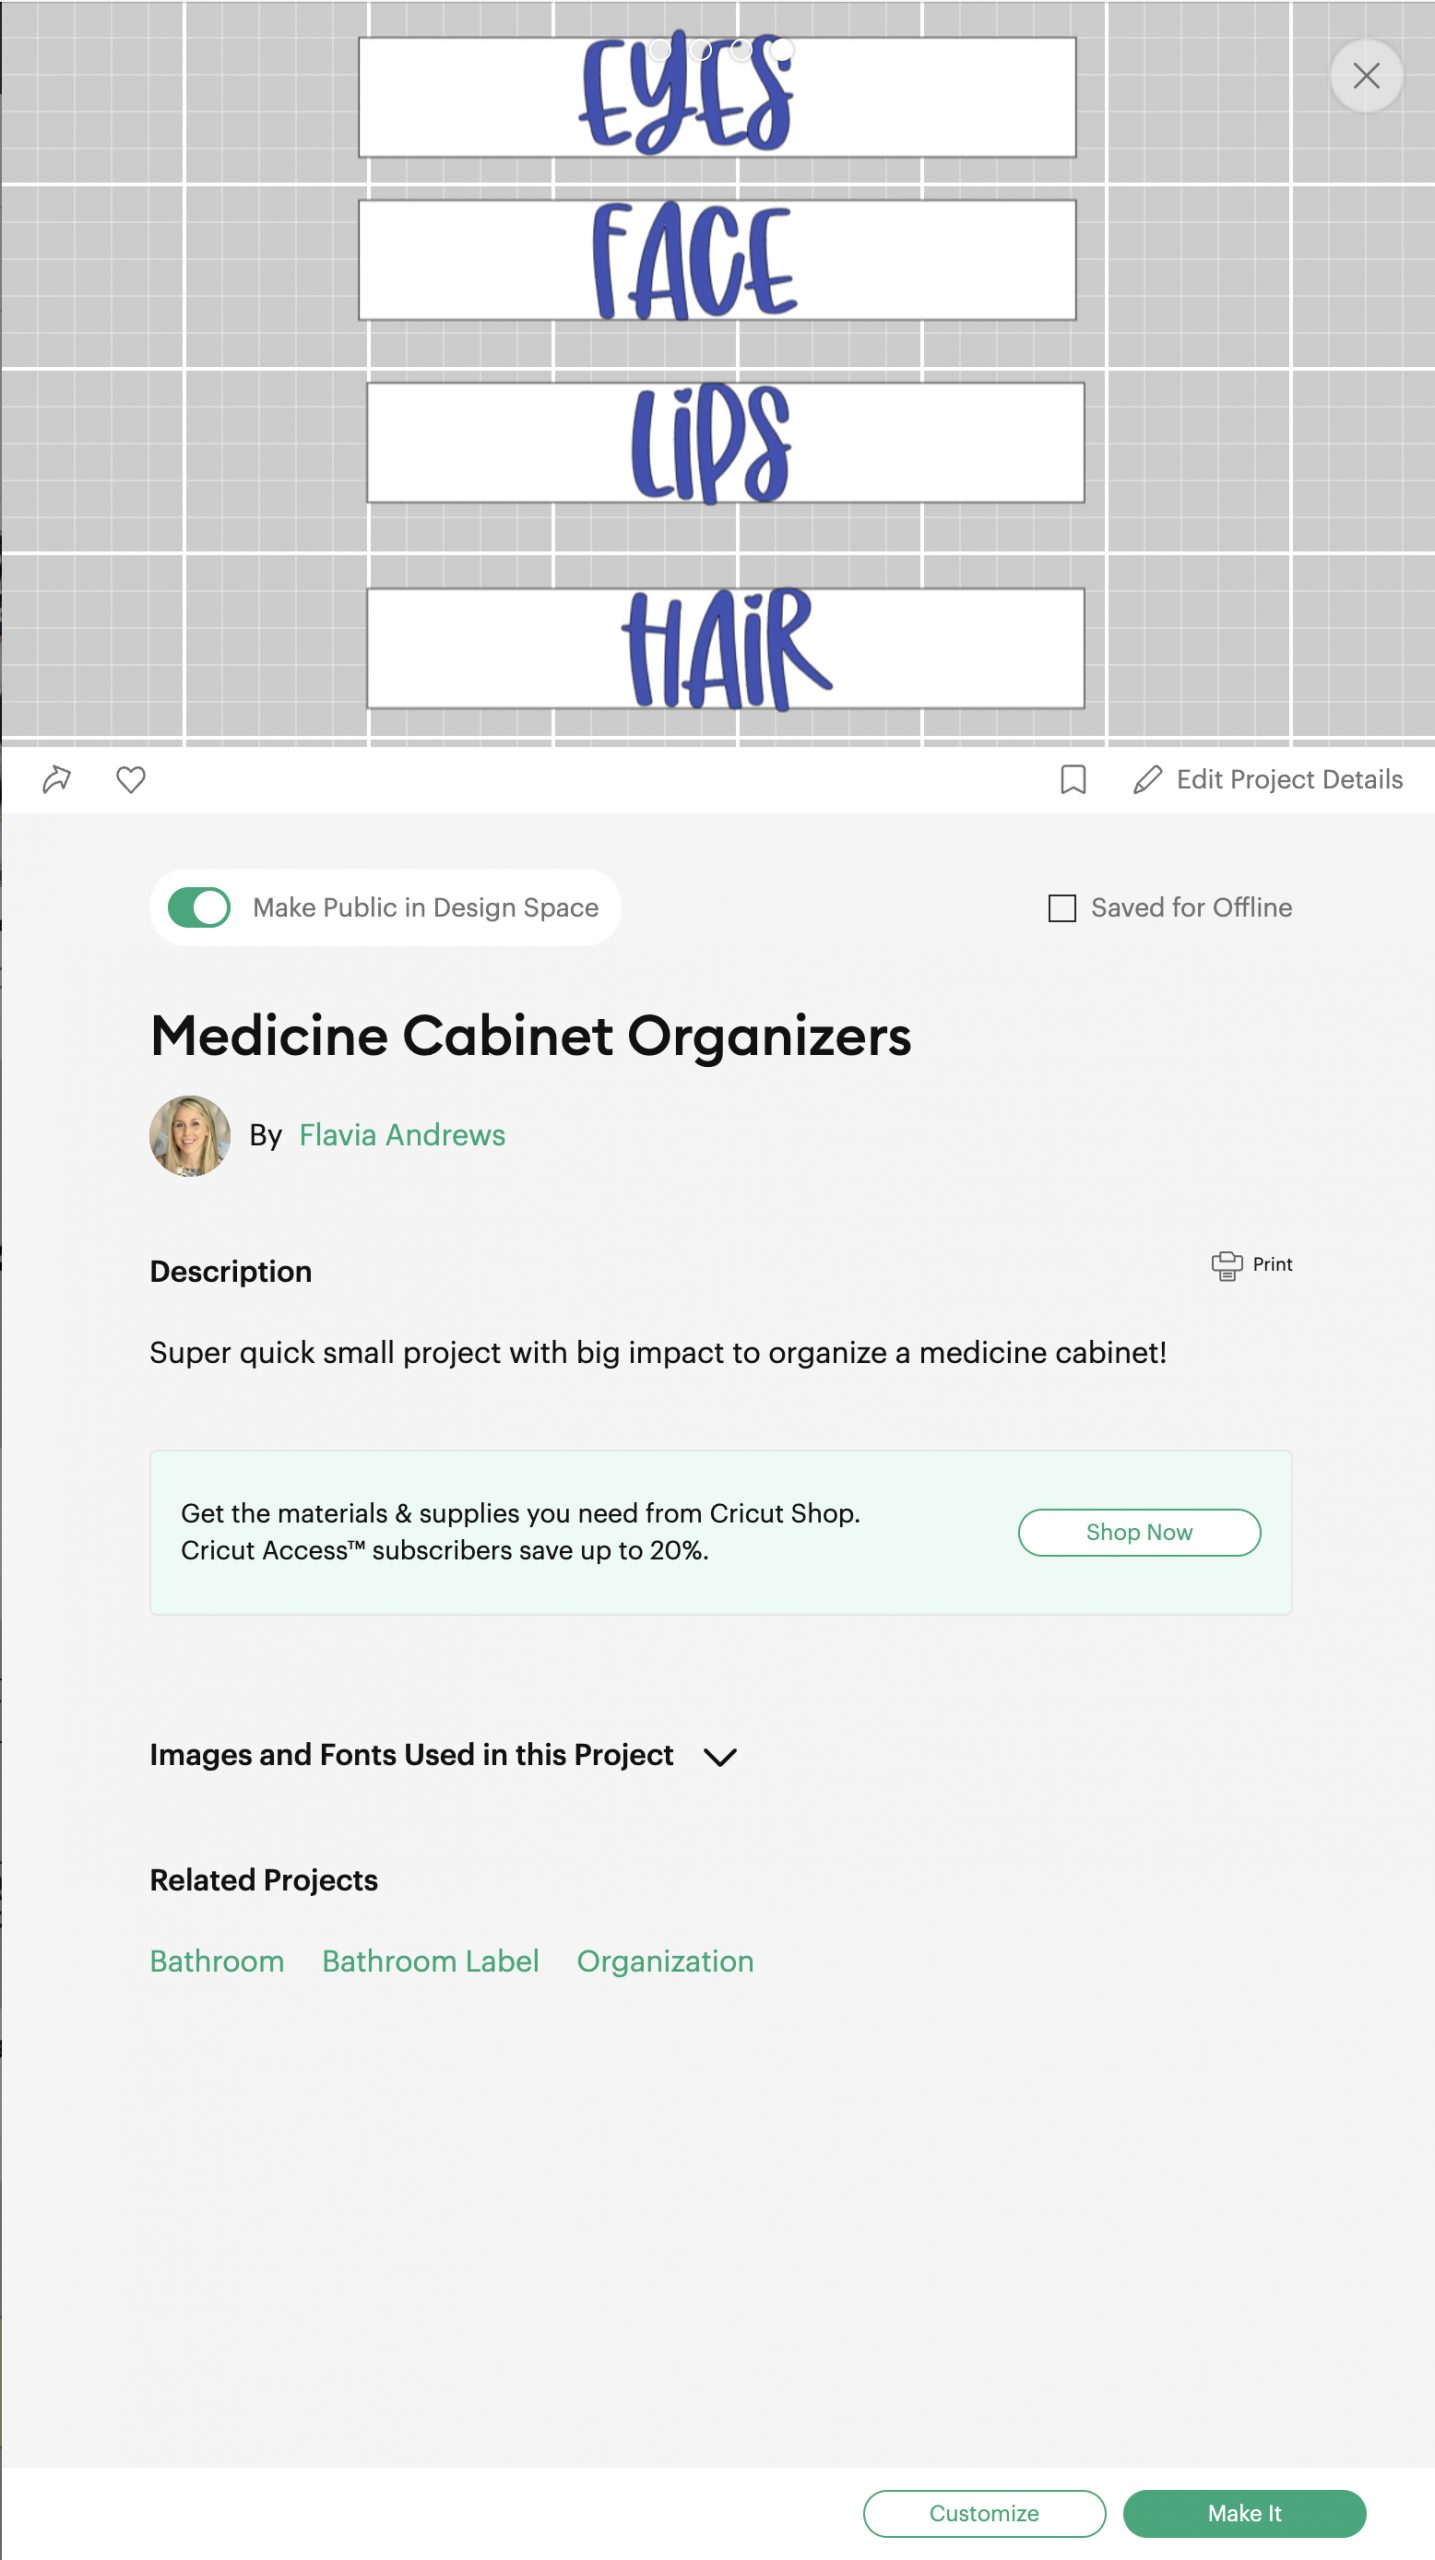
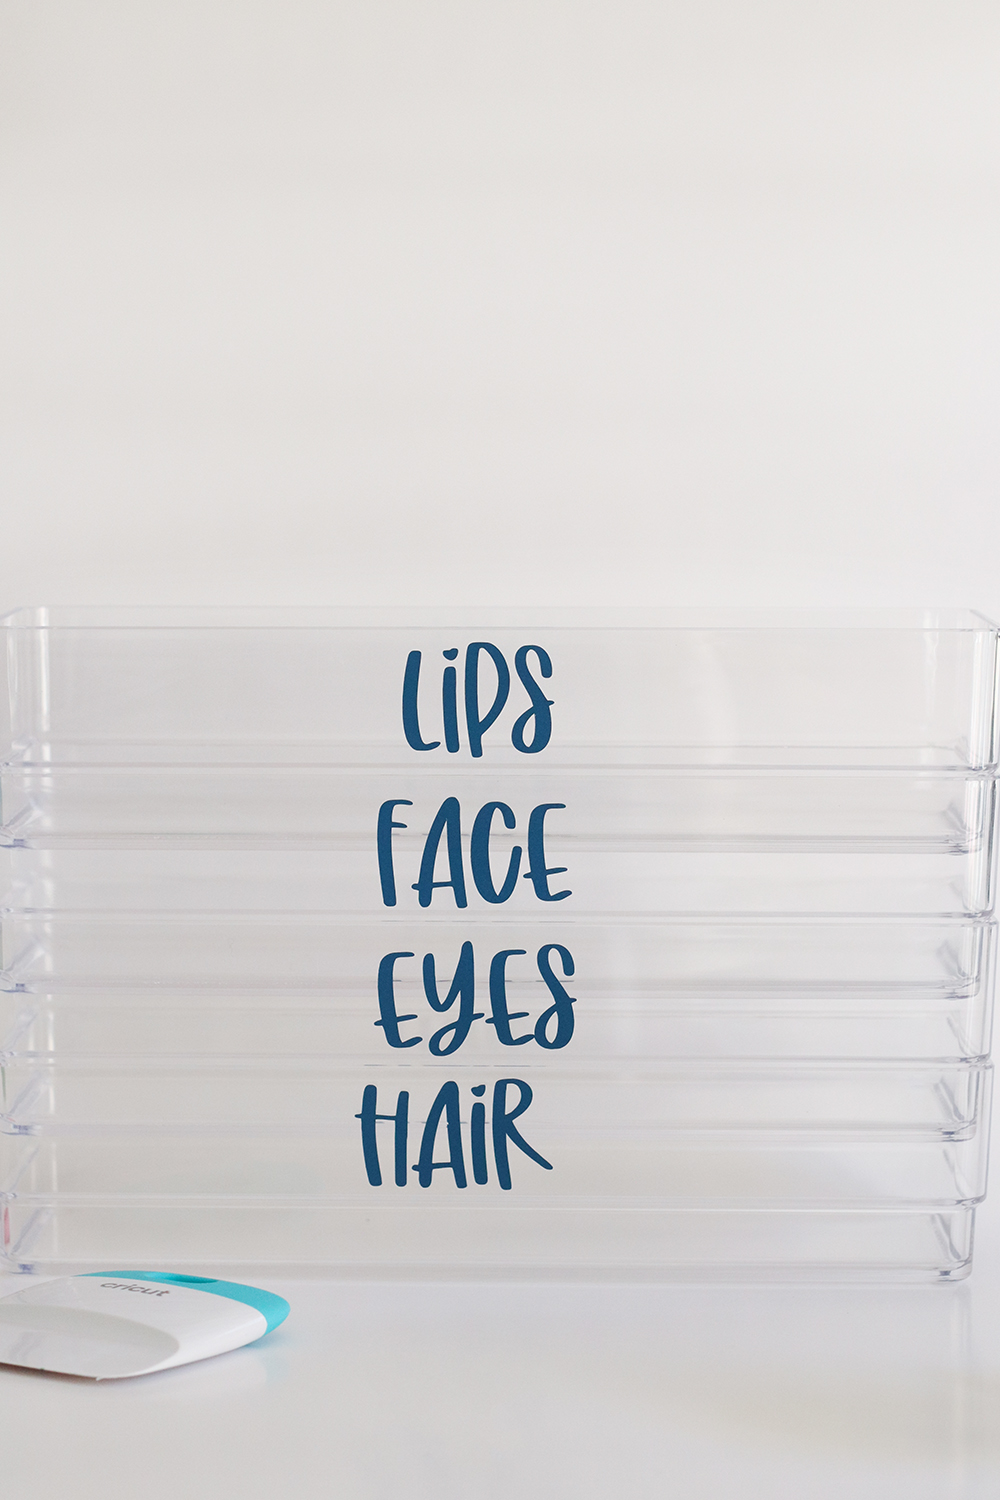
In the file, you will see that I created four small 6×1-inch rectangles. These are made as a guide to simulate the area I have to place my decals.
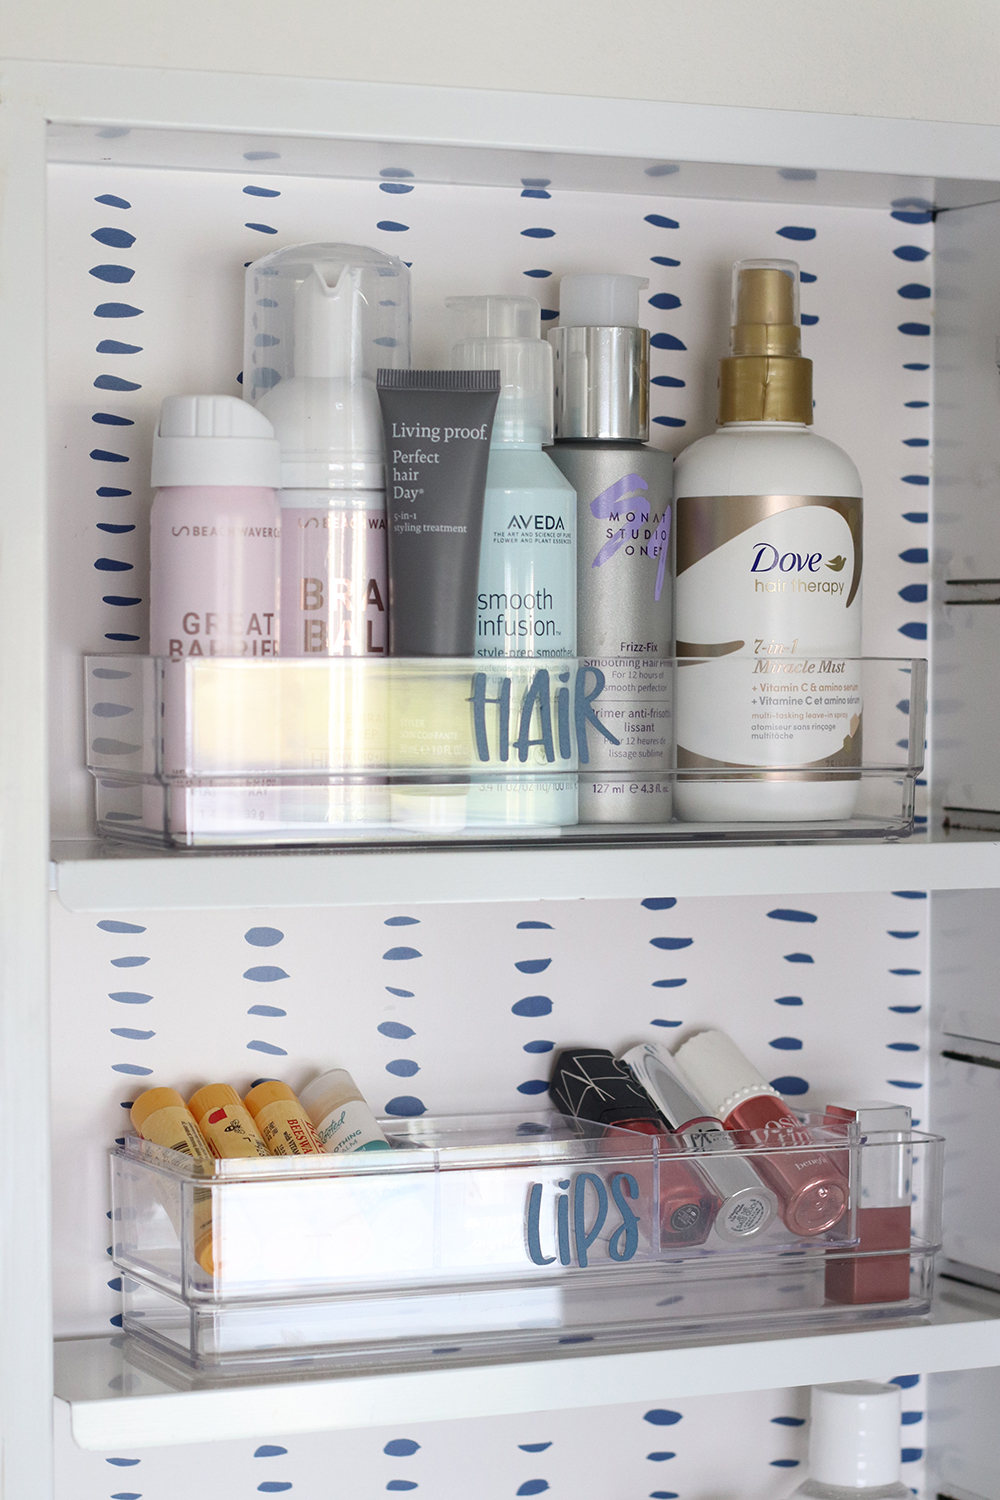
Over that rectangle, I added a textbox and typed my first word: EYES. I made sure it fit within the rectangle. Once I was happy with the font and size, I duplicated the design to type the other three words: FACE, LIPS, and HAIR.
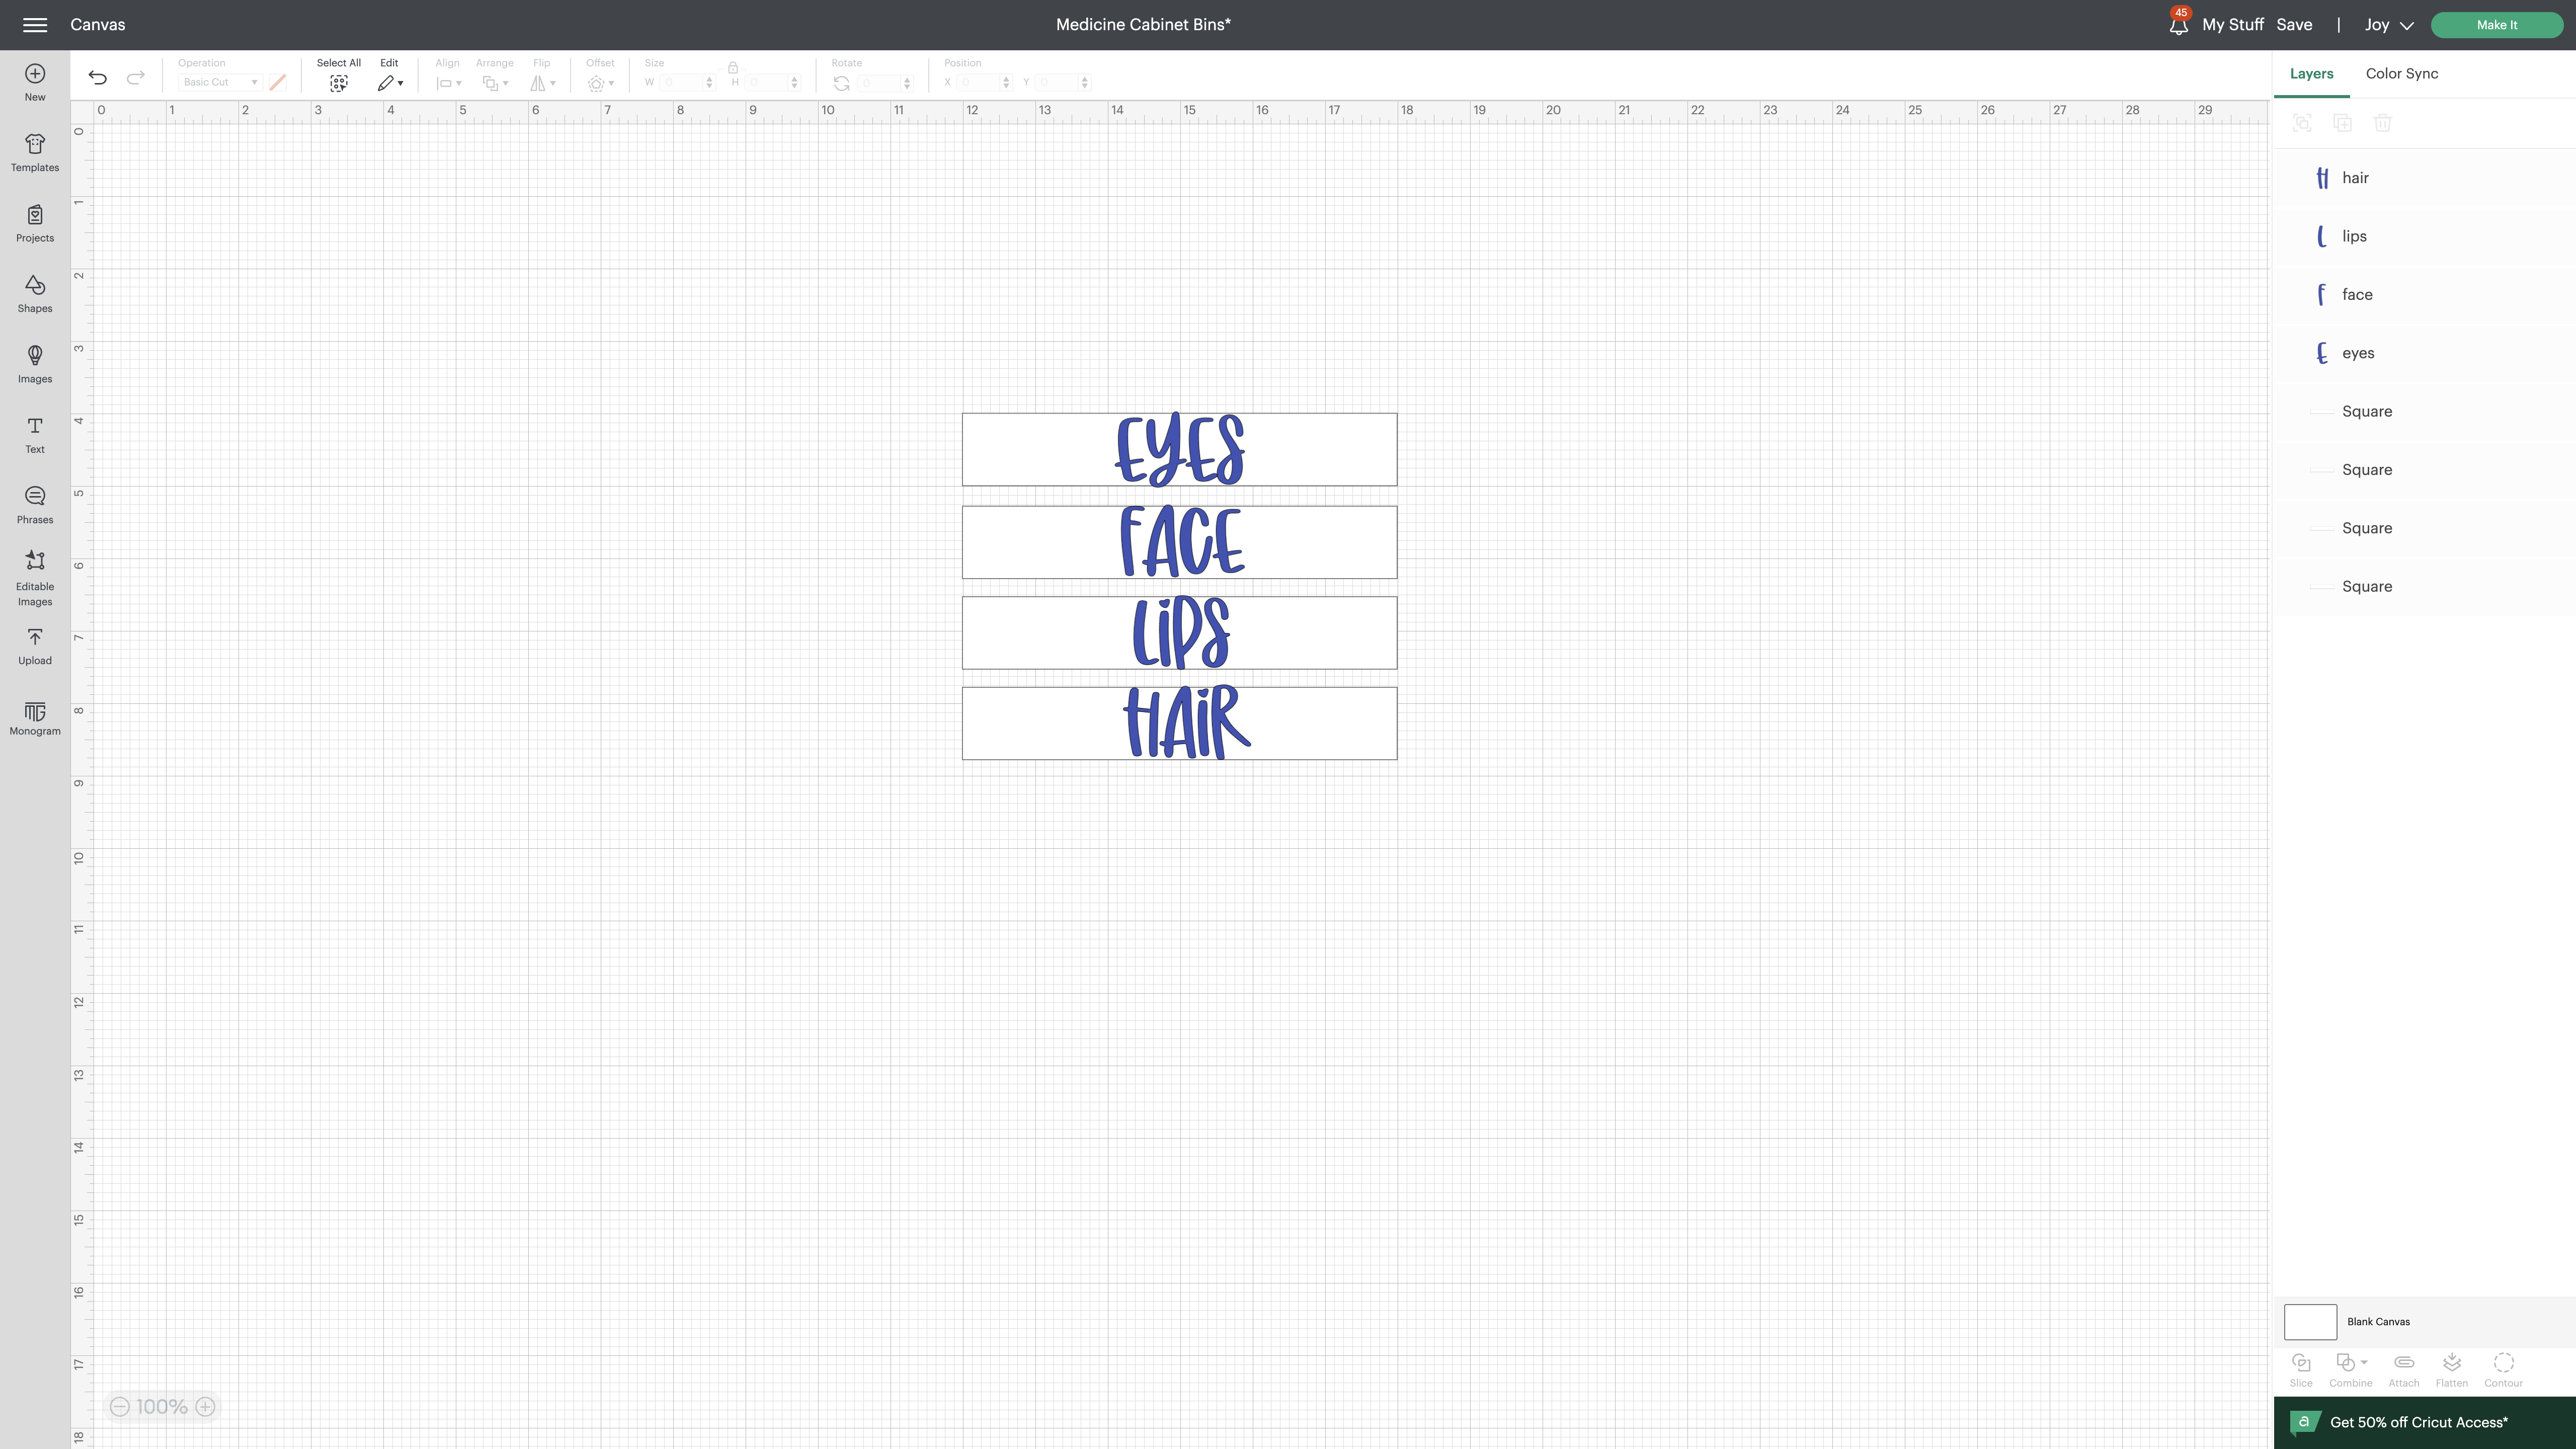
Step 4. Hide the Squares
Once you are happy with your words and design, head over to the layers panel and hide the ‘squares’ layers. Remember, these are just guides, but you are not cutting out vinyl squares.
Step 5. Click Make It
When you are ready, click the ‘Make it’ button on the top right of the screen. You will be prompted to choose if you are cutting with a mat or matless (Smart Materials). Follow the prompts and choose the material you are cutting. For this project, I used Premium Vinyl Removable.

Step 6. Prepare The Cutting Mat
If you are using Smart Vinyl™, you won’t need to prepare a cutting mat. Instead, you feed the vinyl roll directly into the machine. Because I used regular vinyl, I had to cut it to size to fit the small mat for my Cricut Joy.
Click Cut, and the machine will do the rest.
Step 7. Weed and Transfer
Now, for my favorite part. Using the Cricut basic tools, weed the decals. After all the extra tiny pieces are out, cut a piece of transfer tape and smooth it over the -weeded- decals.
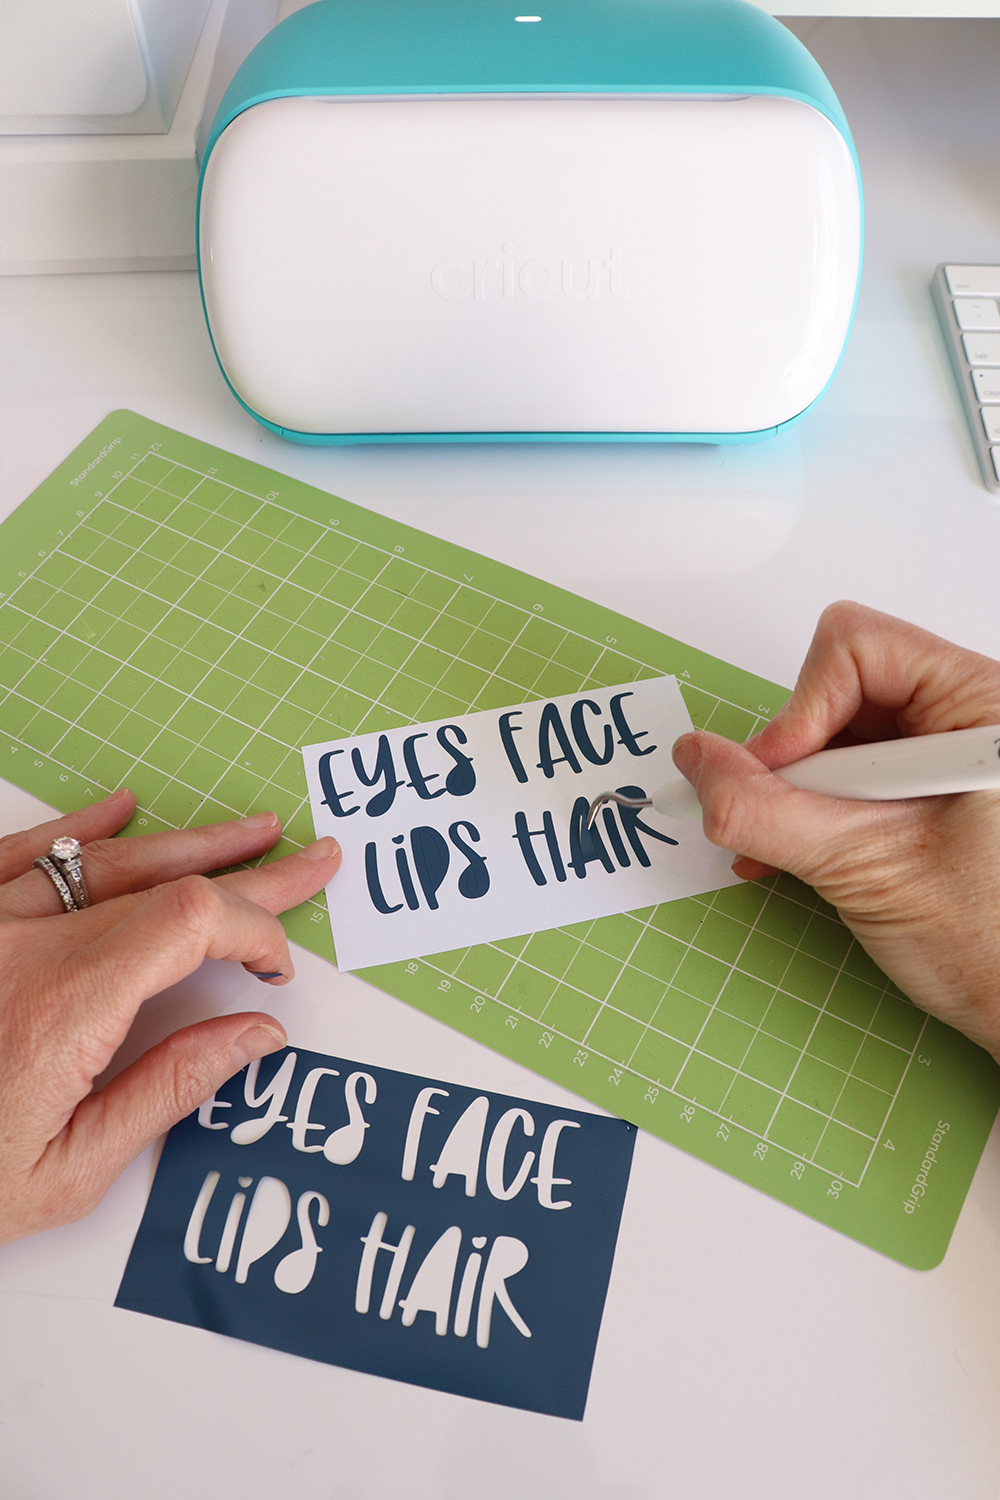
Step 8. Transfer Decals to the Bins
After smoothing the transfer tape over the decals, cut out each word separately. Then all you have to do is transfer each word to a bin.

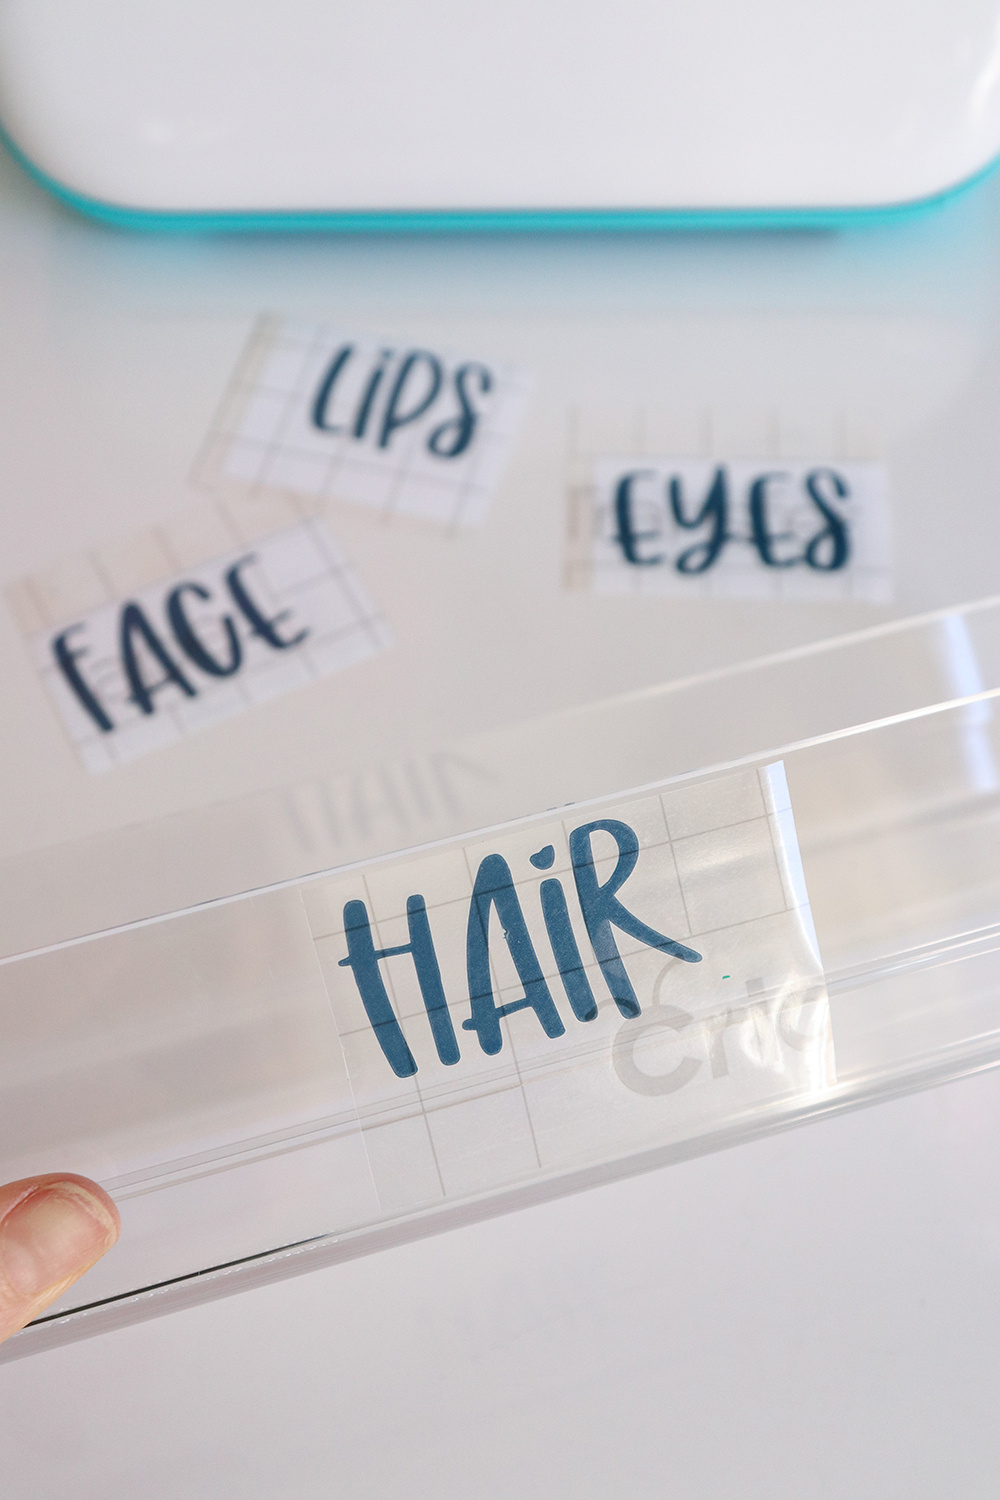
To ensure a good transfer, smooth each decal on the bin using the smoothing tool. Then, peel off the transfer tape, and your bin is done! Repeat the process with every bin.
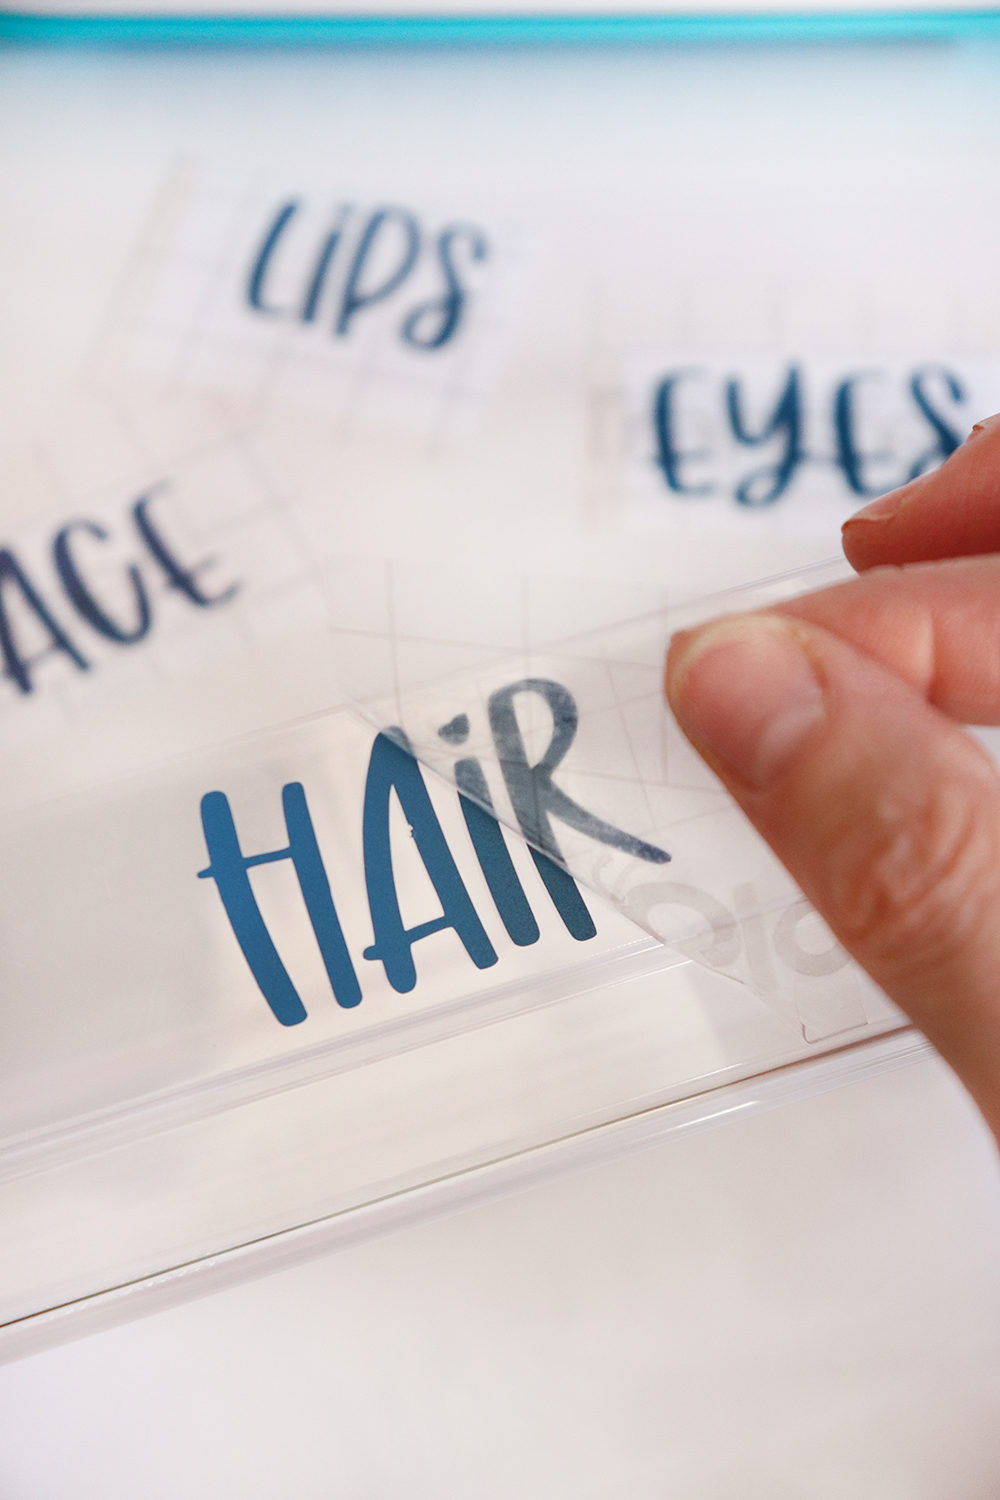
PRO TIP: I first transferred HAIR, then I transferred EYES. Immediately my bionic eyes noticed my first decal was off by 1/2-inch. To ensure the next two decals were all centered in every bin, I stacked the one I was working on over one already done and used it as a guide.
How I Organized My Bathroom Mirror Cabinet
Now for the second and most fun part. Here’s how I determined the organization of my mirror cabinet. First, you should know that I am a creature of habit. Many, and I mean many, of my daily tasks happen on autopilot. Getting ready in the morning is a breeze because my brain remembers exactly what to do and when. In other words, I do not have to think about the tasks; my hands move swiftly as if they had a mind of their own.
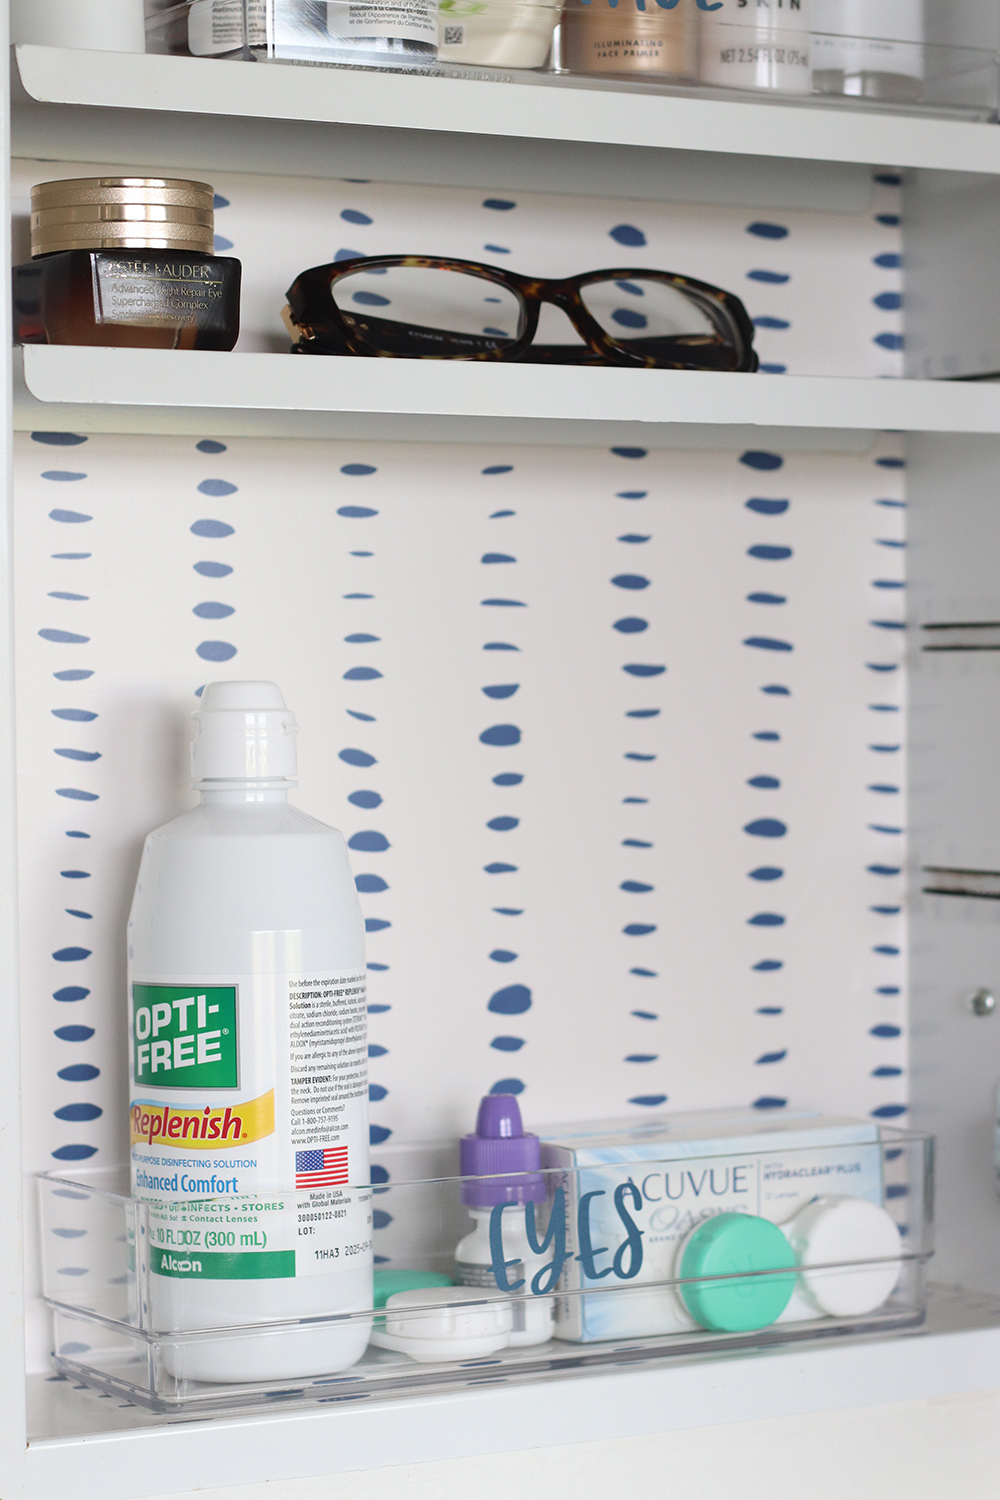
Here’s a perfect example. I have been wearing contact lenses for almost 30 years, wowza! And for the last 16 years that we have been living in this house, I have kept my contact lenses and saline solution in the same exact corner of the medicine cabinet. Talk about creating a habit that sticks!
- In the before picture, you can see the contact lens case and solution on the bottom left. Next to it is the deodorant. These three items are part of my daily routine. Open, grab, use, return, shut. Above it is a small basket containing the boxes of new contacts I need every two weeks.
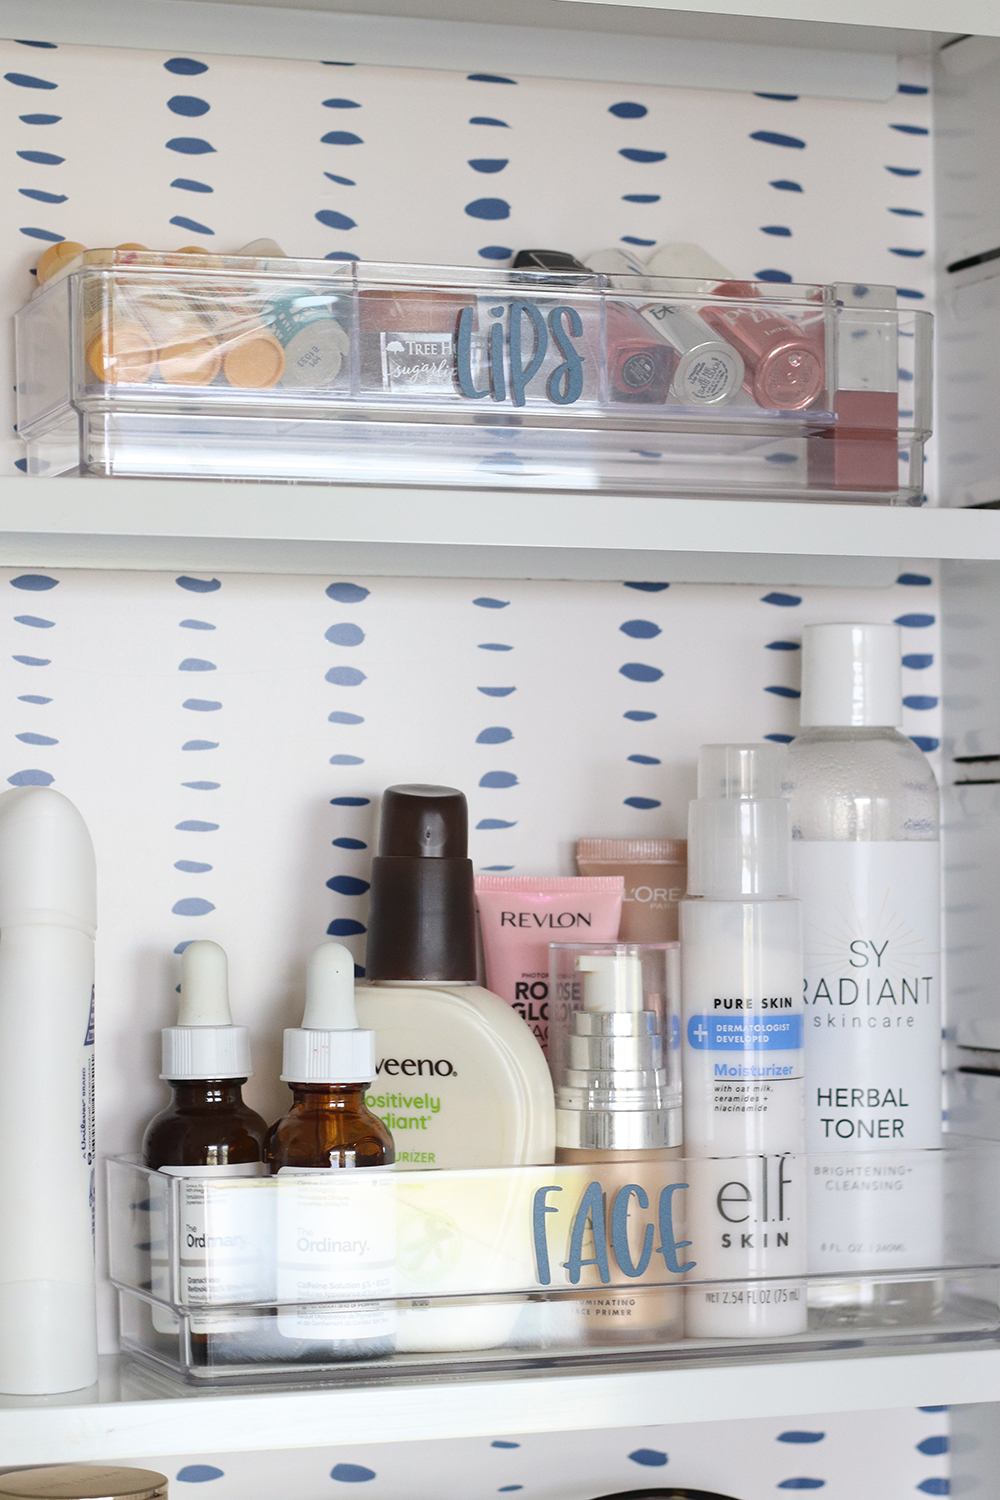
- Face wash, toners, and creams were scattered between the mirror cabinet and my bathroom vanity counter. But when I decided to get serious with the organization of this mirror cabinet, I realized how much space I was wasting.
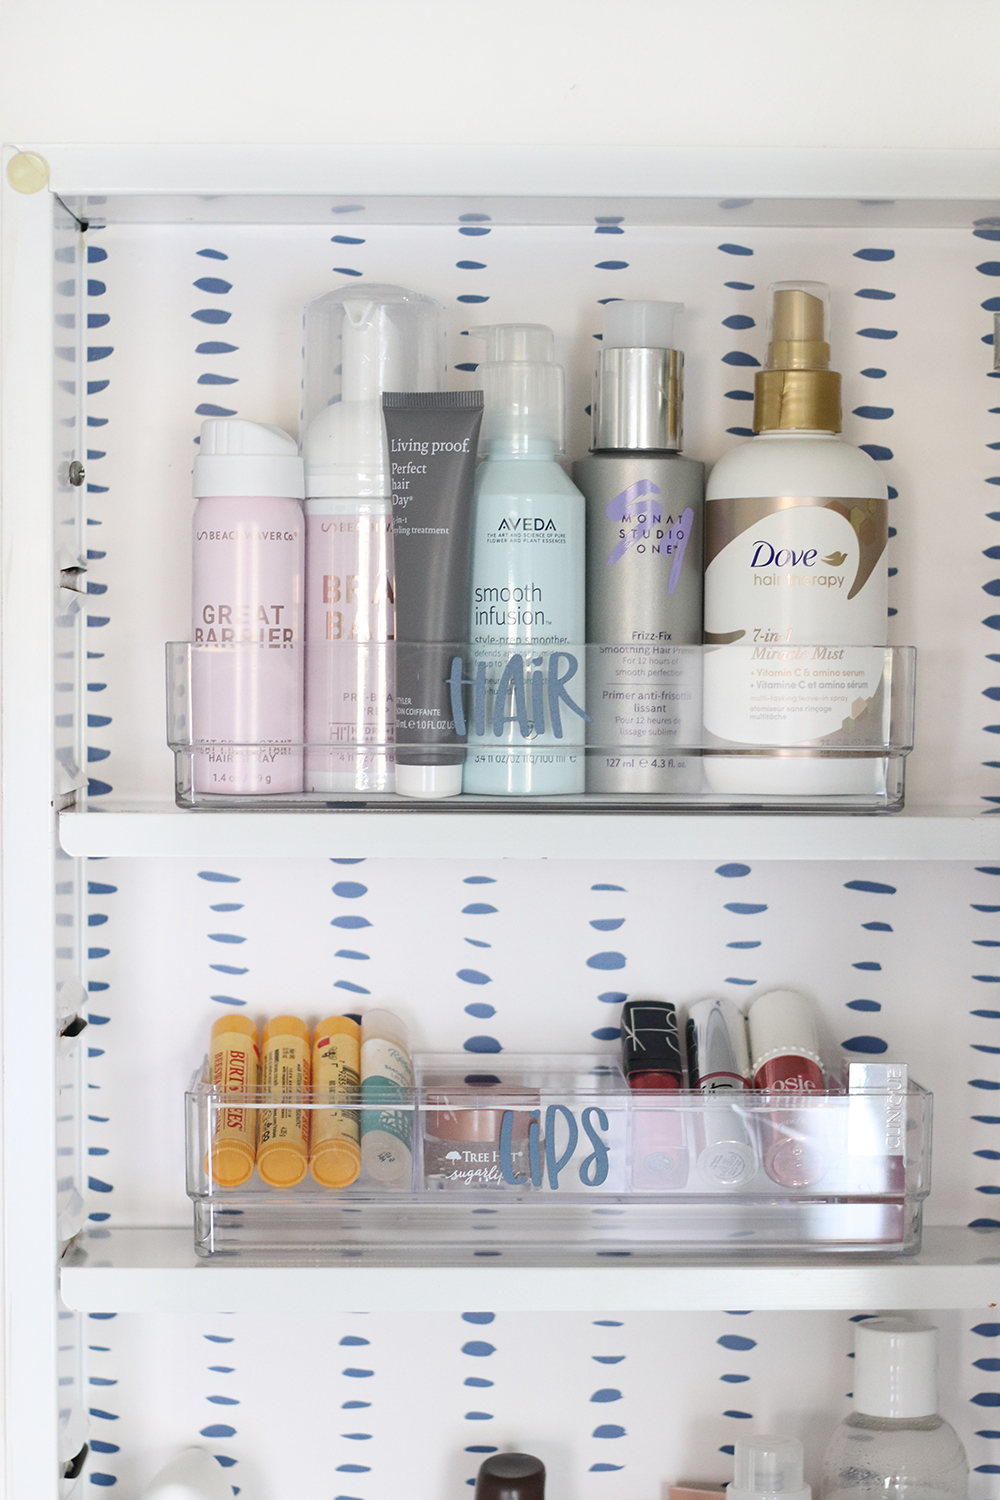
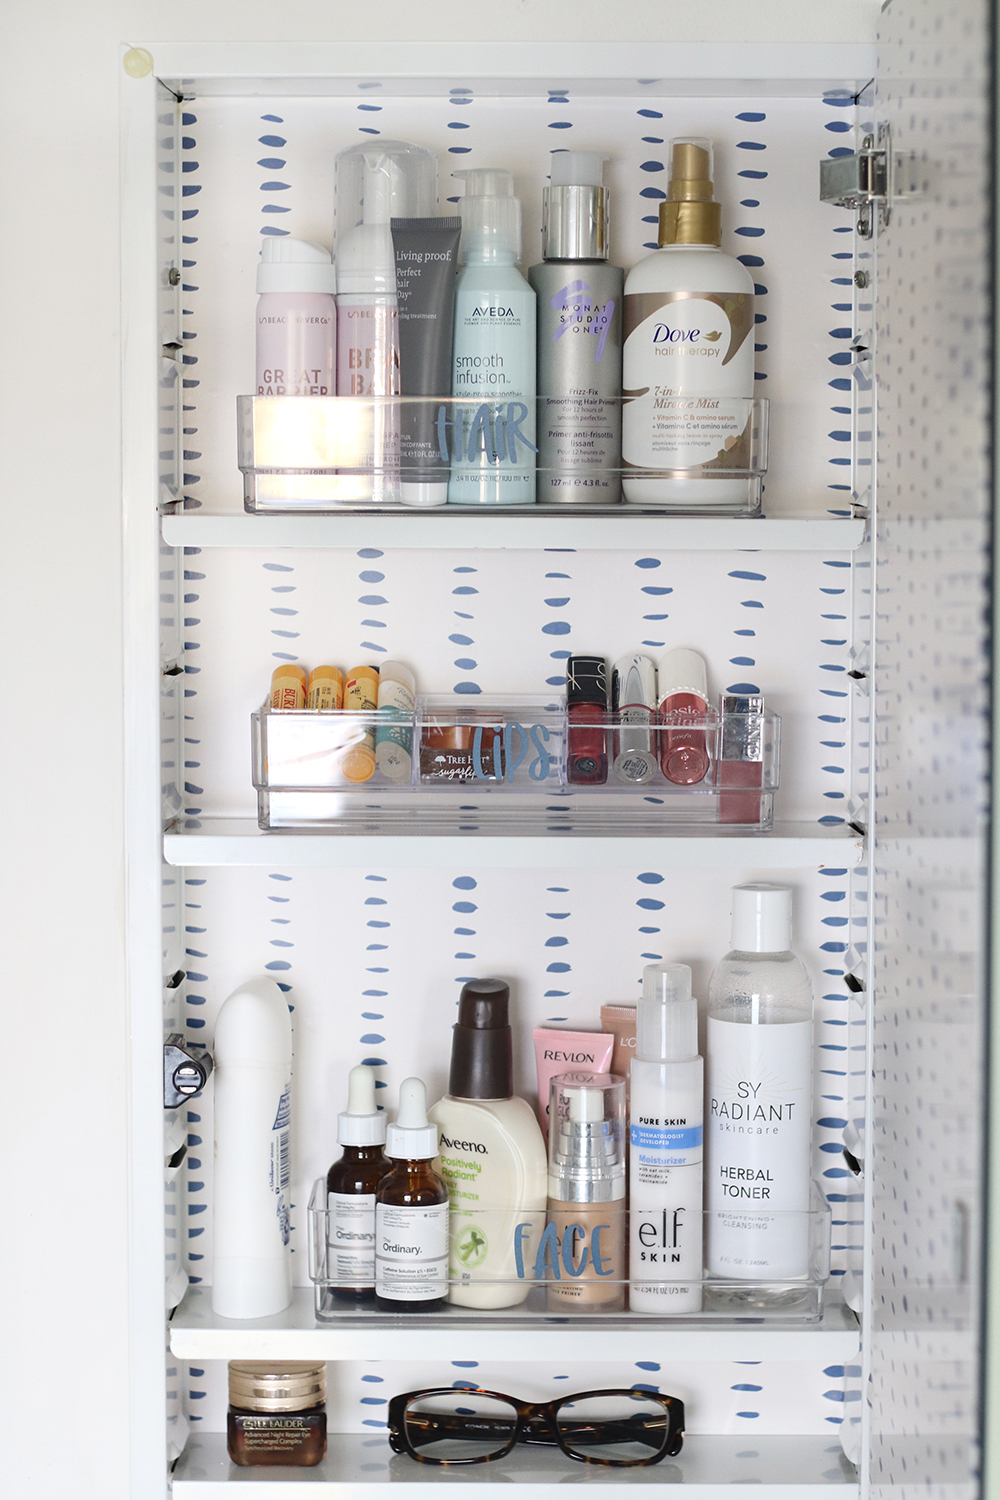
- Hair creams and sprays are high above because I use those products once a week, at the most.
- Finally, the top shelf was underused and wasted, holding only a retainer I had never used and a thermometer.
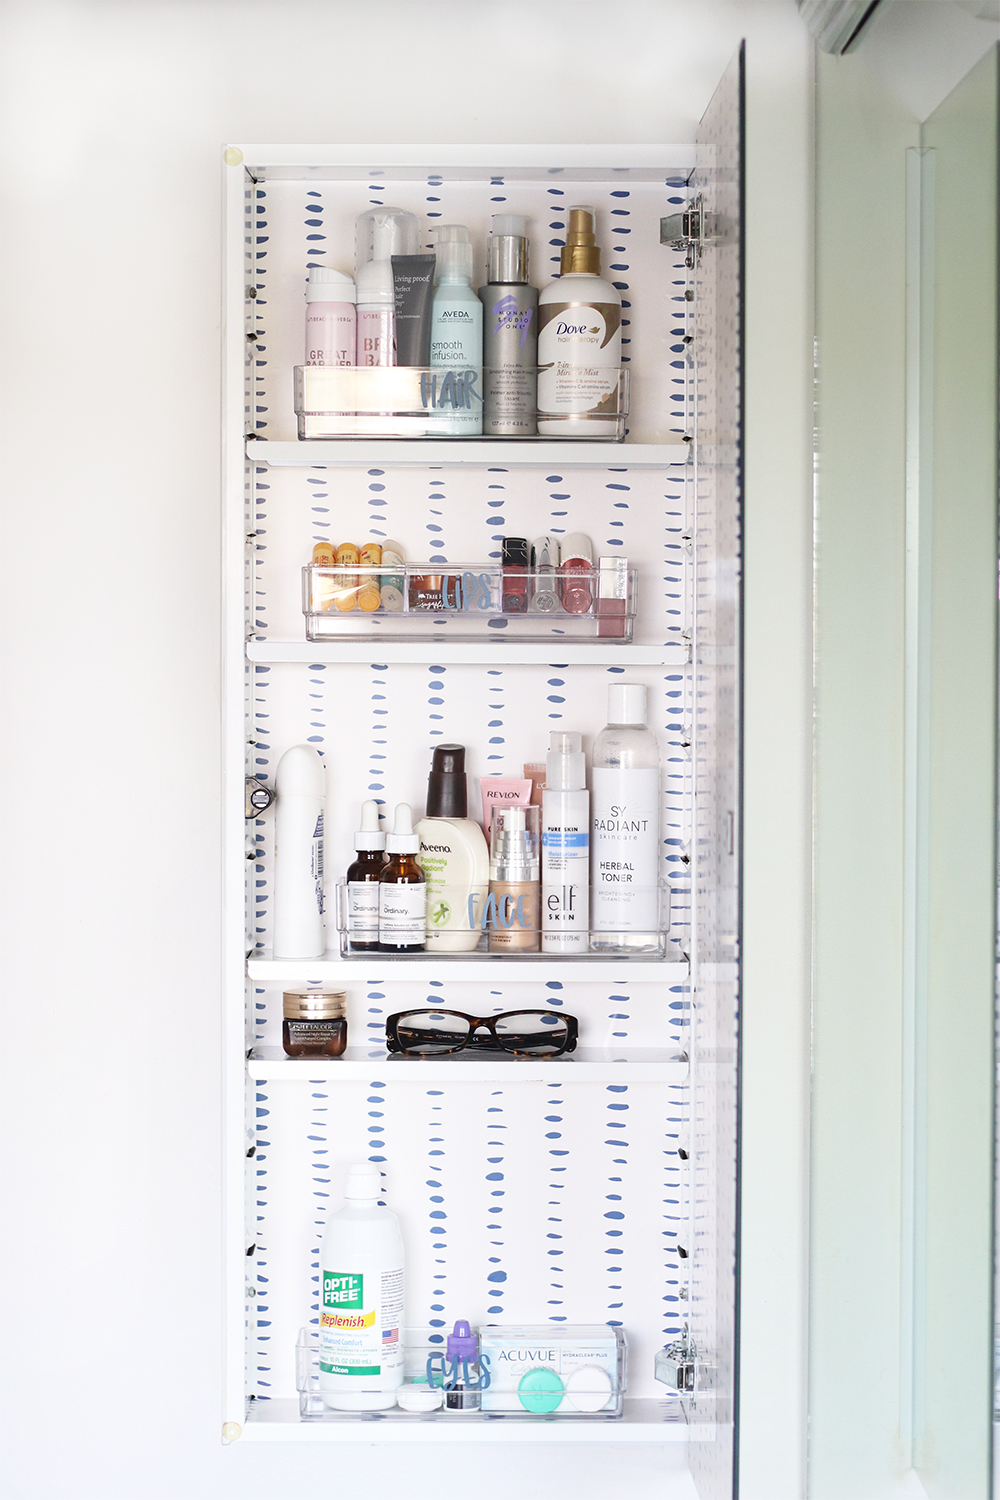
After decluttering, tossing, and relocating, my first thought was to make the four categories (four decals) you see here. I am so happy I even had the perfect space and shelf to store my glasses every morning (instead of leaving them on the counter) next to my eye cream. This is perfect for creating a new habit!
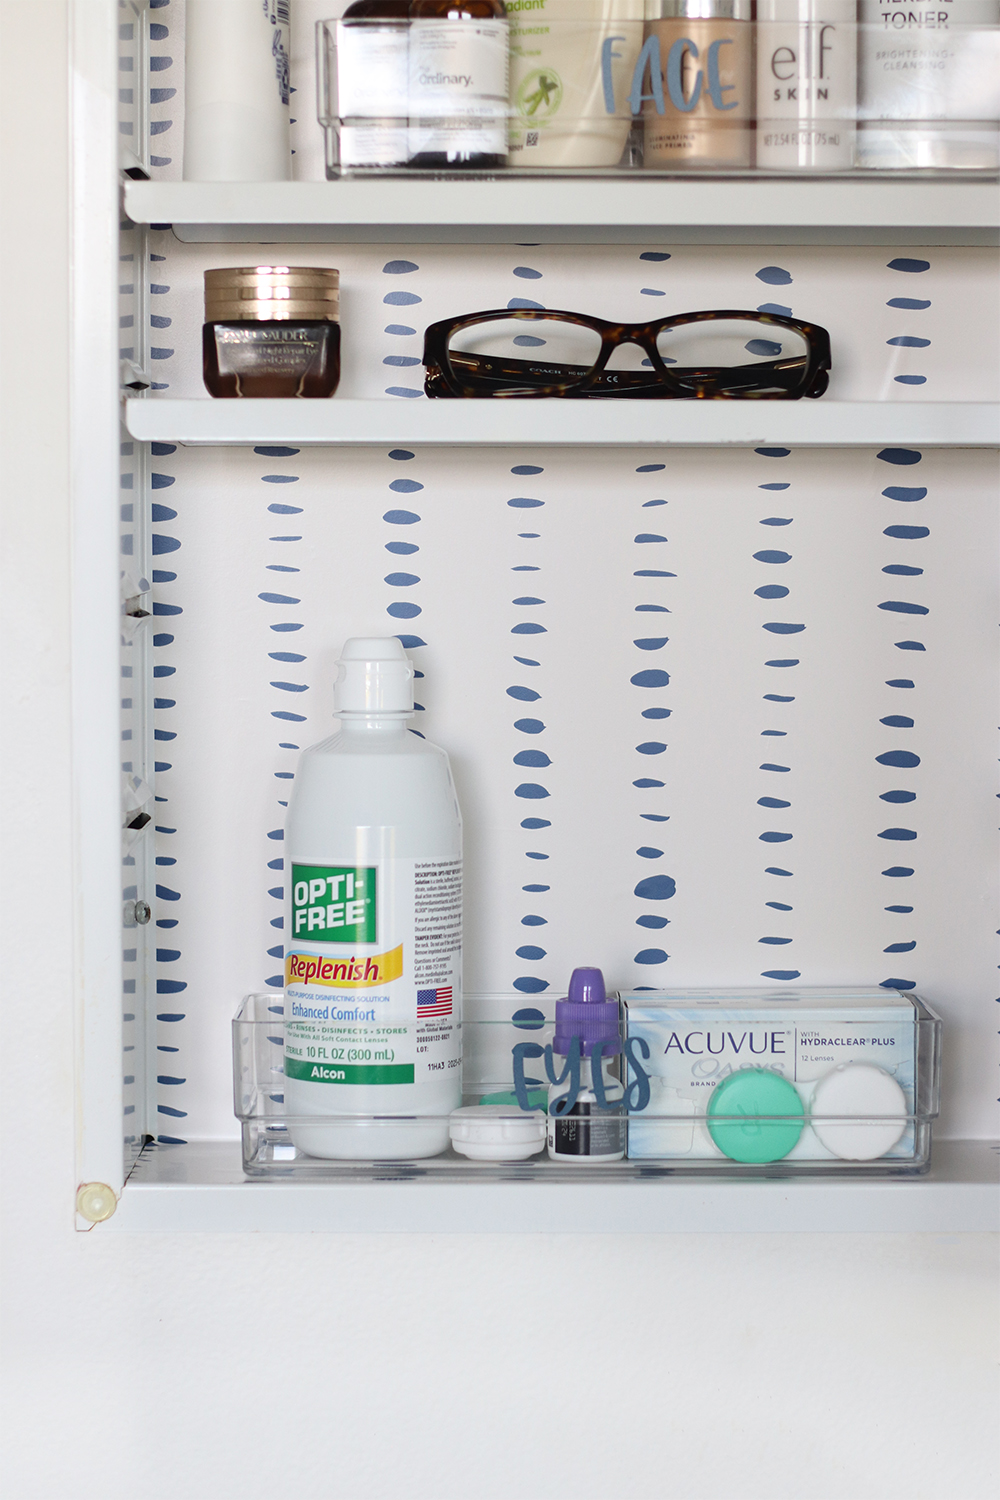
Now, every night, after I take my contacts off, I wash my face, apply toner, apply eye cream, and grab my glasses. The autopilot is on!
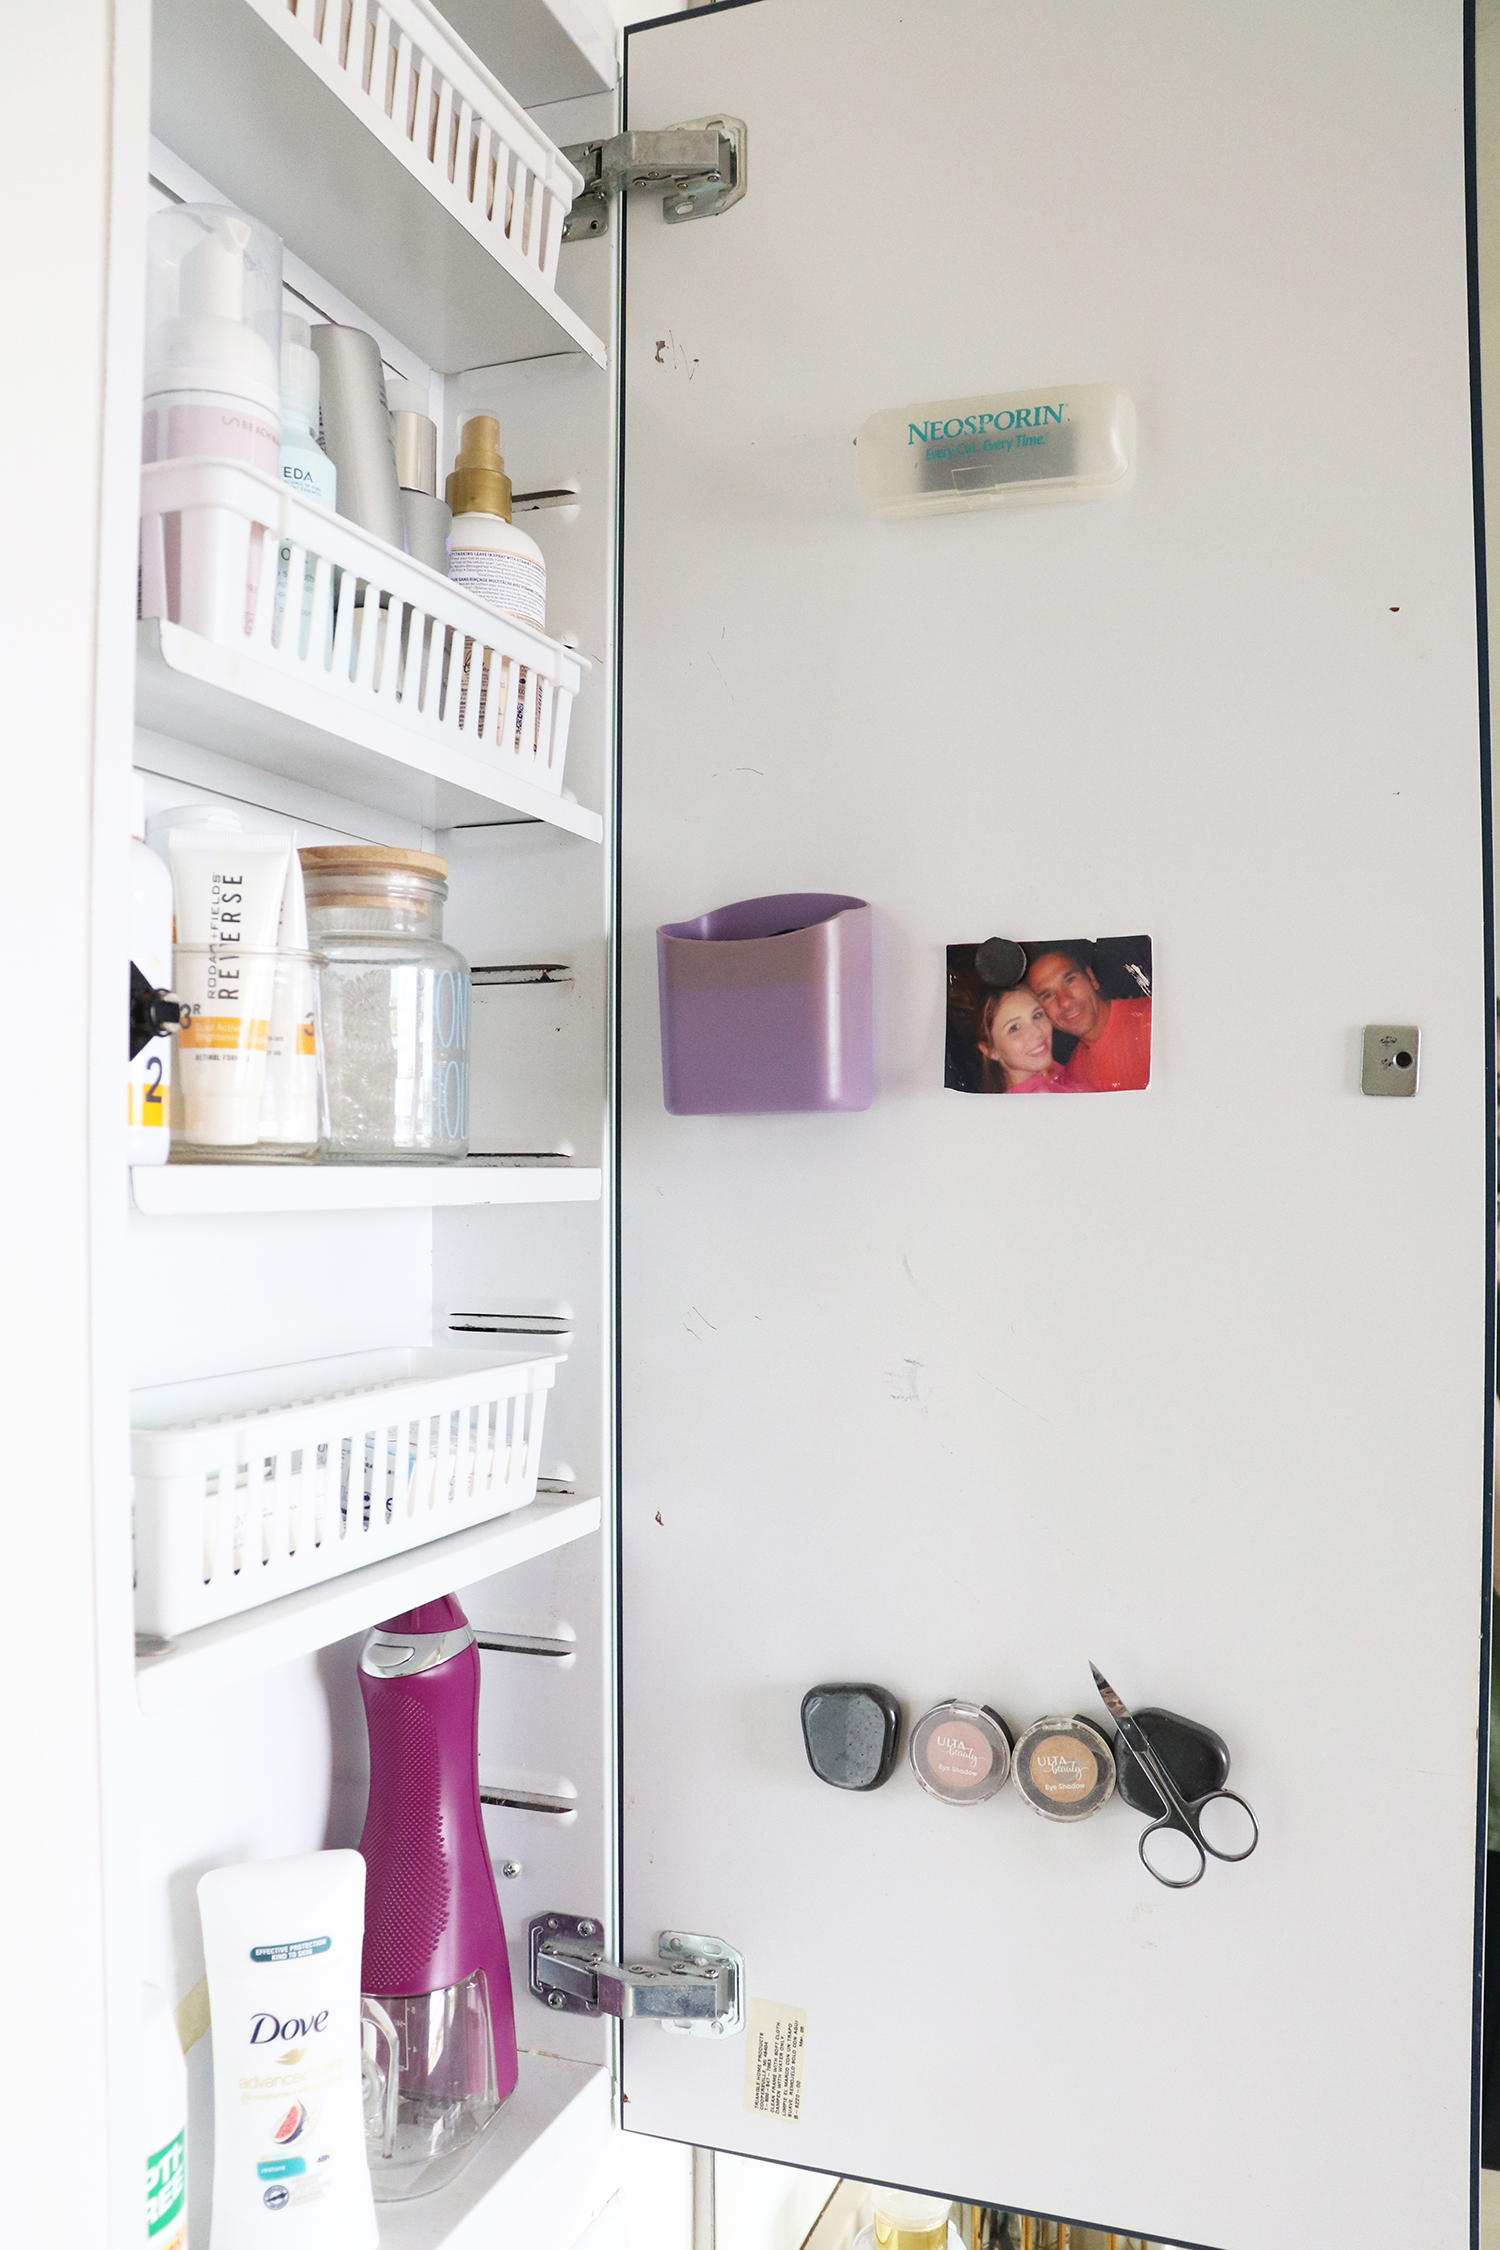
Take Advantage of the Metal Cabinet and Door
One of the things I always liked about this mirror medicine cabinet is that I can use magnets and the door as a pinboard. So, I grabbed a dry-erase label and a magnetic dry-erase marker and added a reminder right above my ‘eyes’ bin.
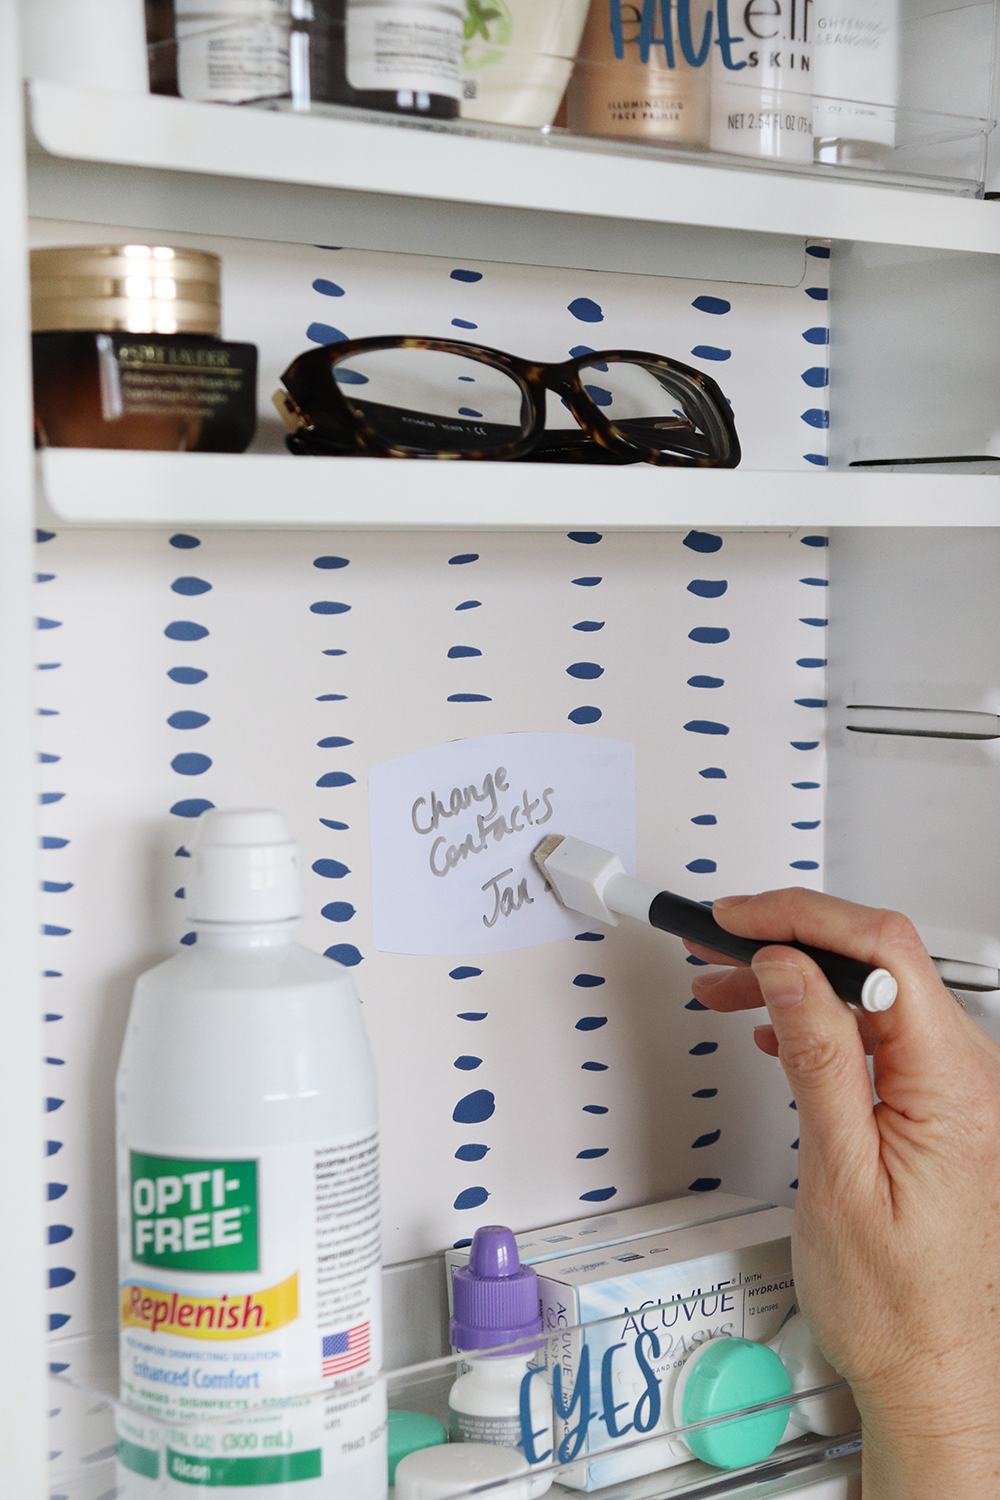
I had these labels in one of my office drawers, and I thought they would work great because they are removable. I can peel them off and move them around without damaging the contact paper.

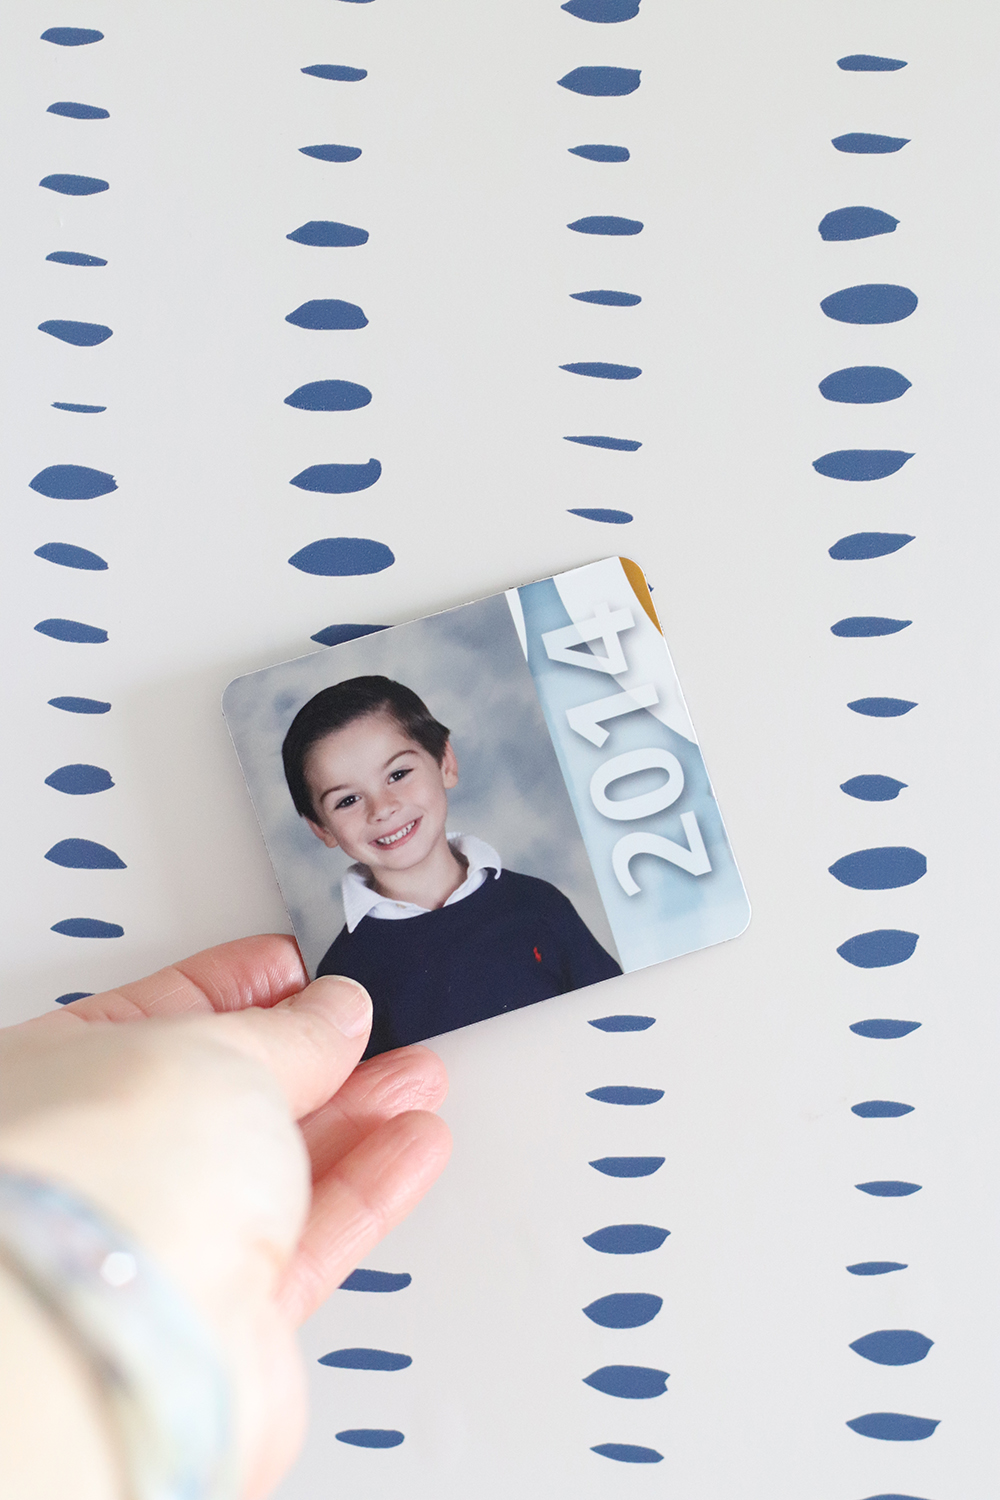
And on the door, a precious magnetic picture of my son’s pre-school years!
Final Look at The Organization of My Mirror Cabinet
Now that you know how my brain works, take a final look at each organized shelf of the bathroom mirror cabinet.
PRO TIP: To keep my lipstick and lip balms in place, I added a small divider to the ‘lips‘ bin. Like the labels, this was another thing I remembered I had in my office. These little trays are from Target’s Bullseye Playground. They are usually available during back-to-school season.
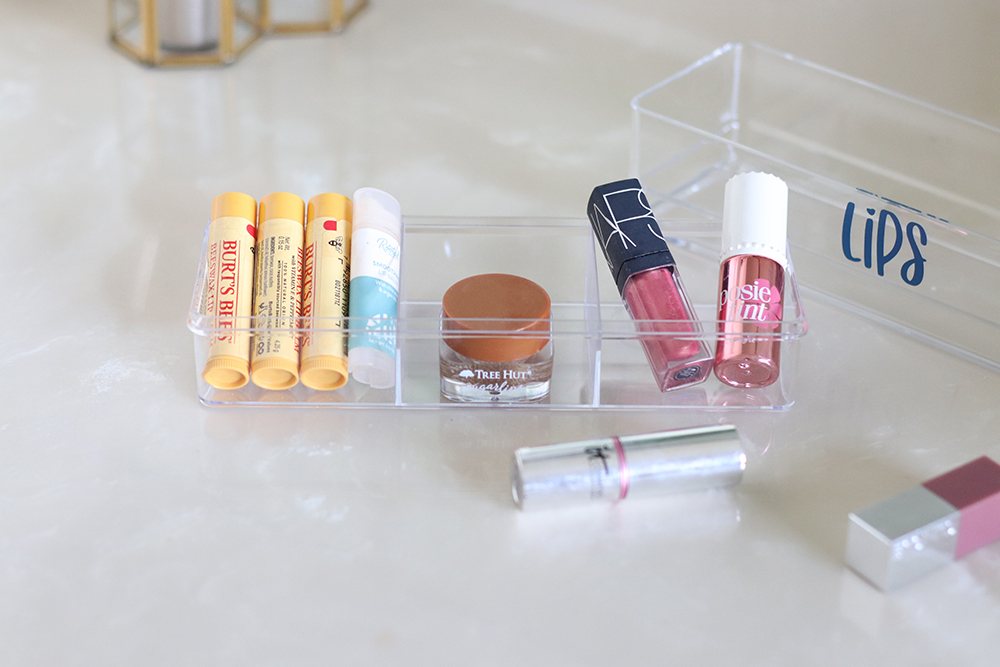
It just happened to fit right in! I searched on Amazon, and I found these bins with small divisions.
🧺 happy organizing, Flavia
Organizing a bathroom mirror cabinet is a simple yet effective way to streamline your daily routine. With clear containers, shelf risers, and labeled sections, it’s easy to keep essentials tidy, accessible, and clutter-free. Love these smart storage tips!
I have a similar very old medicine cabinet and the shelves are stained and rusted. Any tips on how to clean/cover that up? Thanks!
Hi Beth! So were mine. I cleaned it with mild multi-surface cleaner, and covered it up with the removavble contact paper. But if you want to remove the rust stains, you can use something like Bar Keepers Friend cleaner, it works wonders! After that, maybe a fresh coat of paint can help. Thanks for stopping by!