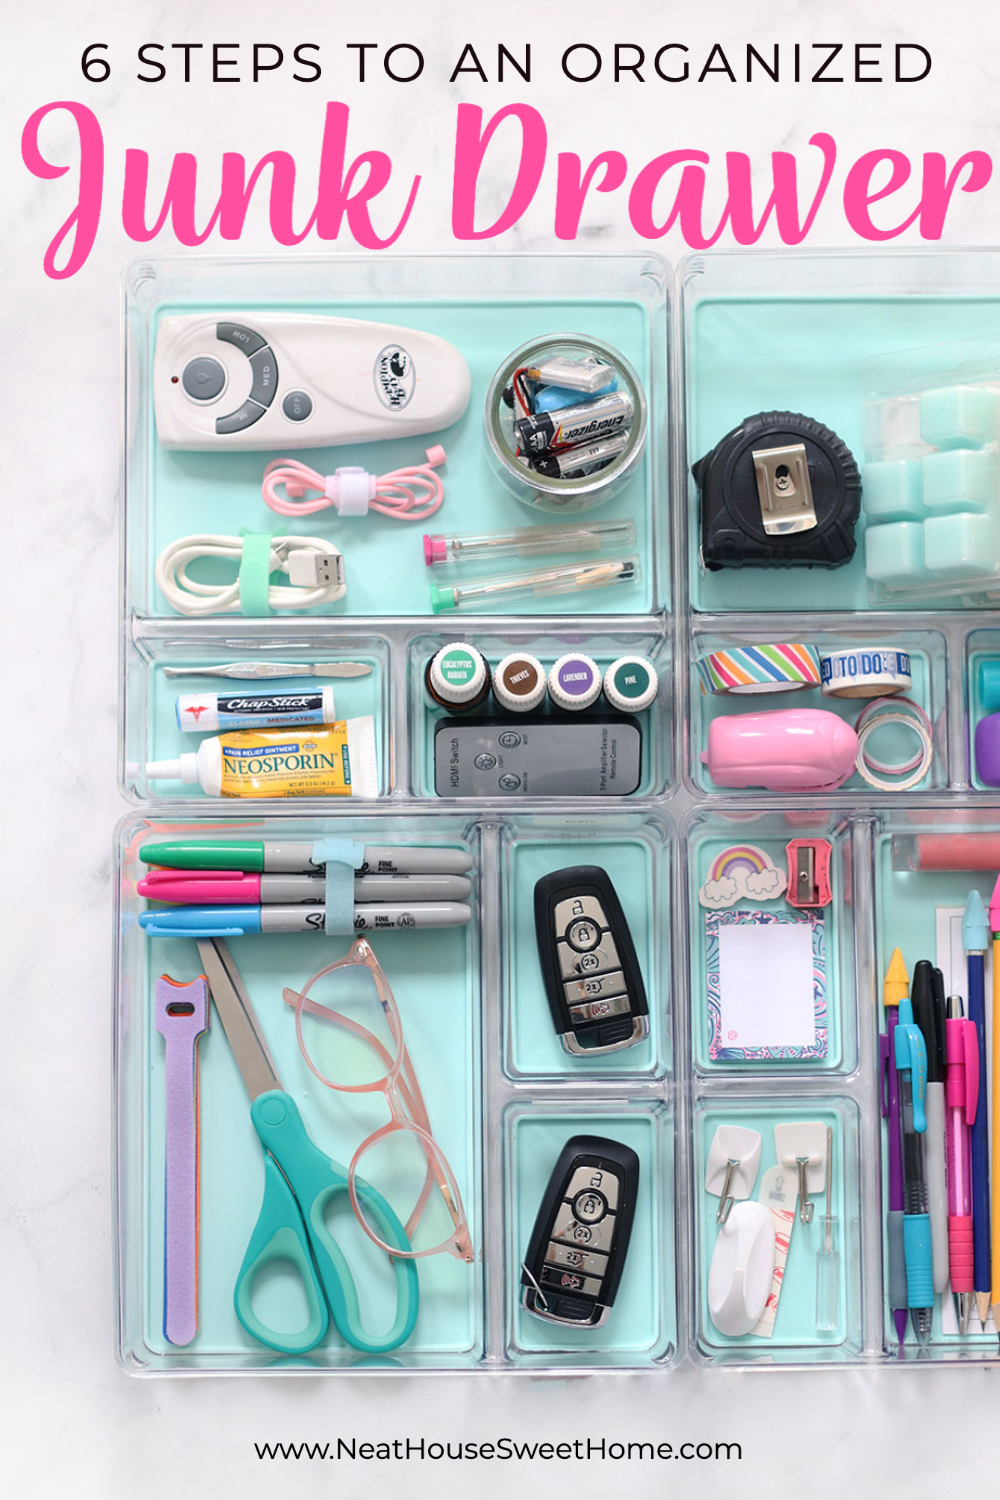
Junk Drawer Organization Minus the Junk

One of the very first organization projects I posted on this blog was the organization of our kitchen’s junk drawer. Fast forward almost 6 years, and here is an update on that same junk drawer. We still use the same exact kitchen drawer as a junk drawer since we moved into this home in 2007 (that’s 13 years at the time of this post). This time our newly organized junk drawer has a little more character and a lot less junk. In this post, I walk you through my 6 steps to organize the junk drawer with only the essentials, to keep the junk at bay.
Oh, the paradox then, and the paradox now! How to organize the junk drawer is self-contradictory. Junk are things of little or no value that should be discarded, not organized. However, junk drawers are a staple in every home, and ours is not the exception.
But, you can have an organized junk drawer, as long as you keep only the essentials. Just take the junk out. This is why I titled this article ‘Junk Drawer Organization Minus the Junk.’ If you follow the same 6 steps I took, you will see how easy it is to organize the junk drawer with everything you need but the junk. I promise!
Would you like to save this?
This post may contain affiliate links for your convenience. For more information, please read my Affiliate Disclosure.
Our Junk Drawer: The Before
In 2015, when I organized the junk drawer for the first time, I was super excited to use a brand new expandable bamboo drawer divider. It worked, it served its purpose for the last 6 years, but it did break about a year ago.
I honestly delayed organizing this drawer for far too long. As long as I could find my car keys and a pencil or a Sharpie, some of my junk drawer essentials that were always in the same compartment, I was ok with the drawer the way it was.
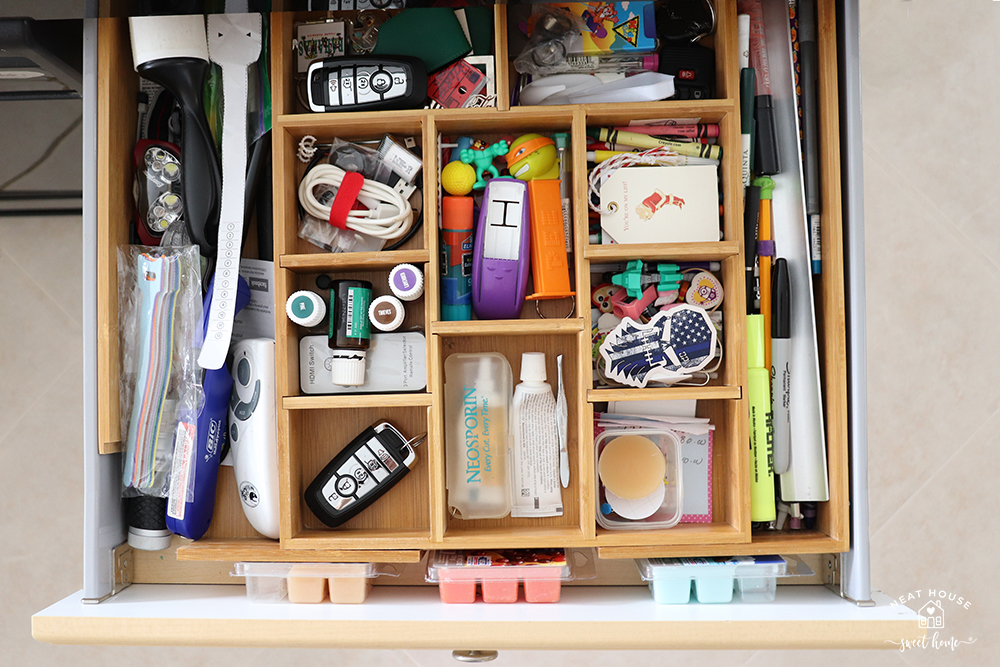
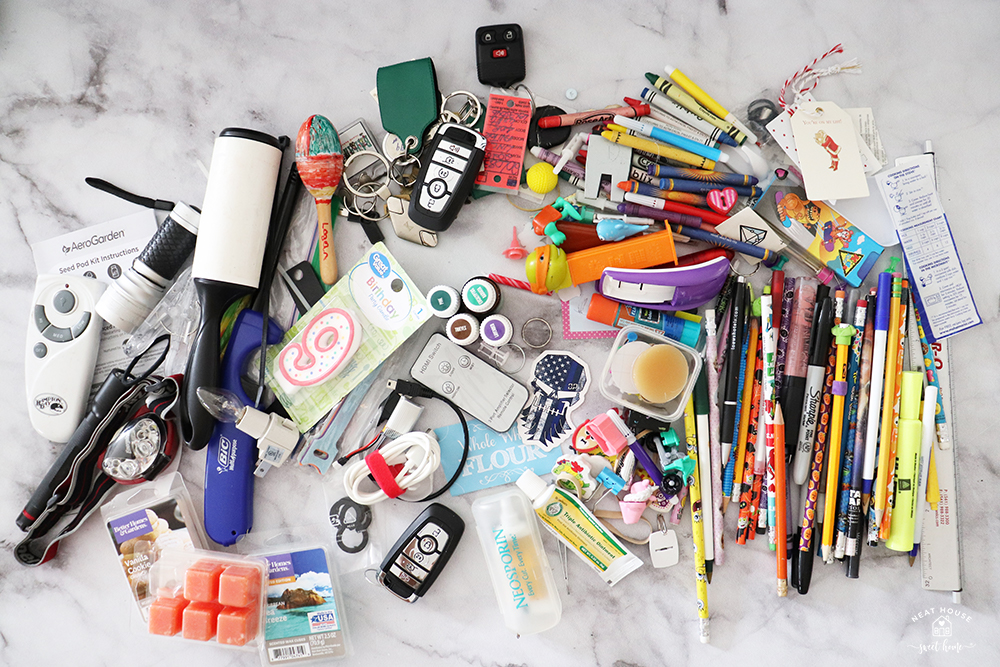
But once I decided it was time for a makeover and started taking out all the junk, I realized that it was definitely necessary. I mean, look at all this junk!
Note the 20 crayons and 14 pencils, as well as the ‘9’ birthday candle that we were supposed to use in 2019. Back in 2015, I found a ‘4’ candle that we should’ve used in 2014. I put two and two together and realized that we celebrated both birthdays out of town.
Back to the crayons and pencils.
In early 2015, our son was still in preschool, so I tried to keep a few crayons handy in the kitchen. The pencils seemed to multiply. That was the ‘kids’ birthday party every weekend’ phase, and there were pencils and erasers galore in every goody bag we brought home.
This time around, I decided to donate them. If I did not use them in 6 years, I wouldn’t use them anytime soon. Especially now that school is virtual. As far as everything else, I took a different approach from the one I usually take when decluttering and organizing.
6 Steps to Organize the Junk Drawer
DO you really need to follow a step-by-step process for your junk drawer organization? Why, yes! I will show you the 6 steps I took to organize the junk drawer back together without necessarily following my usual process: declutter, sort, and then organize.
Step 1: Measure the Junk Drawer
The first step you should always take before purchasing the bins to organize the drawer is to measure the drawer. Sometimes it’s easy to get excited about a product because it’s pretty or low-priced to realize that it doesn’t fit or doesn’t serve a good purpose. So, I recommend thinking about purpose and measuring first.
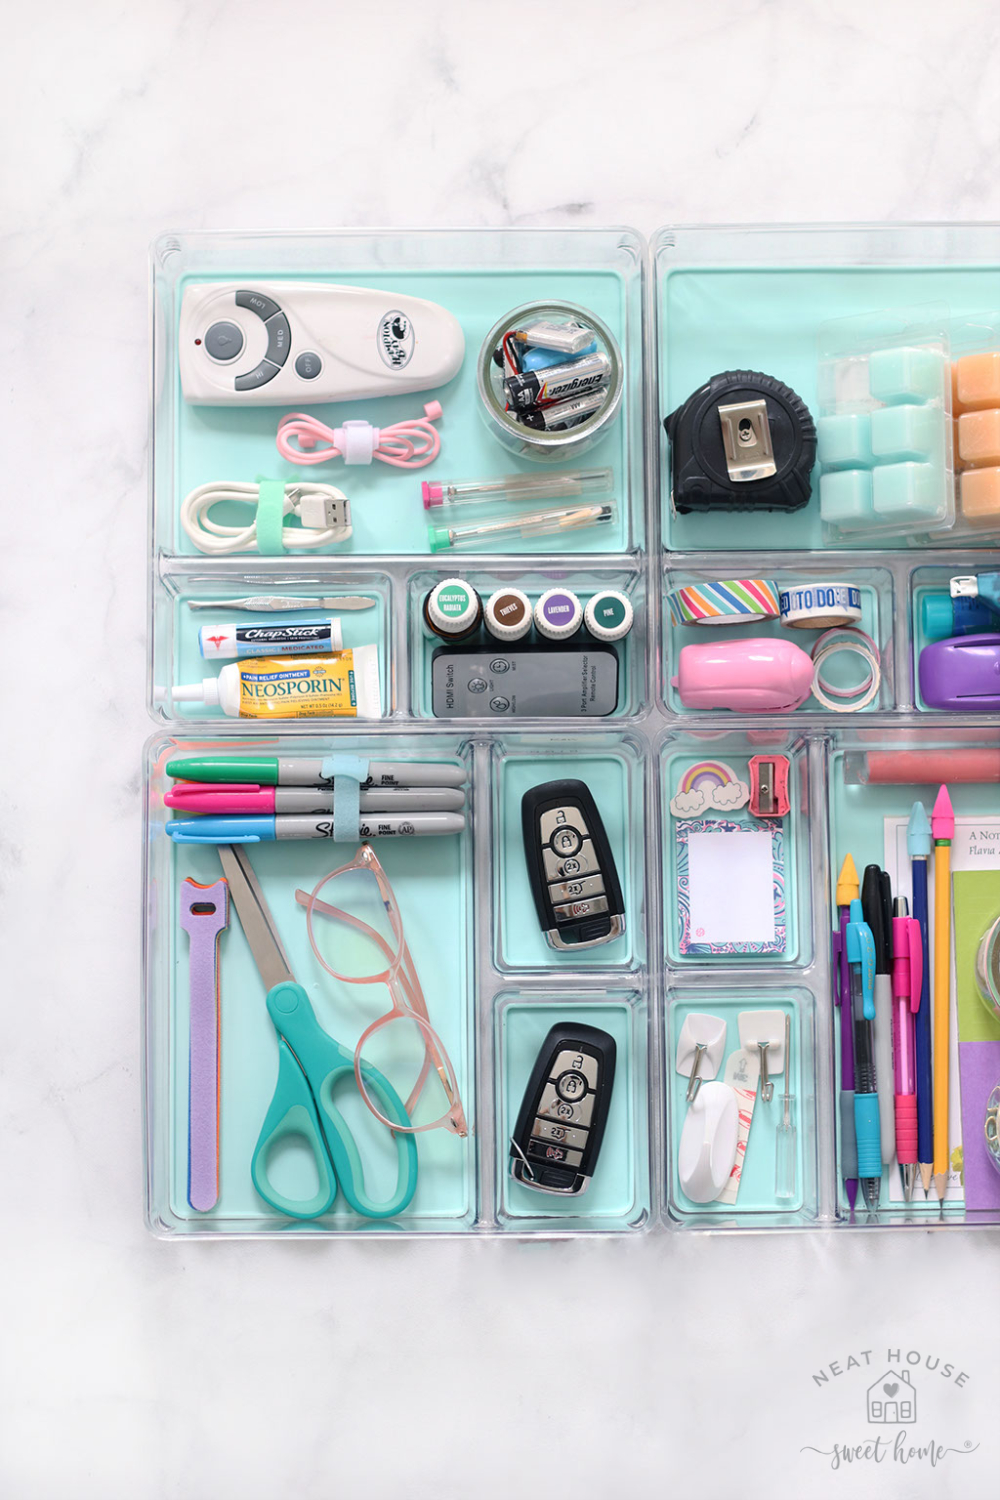
Our junk drawer measures 19 inches deep by 18.5 inches wide. Since I really like the drawer organizers I use in our silverware drawer, I decided to search for the same brand and color.
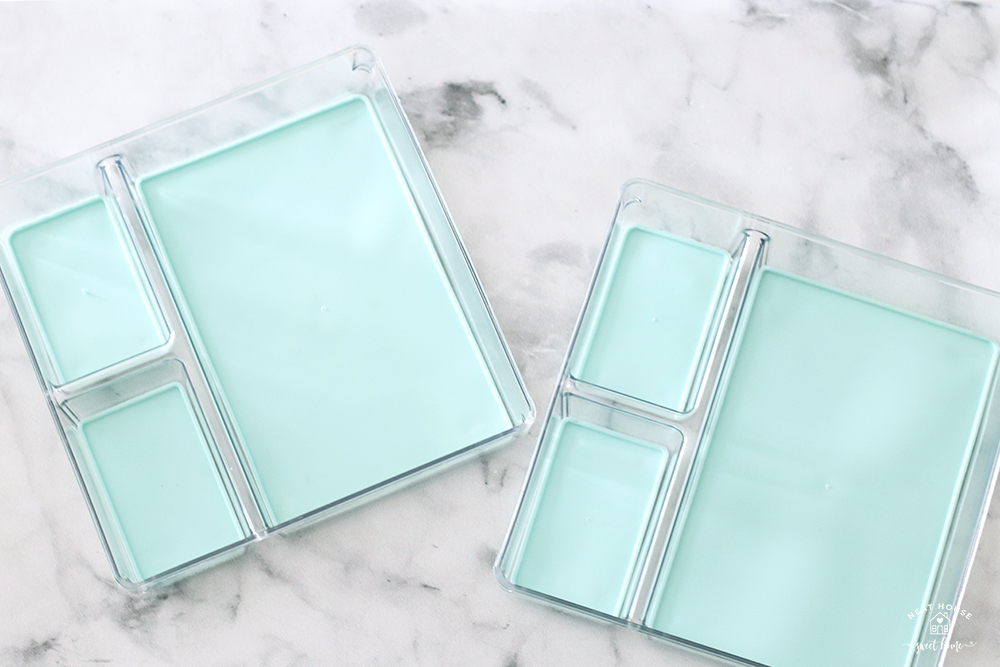
I purchased two sets of these BINO Multi-Purpose 3 Section Plastic Drawer Organizers. It comes in a set of two, so I have 4 in total. Each drawer organizer measures 9×9 inches. They almost fit the entire drawer forming a large 18×18 inches square when put together side by side. This is exactly what I was looking for, so there’s virtually no wiggle room inside the drawer.
The key to success in the organization of your junk drawer is choosing adequate bins and drawer organizers, in the right size.
Step 2. Consider a Shelf or Drawer Liner
Secondly, I thought it would be beneficial to put down a shelf liner so the bins would have something to grip on and not slide inside the drawer. Sometimes it’s the little things like this that make the big difference. Coincidentally, I had this shelf liner in my crafts closet, waiting for the right project.
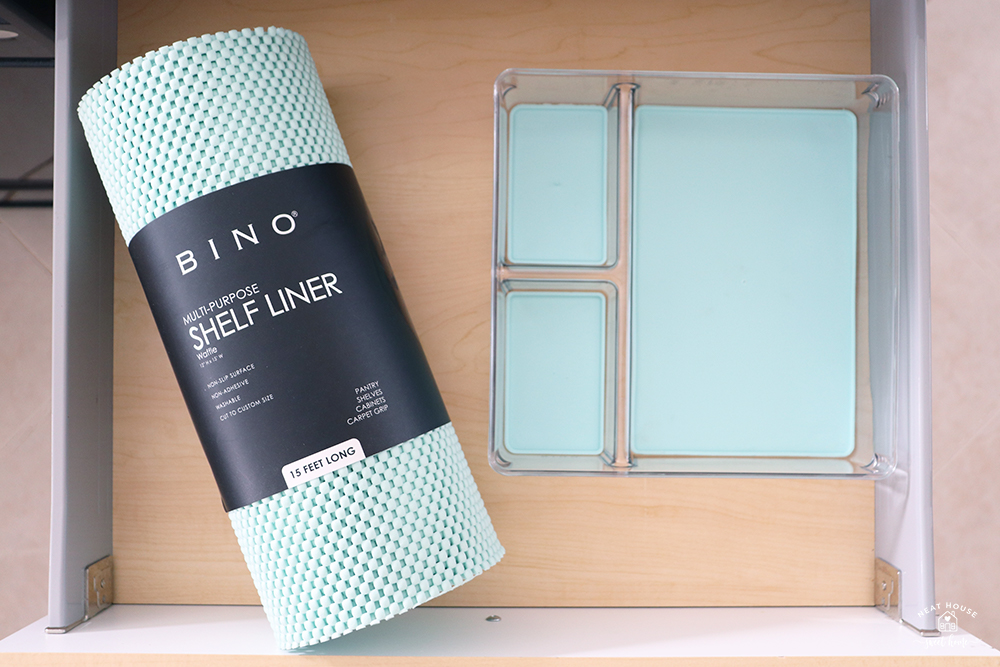
I think the previous drawer organizer broke because it kept sliding inside the drawer every time we opened and closed it, loosening up the nails that kept the corners together—another reason why I decided to go for clear plastic bins for our drawer.
Step 3: Position The Junk Drawer Organizers in Place
You may think mentioning this step isn’t necessary, but I do want to point out how I decided to position the drawer bins.
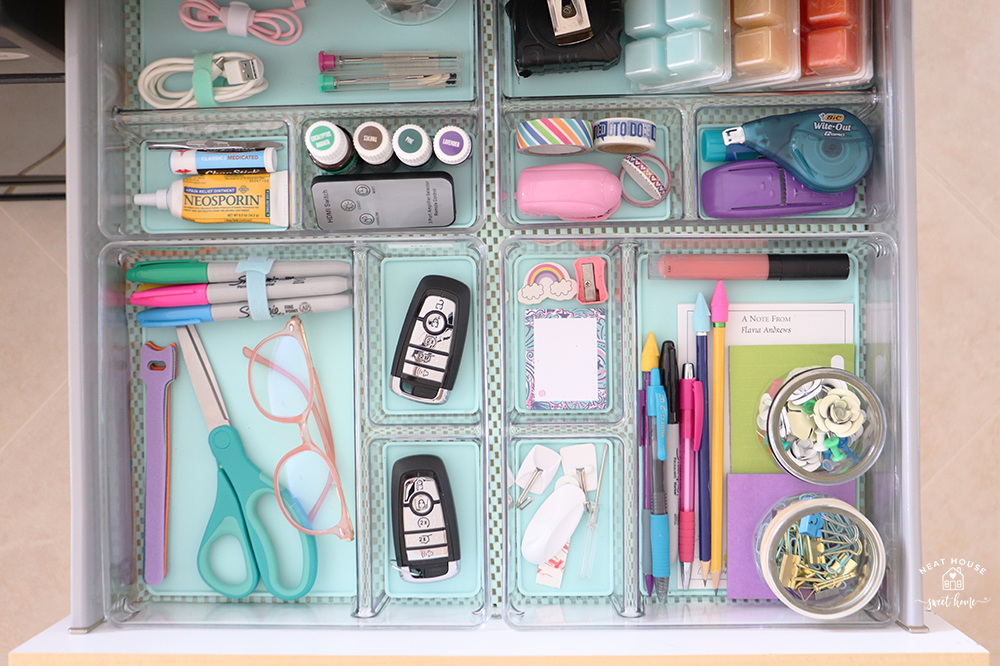
Since one compartment was bigger and wider than the other two, I chose to place the bins in the back with the small compartments facing forward. This way, all compartments are in plain sight.
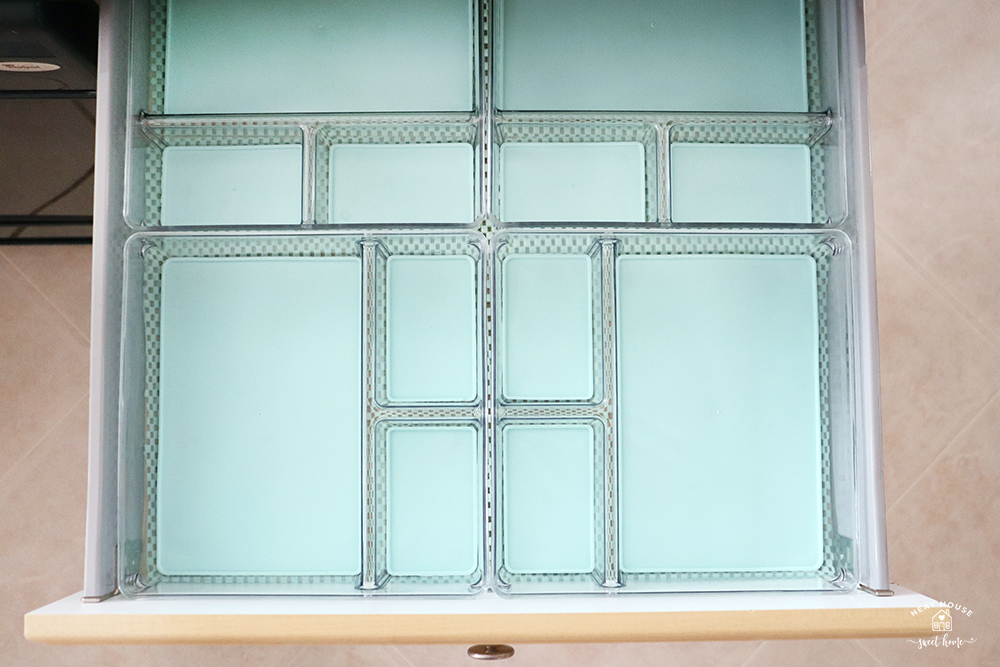
I love how the dimensions worked like a charm. Sometimes you need to add extra bins to the drawer in order to fill the gaps. With these drawer organizers, I had a little under one inch to spare on each side. No wiggle room, really.
Step 4. Bring In Your Junk Drawer Essentials
This is when the fun of organizing the junk drawer begins! And this is the moment when I realized that I wasn’t going to declutter and sort through the junk as usual. Instead, I was going to choose my essentials, or what I would like to call my non-negotiable items. Leave the rest for last.
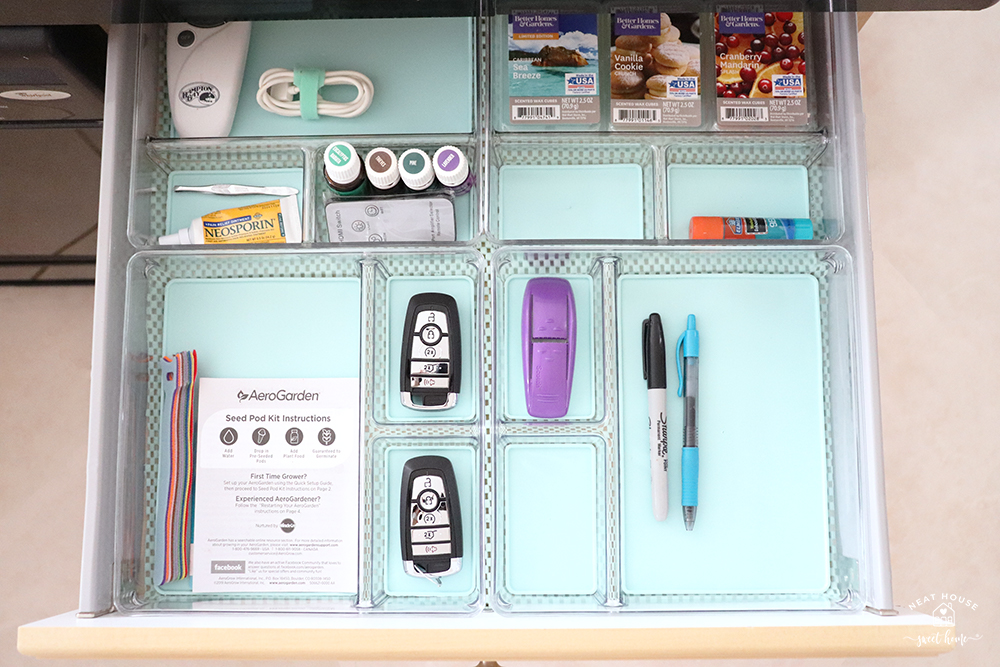
So, I looked at the pile of junk and started putting back only those items that I need, and use almost every day. These were:
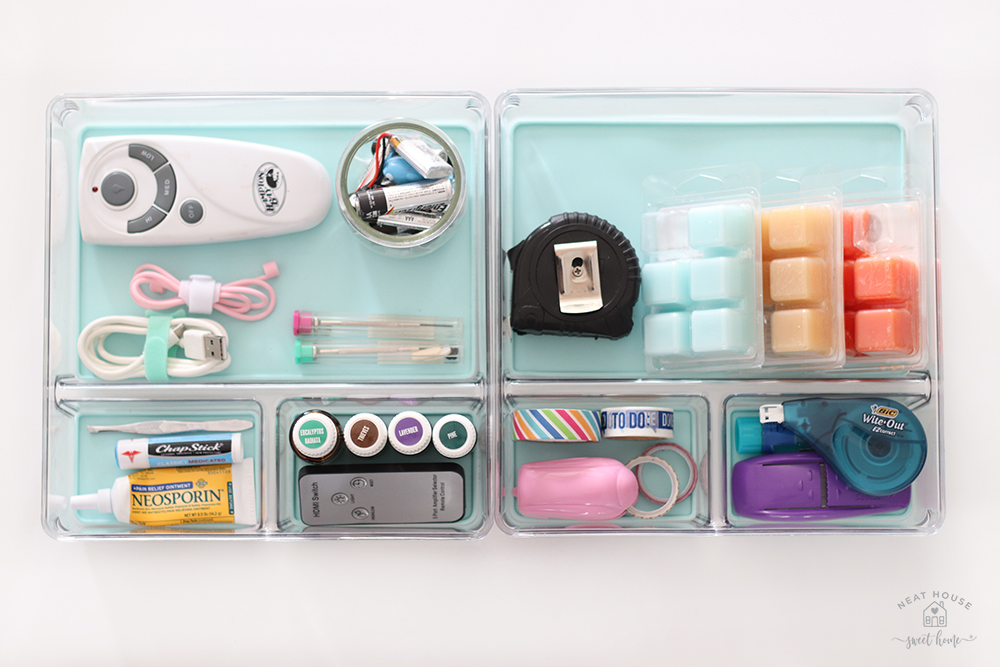
- Ceiling fan remote control
- USB cable to charge bikes’ speaker
- Wax cubes for living room wax warmer
- First aid cream and tweezers
- Essentials oils, and diffuser’s remote control
- Glue stick
- Velcro ties (I recently purchased these for this cable organization project, and I like to keep them handy).
- My AeroGarden instructions (afterward, I found a better place)
- Car keys
- Tape
- Sharpie and pen.
Your essentials might be a lot different than mine, but along the same lines, think of those things you can’t compromise and give them a compartment. Once your essentials are organized, you can start bringing everything else you think might be useful to have inside the junk drawer.
Step 5. Sort Through the Rest of the Junk
Now, don’t get me wrong, there was still a lot of stuff I knew I needed inside the junk drawer. But there was nothing really necessary or of good value from the old junk pile that I could bring back this time around.
As I mentioned before, I discarded many little erasers, pencils, and crayons. I only kept three pencils and added brand new eraser caps to them. Different phases in life call for different needs. This is why it is essential to reassess your needs and adapt your organization systems once they do not serve a purpose anymore, especially when organizing the junk drawer.
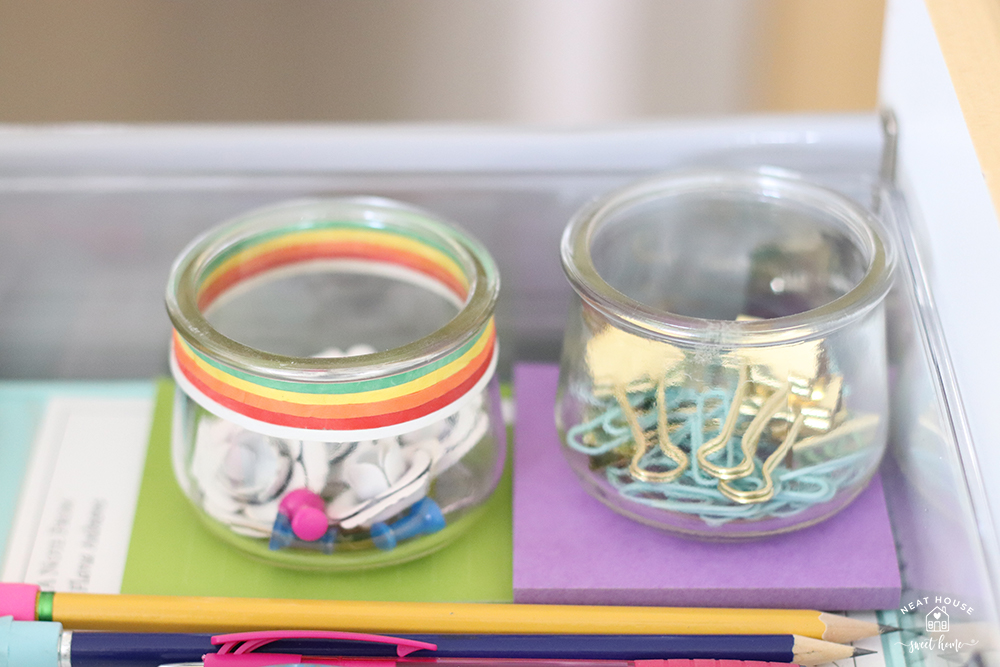
I like to corral small and random items in recycled Oui™ yogurt jars. In fact, I have a few articles where you can find several uses for them.
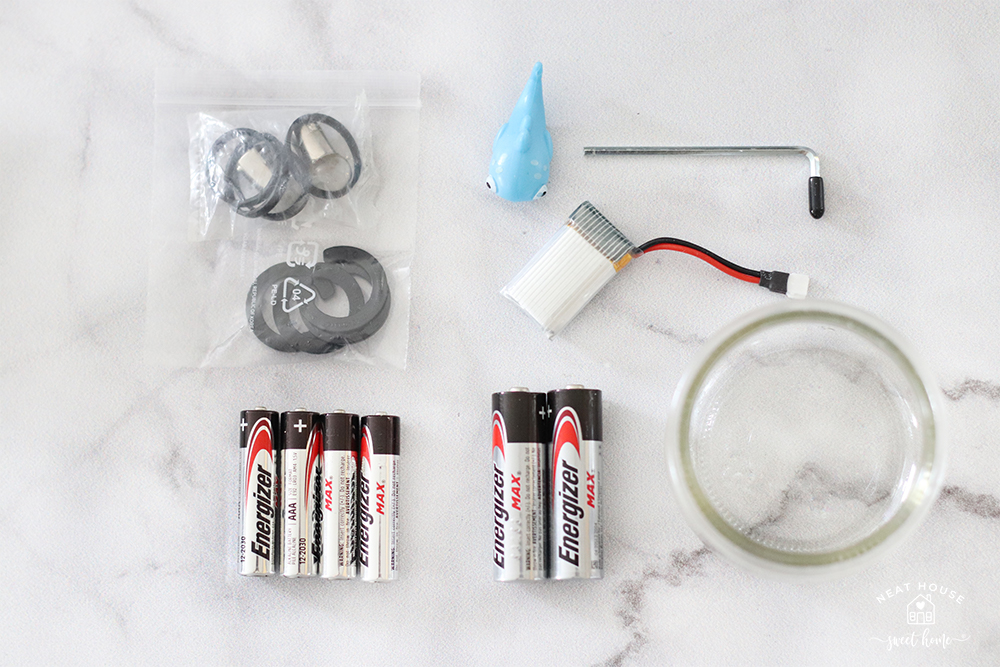
For example, I found some hardware, a spare battery for our son’s drone (which he’s currently playing with), a cable saver, and an Allen wrench for the fridge. I added 2 AA batteries and 4 AAA to the jar because we seem to need those more often than not.
All of these small items can be contained inside the Oui™ petite jars.
Step 6. Bring In New and Necessary Items
The last step in organizing the junk drawer was to bring new items. And by new, I mean new to the drawer, but not necessarily brand new, never used.

In my case, I added the following items to the junk drawer:
- AirPods strap holder. Since I only use it when I go out for a walk or jog, it’s nice to have it handy downstairs, and I can grab them on my way out.
- Glasses repairing kits.
- Measuring tape.
- Chapstick
- Washi tape. It comes in handy to seal anything with a pretty touch.
- Mini office supply kit (similar)
- Wite out
- Scissors
- Extra color Sharpie markers. Good for labeling things in the kitchen.
- An extra pair of blue light blocking glasses. They come in handy when I’m reading on my iPad downstairs.
- Small Command hooks come in handy every time, especially in the kitchen.
- A couple of pens, pencils, and a pencil sharpener.
- 3 Notepads, including one set of sticky notes.
- Pushpins for our corkboard
- Just a few rubber bands
Shop Junk Drawer Essentials

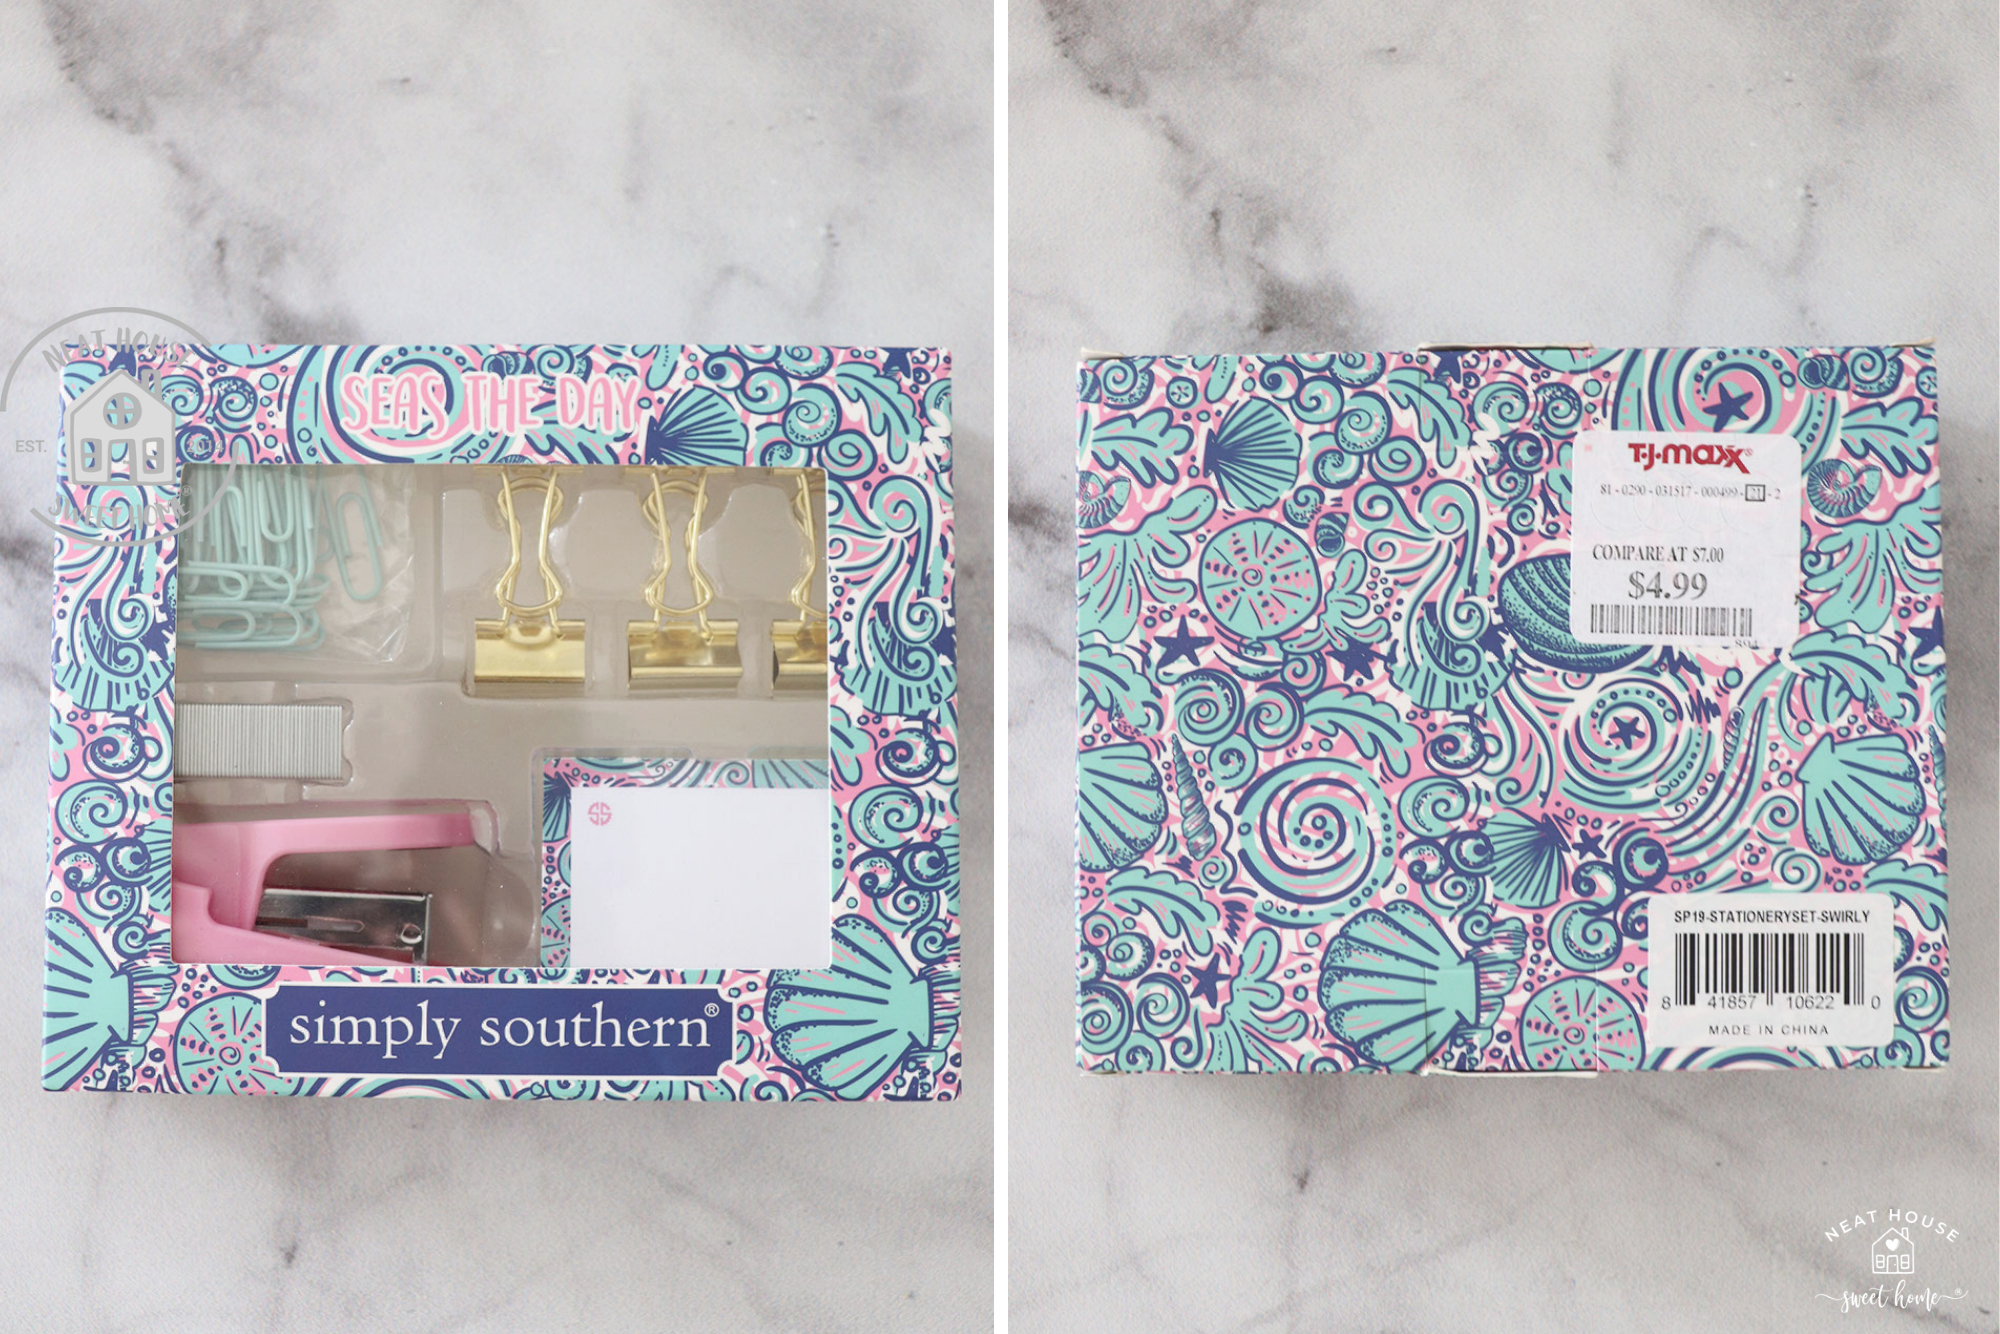
In May of 2020, when I organized the paperwork in the home office, I found some extra office supplies that definitely came in handy for the junk drawer organization, including this TJ Maxx impulsive buy.
I also corralled the pushpins, clips, batteries, and binder clips inside yogurt jars.
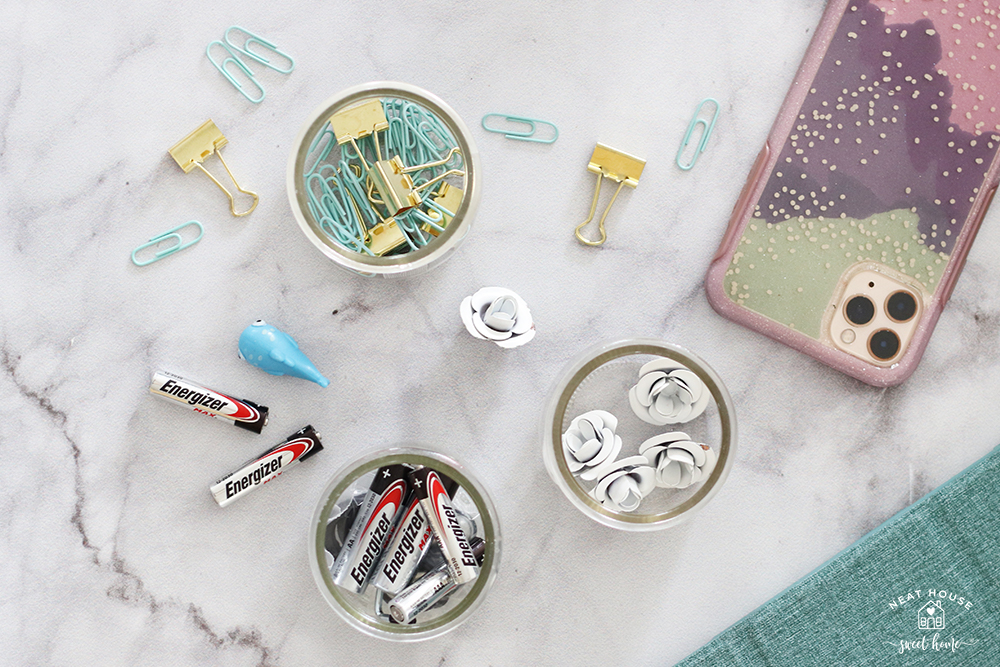
I like to wrap rubber bands around the neck of the yogurt jars. I do this in my home office too.
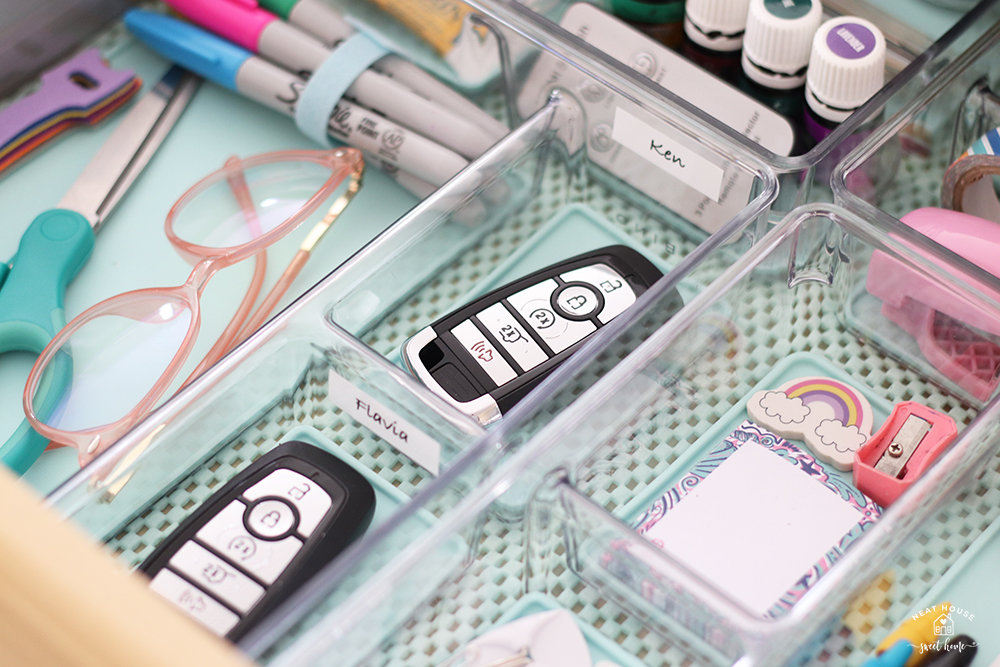
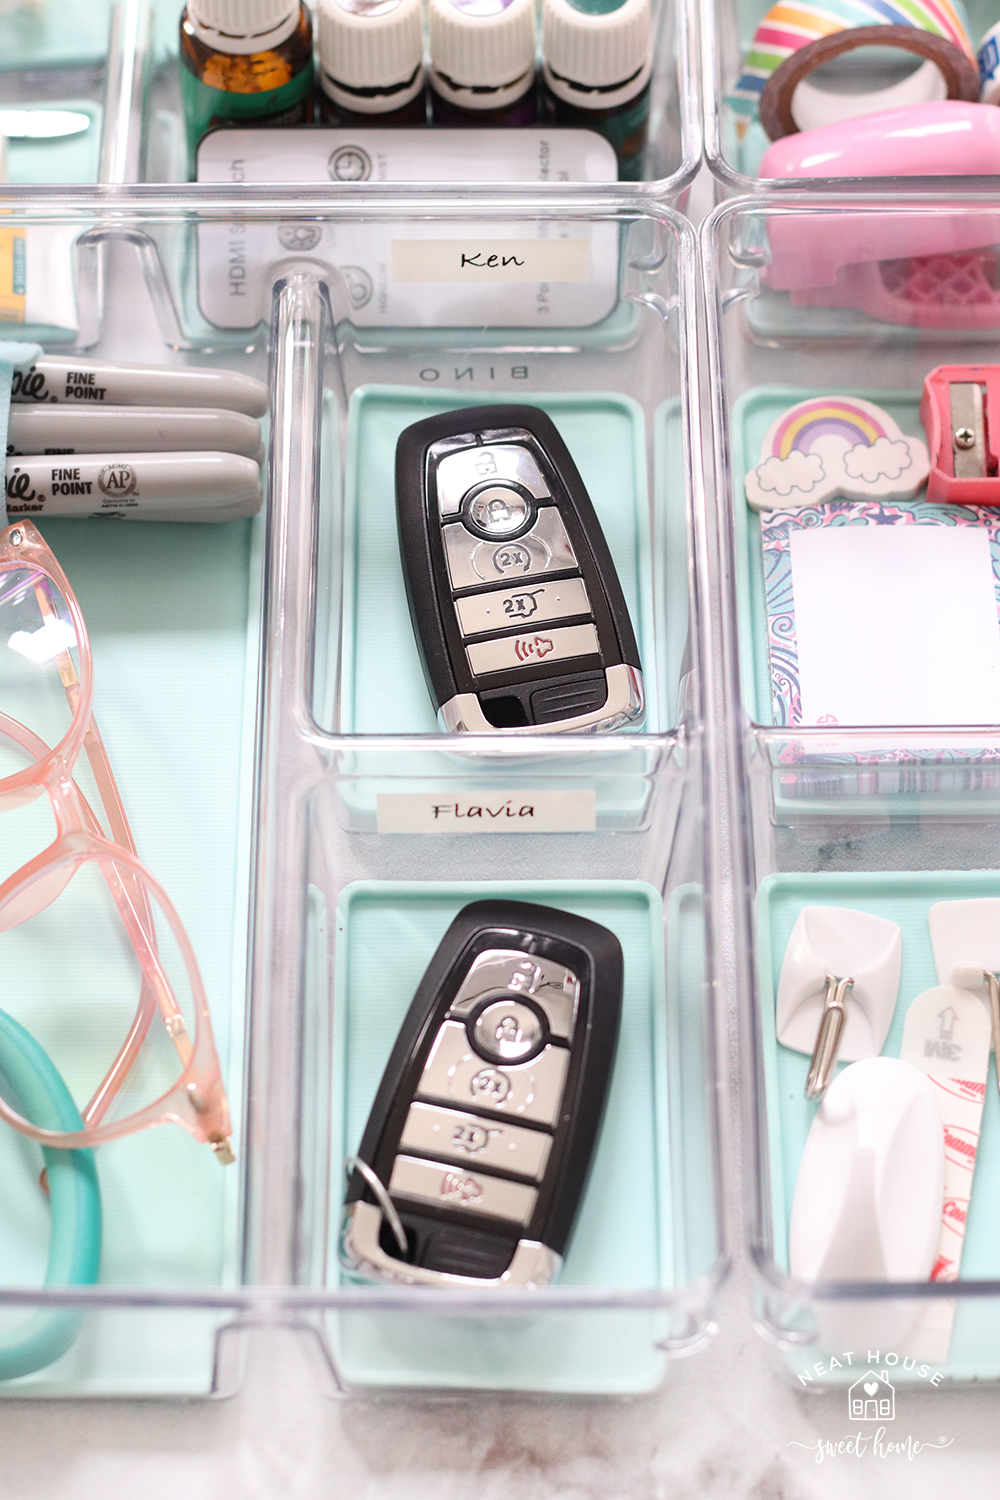
I labeled two of the compartments with our names to differentiate the car key FOBs.
A Closer Look at Each Drawer Organizer
Because it was very hard to photograph the entire view of the final project, I decided to pull the drawer organizers out of the drawer and take extra pictures to show you the contents in more detail.
Drawer Organizers in the Back
Drawer Organizers in the Front

One of the updates that made me happy about this organization project was having a dedicated spot for our key FOBs. One for me and one for my husband. #itsthelittlethings
The car settings (seat position, AC, and radio) will vary depending on the key you grab. Since we are very particular about how close to the steering wheel we drive (AKA, I am an old lady), we wouldn’t like to grab the wrong key. When they are not inside the drawer, we can still recognize them because I keep a small key ring attached to my FOB.
And just for fun, one last look at the before and after of this junk drawer organization!

If you enjoyed this organization project, save and share the images below!