Wood Slice Christmas Ornaments


Wood slice ornaments are abundant on Pinterest, and I always wanted to make my own whenever I saw them. There are many ideas to decorate these little wood rounds; you can use them as ornaments, gift tags, or place settings on your holiday table. The sky is the limit! The wood on these slices is smooth, so they’re paintable (and stainable), and in my case, the decals I made with Cricut adhered very well to the ornaments.
I purchased these wood slice ornament blanks a few days after Christmas last year. With the arrival of the new year and new projects, Christmas crafts are the last thing on my mind, but there’s still time to make these little ornaments for your Christmas tree! They also make great gifts for teachers, friends, and neighbors. I customized two of these wood slice ornaments for two of my friends: one had her first baby this year, and the other is getting married in 2 weeks. Take a look!
Would you like to save this?
This post may contain affiliate links for your convenience. For more information, please read my Affiliate Disclosure.
List of Supplies for Wood Slice Ornaments
I customized these wood slice ornaments with custom decals made with Cricut Joy. But you do not need a cutting machine to decorate the little wood slices, paint them and add pre-made decorative embellishments from the craft store. Here’s the list of supplies you need to make the ornaments.

- Wood slice ornament rounds – I purchased mine individually at Michaels, but these are a bit rounder and more polished. They come in different sizes, too.
- Craft Paint – I used black chalkboard paint from my craft stash, but acrylic paint will work well, too.
- 1-inch foam brush – I purchase these in bulk. Use a smaller nylon paintbrush near the edges (for fine detail).
- Ribbon – I used a 1/4-inch wide gold metallic ribbon. Feel free to use the color and width of your liking.
- Cricut Joy cutting machine – I used the Cricut Joy, perfect for small projects like these sliced wood ornaments.
- Smart Vinyl Permanent – I used silver, gold, and white.
- Transfer Tape – You don’t necessarily have to use the Cricut Joy; any transfer type will work.
- Basic Tool Set – This set is for weeding and transferring the decals to the wood slice.
- Decal designs – You can access the same designs I made in Cricut’s Design Space. More info is below.
- Rhinestones and Hotfix Applicator – Optional; for adding bling to your wood slice ornaments.
Using Cricut Design Space for Wood Slice Ornaments
Here are a few things you should know when using the decal designs I made for the wood slice ornaments on Cricut Design Space.
- The black circles simulate the background. You can resize them to the size of your ornaments. They are your guide to sizing the designs. Once you resize and adjust, you can delete the rounds or hide them in the layers panel on the right. I prefer hiding them in case I need to re-cut or re-design.
- Each design is grouped. Ungroup so you can move the designs (and backgrounds) freely on the canvas.
- Some designs have hidden details. Select a design, and click on ‘contour’ (bottom right) to show or hide specific details. For example, I hid the contour of the words ‘our first Christmas as’ in the Mr. and Mrs. ornament. Alternatively, I typed the exact words in a different font and cut them separately. I did this because the original font was too thin and didn’t cut well. A separate design with a thicker font yielded better results.
- Change the colors. I could’ve cut out all the designs in the same color vinyl, and it would have been easier. But I wanted to mix colors so the ornaments didn’t look so flat. Change the layer color if you want a design cut out in the same color.

How to Make Wood Slice Ornaments
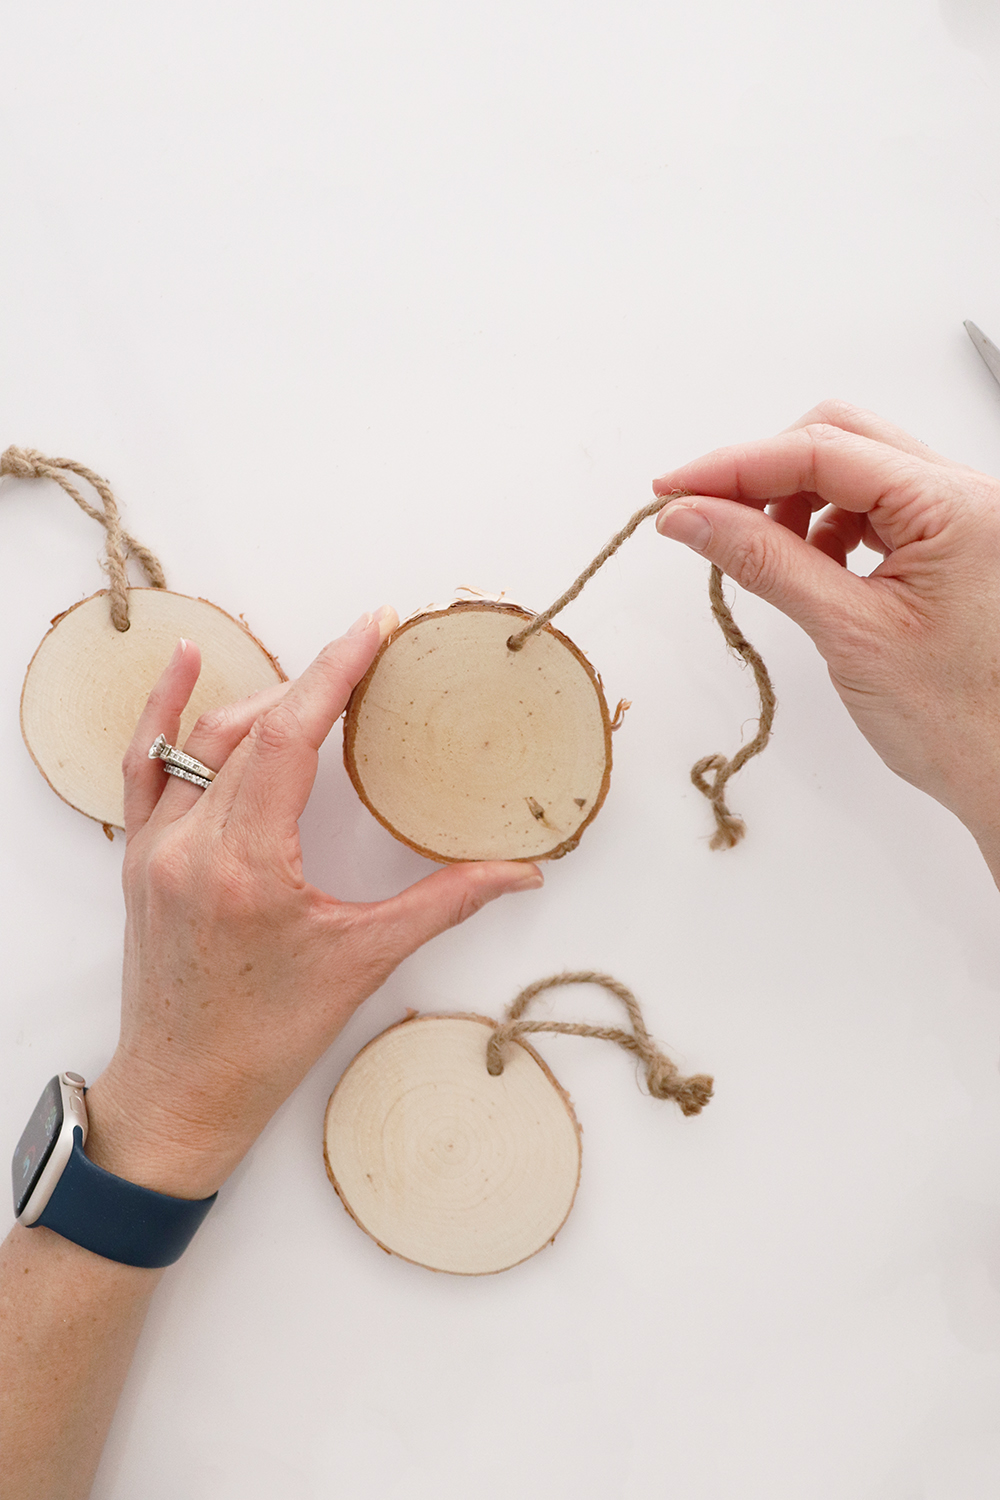
If your wood ornaments come pre-strung, as mine did, the first thing you have to do is remove the ribbon, string, or twine that’s threaded through the slice. You can either save the ribbon and thread it back or choose a different one that matches your designs. In my case, I tossed the twine since I thought it was too rustic, and I wanted a bit of glam.
Step 1. Measure the Wood Slices
Before making your ornaments, measure the diameter of each wood slice. If your slices are not perfectly round -like mine- measure both the ornament’s height and width. My wood slices were 3 inches tall and 3.25 inches wide on average. Only a couple of ornaments were perfectly round (3×3). To standardize it, I used 3×3 as my dimensions.


Step 2. Create the designs
I created my designs using images from Cricut Design Space and customized some of them to my liking. You can open and use the same file I used. Grab it from my Cricut Design project library and customize it. To make the most out of this file, follow the instructions highlighted above.

Step 3. Paint the blanks
Prep a clean surface, and paint the wood rounds in your choice of color. I chose a black background and white, gold, and silver vinyl for the decals. When painting, get as close to the edge of the round as possible. The foam brush is perfect for painting large areas, but once you get to the edge, you should use a fine brush.


Step 4. Cut the Designs
Head over to Cricut Design Space, and once you are happy with your designs, click on the Make It button. Choose the machine and the type of material you are using for accurate cutting. You can make these wood ornaments with any Cricut machine model.
Cricut Design Space will arrange the designs by color, so you know which roll of vinyl insert first. Once again, you can make them all in one color and be done in one cut.

PRO TIP: I highly recommend the Cricut Joy because it’s compact, and the small rolls of Smart Vinyl are great for matless cutting. I always keep my Cricut Joy on my desk, next to my computer screen. It’s plug-and-play!
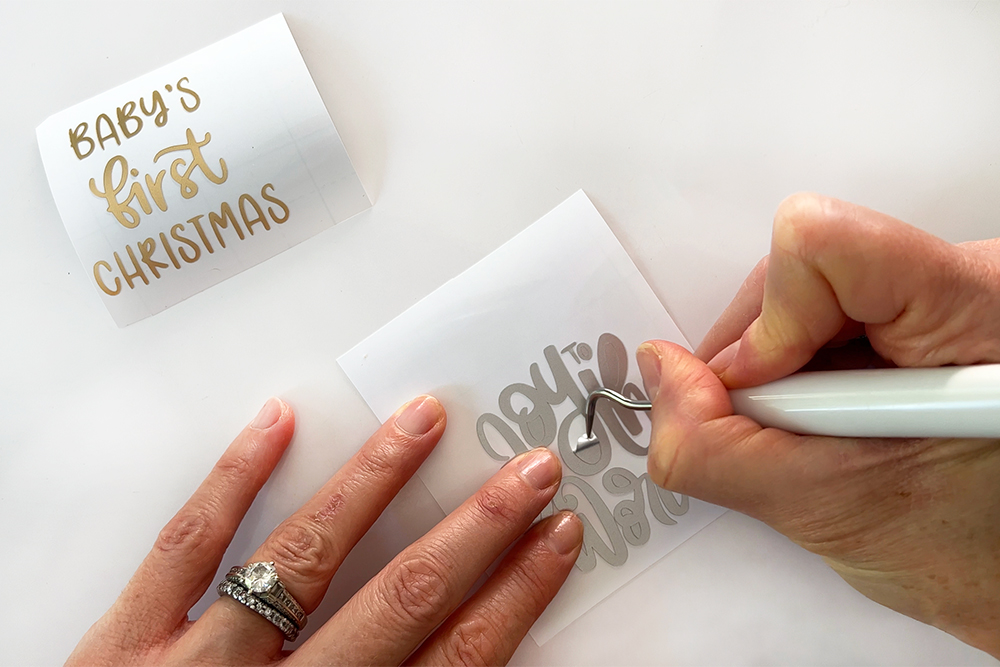
Step 5. Weed the designs
Weeding and transferring decals can be tricky. I recommend using proper weeding tools for this step. I had difficulty weeding the decals with the finest details, such as the family name wreath, the apostrophe in ‘Baby’s,’ and the word ‘TO‘ in the ‘Joy to the World’ design.

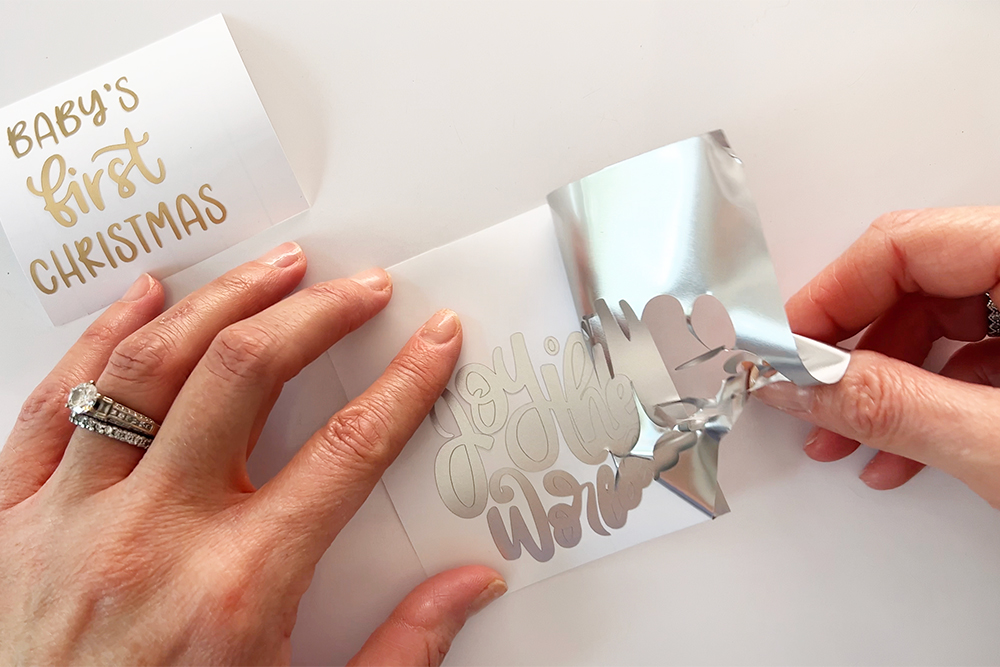
This is the step where using the Cricut weeding tools comes in handy. I used a fine tweezer to pick the letter T off the silver vinyl and placed it again on the white backing.
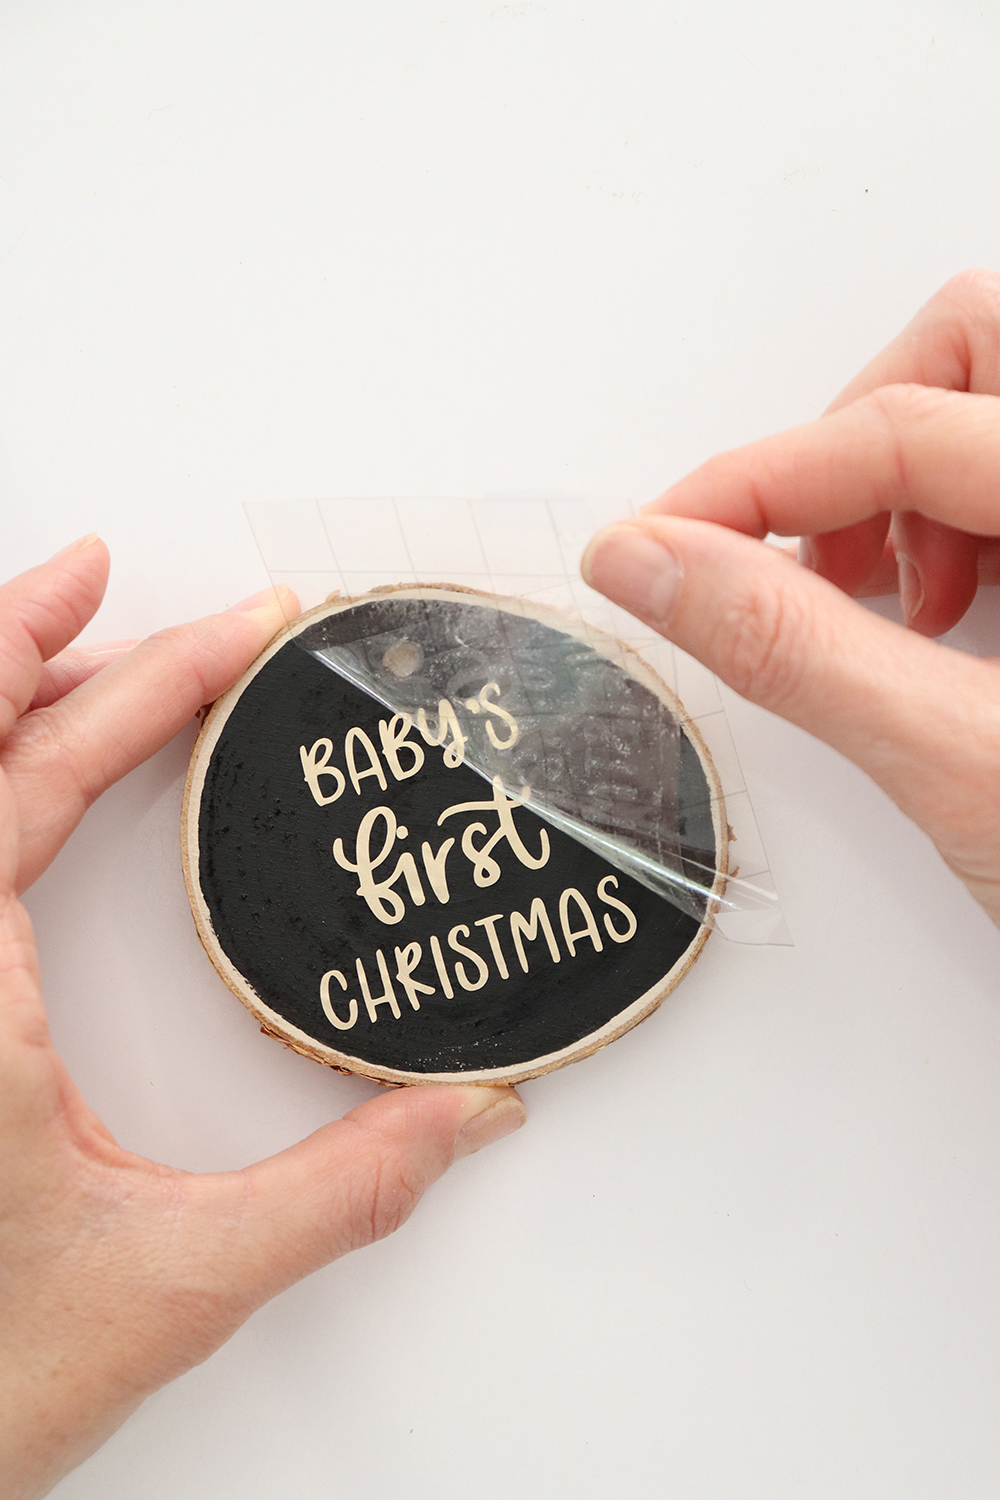
Step 6. Transfer the designs to the wood slices
This is the step that brings the wood slice ornaments to life! Your Christmas ornaments are practically done once you transfer the decals onto the wood rounds. As I mentioned earlier, adding extra design details is up to you.
Cut out a piece of transfer tape, enough to cover your design, and smooth it over using the scraping tool. This same process is explained in my post How to Make Decals with Cricut.

Carefully peel the transfer tape off; it should remove the entire design from the white backing. When the design is wholly transferred to the tape, you can transfer it again to the wood slices.


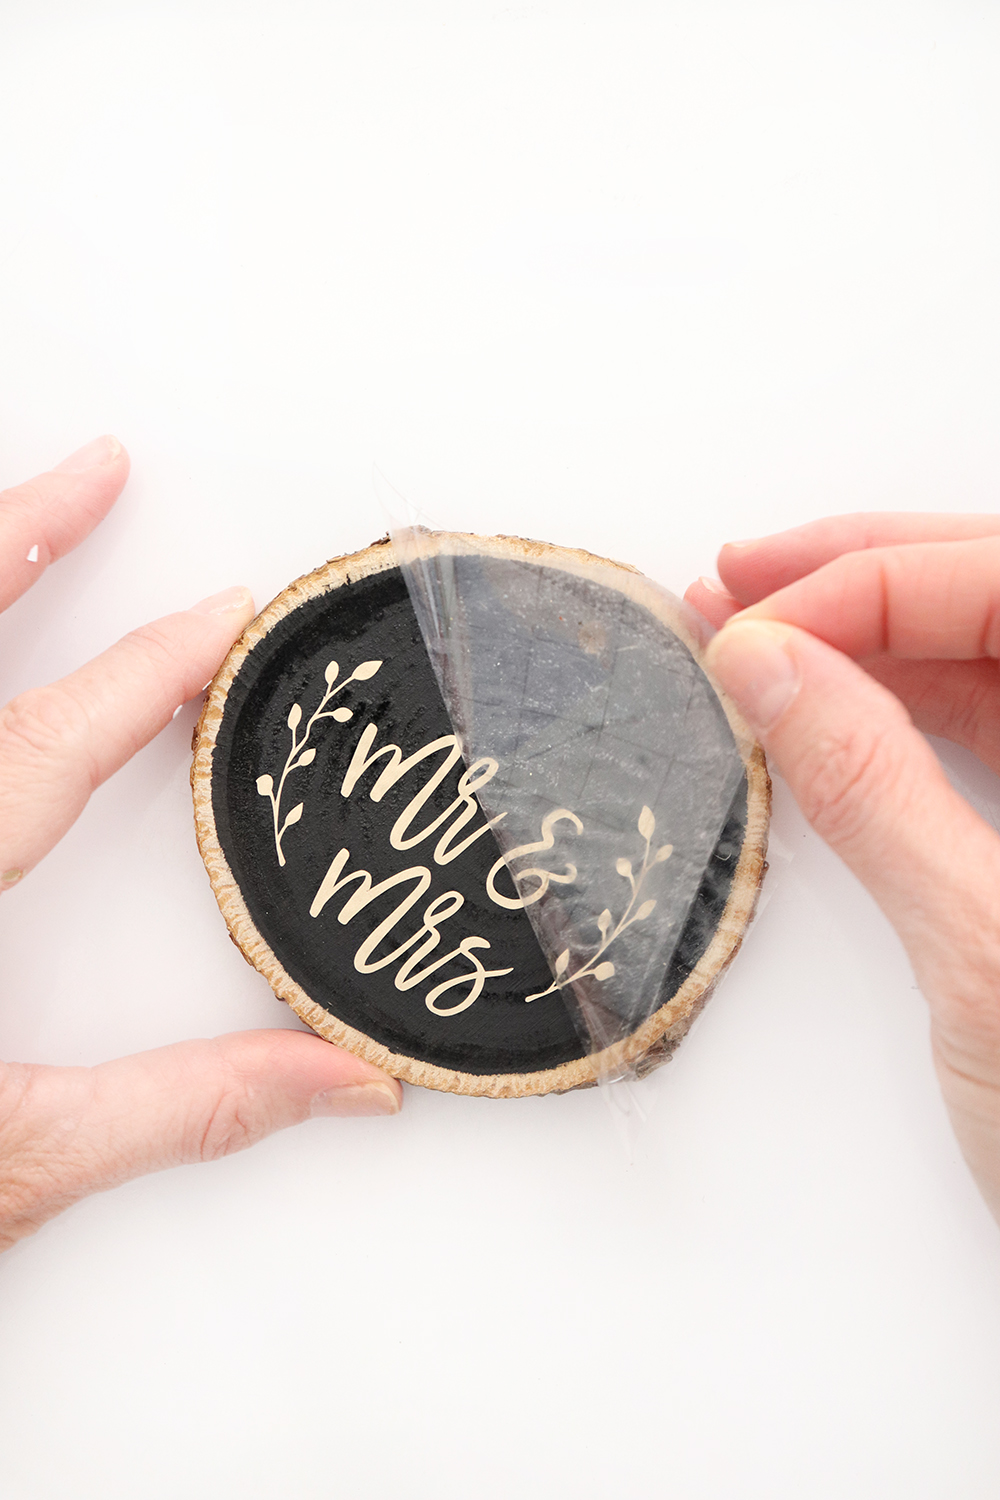
For this step, you may need to place two decals onto the same wood round, mainly -but not limited to – if you choose more than one color for the same design. So here are some examples.
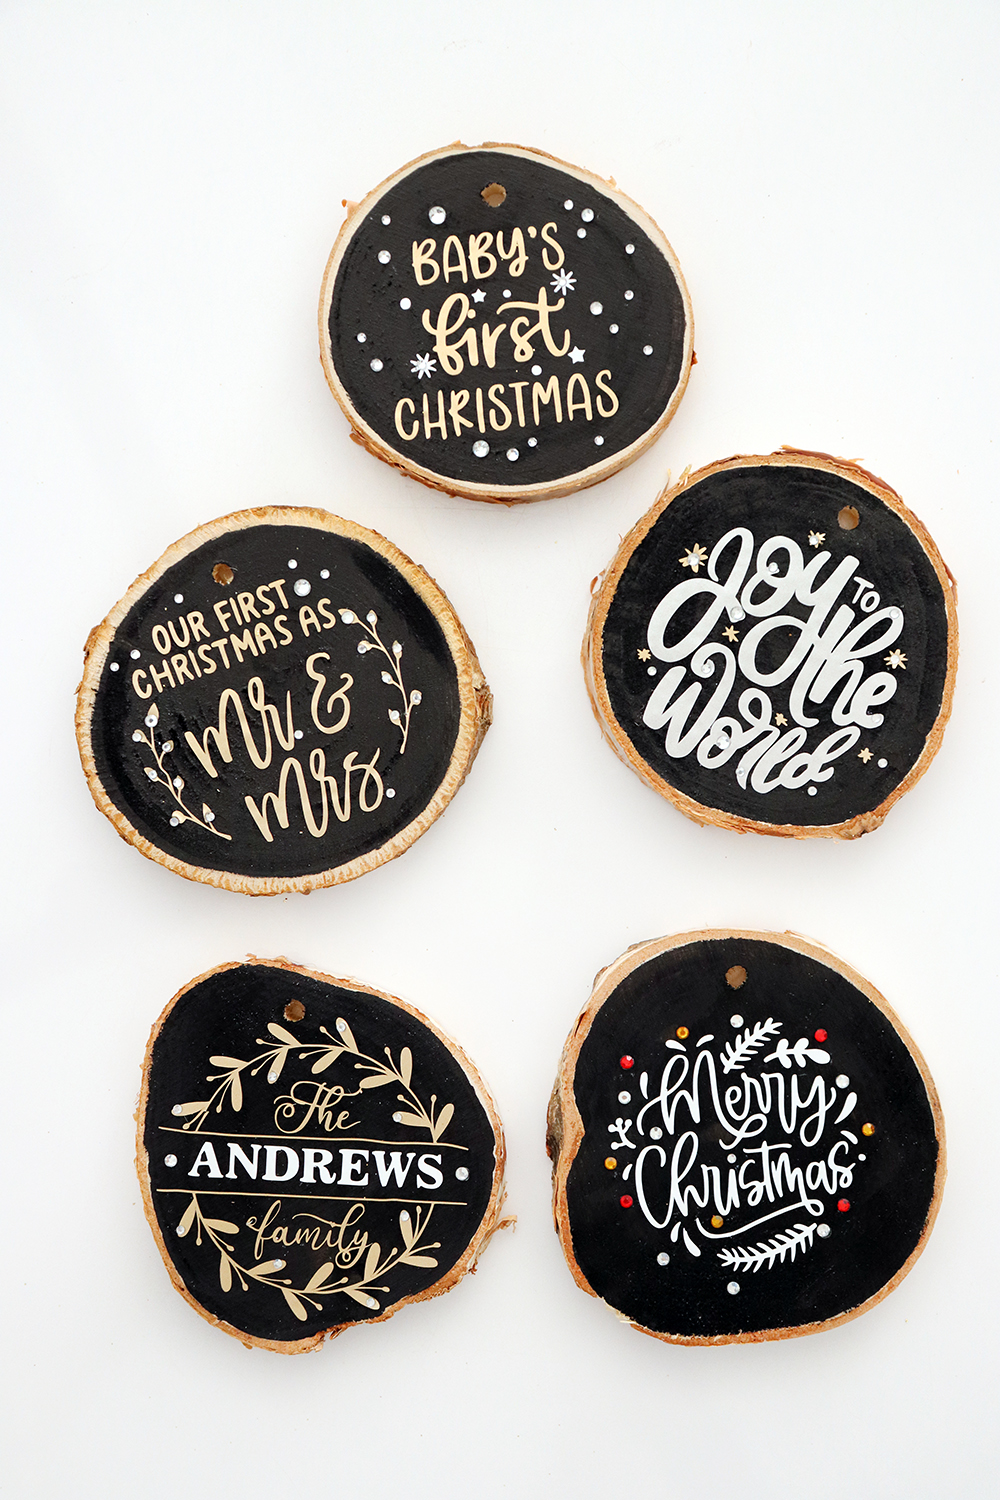
Joy to the World Ornament
I cut the words Joy to the World on silver vinyl and the surrounding stars on gold. Notice that the machine cuts the stars spaced precisely as in the design. So when you transfer them, you can do it all at once.


Family Name Ornament
Another example of using two colors is the family name ornament. I chose gold for the wreath and white for ‘Andrews.’ This was a very odd-shaped wood slice, but the beauty of these ornaments is in those natural irregularities of the wood slice. I think this one turned out beautiful. Maybe I am biased because it has my last name on it! 🙂

Our First Christmas as Mr. and Mrs. Ornament
For this ornament, I cut out ‘Our First Christmas As’ separately from the wreath, and Mr. and Mrs. I did this because the original font was too thin. I used a thicker font instead. Position the bigger design first and leave room to transfer the second design.


Notice that the periods (.) next to Mr. and Mrs. did not transfer. This is because they were minuscule. I could have carefully weeded them off the vinyl, but I had other plans, which took me to the next step!
Step 7. Add Rhinestones (optional)
Christmas is full of merry and bright things, so I glued on rhinestones in varied sizes and colors to add sparkle to these wood slice ornaments. I used a rhinestone setting tool, making transferring and gluing the tiny beads onto any surface easy.

The kit comes with hundreds of rhinestones in different colors and sizes and different size tips that attach to the tool. Choose the tip according to the rhinestone size. Here’s what you have to do:
- Choose the tip and attach it to the tool. The flat head tip is good for the most petite rhinestones. This is the tip I used.
- Turn the tool on and rest it on the support stand. Handle the tool carefully, and never touch the tip with bare hands. The metal gets very hot!
- The kit comes with tweezers and a white pencil, which help you pick up, transfer, and place the rhinestones.
- Pick up and place the rhinestones with the white pencil wherever you like. I used tiny ones to decorate the wreaths and simulate stars. I also used them to dot the letter i in the Merry Christmas ornament and periods for the Mr. and Mrs. ornament.
- Once you are happy with the rhinestone placement, place the hot tip over them to melt the glue and set them in place.


I added two larger rhinestones on each side of our family name ornament, some on the leaves of the wreaths, and ‘sprinkled’ some all around the Baby’s First Christmas ornament. The rhinestones make these wood slice ornaments go from beautiful to gorgeous! So, give it a try!
Step 8. Thread the Ribbon
The easy last step is to cut and thread the ribbon through the wood slice. I like to cut the end of the ribbon at a wide angle so I can thread it through the small hole in the wood round.


Finally, align the ends of the ribbon and make a knot. Your wood slice Christmas ornaments are done!


Finished Wood Slice Ornaments
And here they are, all finished, full of bling, silver, and gold. I hope you find some time this season to make these ornaments. This would make a fantastic activity for a girls’ night in!

