Organizing a Bathroom Vanity for a Teen
Let’s be honest, organizing a teenager’s bathroom vanity is a bit of a losing battle. However, there are methods on how to organize bathroom cabinets under the sink, and drawers that can help manage the chaos. Between skincare products, toothpaste that somehow ends up everywhere, and the rotating lineup of creams, sprays, and colognes… a perfectly styled setup wasn’t really my goal here.
But creating a system that helps keep track of the important stuff was worth the effort. We needed a designated place for asthma medication and Invisalign retainers. These are things that we can’t afford to misplace. So instead of aiming for a full-blown makeover, I focused on resetting the most important zone first: the cabinet under the sink, and along the way, gave the drawers and countertop a little refresh too. And I’m happy to say, it made a huge difference!

Would you like to save this?
This post may contain affiliate links for your convenience. For more information, please read my Affiliate Disclosure.
TL;DR: What I Did to Organize My Teen’s Bathroom Vanity
- Focused on function, not perfection—especially in a space used daily by a teenager
- Reorganized the cabinet under the sink to create clear zones:
• Asthma & allergy meds (stored upright)
• Invisalign trays and care products
• Skincare, travel items, and cleaning supplies - Used stackable drawers and slim pull-out bins for visibility and easy access
- Moved bulky items (humidifier and nebulizer) behind the drawers
- Switched the towel basket to the left cabinet door after installing a fabric/bamboo TP holder (still testing its practicality!)
- Tidied up the vanity drawers with a simple system:
• Rolled towels + bamboo dividers
• Daily care items
• Travel bags, trash bags, and extras - Corralled countertop clutter into a small caddy and a divided lazy Susan
- Skipped labels—clear bins make contents obvious and keep things flexible
Bottom line: I let go of the picture-perfect setup and focused on simple systems that support real life. That’s what works for us.
Shop My Curated Finds

Under The Sink Organization #4
To be honest, I wasn’t sure it was worth posting another under sink bathroom (or kitchen) storage idea. I’ve already shared a few over the years. How different can one organize bathroom cabinets if they all look the same? Plus, there’s several out there. But I always come back to this: if one small organizing idea helps even one reader simplify their home, then my mission is accomplished. And truthfully, I love organizing! Even if this bathroom vanity barely stays clean for a day or two!


The last time I gave this bathroom cabinet a dedicated makeover was way back in 2017. That setup was all about soft details and decorative bins for a space that was under my control and care, when my son was 7 years old.
This time, the needs are completely different. Now my son is a teenager, and the focus isn’t on aesthetic charm and guests, it’s on function. I needed under sink bathroom storage that could handle everything from asthma medication and Invisalign trays to skincare, travel toiletries, and the usual teenage clutter.
So rather than focusing in a whole bathroom vanity reorganization (let’s face it: teenagers!), I focused on the area that would make the biggest impact: the cabinet under the sink. After that was done, rearranging the drawers and the vanity countertop was a breeze!
What We Needed This Cabinet to Do
This is my son’s main bathroom, and over time, this cabinet had become a catch-all for everything from travel toiletry bags to used-up hair product. So much used hair product. So many bottles of hairspray!
I wanted to declutter and make the most of the space while keeping two priorities front and center:
- Asthma and allergy medicine visible and stored upright.
- Invisalign retainers and the care supplies that go with them. We can not afford to accidentally toss or lose.
Everything else, like daily toiletries, towels, toilet paper, could fall into place once we had a central zone for the things that really matter.
The Under-the-Sink Bathroom Storage Setup
Over the years—and as my son has grown up—this cabinet slowly turned into one of those “shove it and close it” kind of spaces. What started as a somewhat tidy setup during his younger years eventually became a bit of a black hole for all things bathroom-related. Actually, scratch that. It got a lot out of control.


Daily-use items, back stock, skincare, cleaning supplies, medical supplies, random tech accessories… it was all just crammed in with no system. Same with the vanity drawers. We had officially reached the point where we could easily accidentally throw out something important.
It’s not that it was hard to find what we needed, but it definitely wasn’t easy on the eyes to open a cabinet or a drawer and see everything in disarray. And not being able to reach for something instinctively, without having to dig, doesn’t work for us. We operate by habit. And that only happens when everything has a designated place for a long enough period that our brains shift into autopilot.
So before anything else, I did a complete clear-out and took inventory of what we actually use. Here is a before photo so you can see what I was working with!

A mix of products, gear, and clutter that had built up over the years. Functional? Not really. Findable? Only sometimes.
After pulling everything out, tossing the empty bottles, sorting through what he uses, and grouping items by purpose, I finally had a clear picture of what this cabinet needed to hold and how it could all fit in a way that makes sense.
Now let’s walk through the updated setup, section by section.
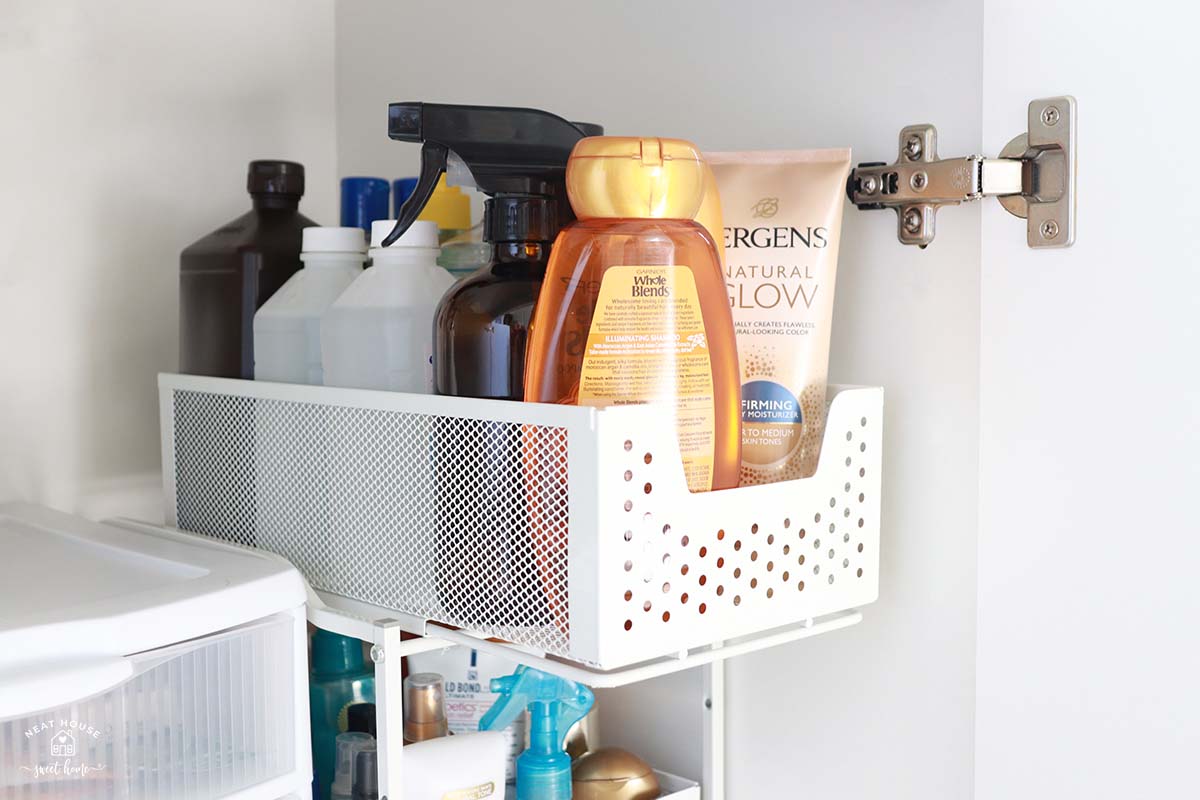
Left Side of the Cabinet
I used two skinny, clear roll-out bins with built-in handles and small wheels in the back. These are easy to slide out and put back in, even for a teenager. I found mine at my local TJ Maxx; I am linking to similar ones on Amazon here. But, try looking for them at your local discount store first since the ones on Amazon are definitely overpriced.

I was also able to fit a bottle of distilled water, which my son uses for both the humidifier and his ultrasonic retainer cleaner. I like to decant it into a slim glass jar—it’s easier to handle, and it takes up far less space than the bulky original container. The rest of the backstock stays in a larger bathroom closet.
- Bin 1: Backstock items like extra hand soap and hairspray
- Bin 2: Basic bathroom cleaning products (just enough for him to clean the counter and mirror on his own. No excuses!)


Behind the Pipes
That awkward space behind the pipes fits two bulky items: the nebulizer and the room humidifier. They’re tucked away but still easy to reach when needed, which, thankfully, is not that often.

Center (In Front of the Pipes)
In front of the nebulizer and room humidifier, I placed a set of six clear drawers, stacked in two columns of three. I placed four tall drawers (7 inches) on the bottom and middle rows, and two shorter drawers (4.6 inches) on the top row. This layout gave me just the right mix of storage for both bulky items and small essentials, while still working around the pipes.

Each drawer now has a clear purpose:
- Hair trimmer blades + facial cleaner + cables
- Travel tissue packs
- Skincare & acne treatments
- Invisalign retainers + care products
- Asthma & allergy medication
- Nebulizer masks + hoses, inhaler spacer, saline rinse crystals
For the asthma and allergy medication, one of my biggest priorities was keeping the inhalers and bottles stored upright, as recommended on the packaging. The taller (7-inch) drawers were perfect for that—they keep everything stable, visible, and easy to access at a moment’s notice.

Keeping the retainers in a dedicated drawer has been equally helpful—he switches trays weekly and needs to hold on to the previous set just in case. Previously, they were in a larger drawer, making them easy to misplace or accidentally toss. Now, everything’s visible and contained. Here’s is how these two essential health care products were stored before.


Right Side of the Cabinet
I added a toilet paper holder to this side of the cabinet—one of those aesthetic ones with a soft fabric body and a bamboo lid. I was influenced (if you know what I mean!) and ended up buying it because, well… it looked nice in all the videos.


I do like it. It keeps the rolls contained, it’s soft and easy to open, and of course, it’s aesthetically pleasing. But I’ll admit, for a 15-year-old boy’s bathroom… I’m not sure it really matters. A stack of rolls or even just the original packaging might’ve worked just as well. That said, it looks neat, and I love anything neat. So for now, it stays.

Over the Cabinet Door Basket/Towel Holder
I’ve had the over-the-door basket/towel holder since that 2017 bathroom update, and it’s always lived on the right cabinet door. With time, it was just a dumping ground. It was holding 4 different categories.
But with the new toilet paper holder in place—which is a bit deep—the right door no longer closes properly if the basket’s still hanging there. So I moved it to the left side. It works… but it might not stay this way.


For one, my son immediately said that having the towel on the left was going to be “an adjustment.” I get it. He’s right-handed, and after years of reaching to the right without thinking, the shift feels off. Habit is real, especially with everyday routines like washing your hands and grabbing a towel.
Unfortunately, I couldn’t place the toilet paper holder on the left because a pipe takes up part of the depth on that side. So we’re working with what we’ve got. Adjustments, adjustments.
And while I do like the TP holder, I’m still deciding if it’s the best fit for a teen bathroom. We’ll give it a little more time.
Real-Life Approach to Organizing a Bathroom Vanity
While I didn’t go wild organizing every drawer, I did make a few simple improvements to the vanity storage system overall. These drawers are opened and shut multiple times a day, so I have very low expectations that anything will stay perfectly in place—and that’s okay.
Since I was able to clear out quite a bit by moving items under the sink, I took a moment to rearrange what was left. The best upgrade by far was adding expandable bamboo dividers to the drawer that holds hand towels and washcloths. It keeps everything neatly rolled and contained—especially helpful for a teen who’s continuously rushing and throwing things around. Pulling out one towel won’t mess up the rest of the drawer, unlike when I used to have them stacked.
Nothing complicated, just little changes that make daily routines feel more manageable.
Top Drawer
Daily-use items. Toothpaste, toothbrushes, hairbrushes, asthma inhaler, rescue inhaler, cotton pads, flossers, soap bars, etc. This is the drawer that gets the most use daily. I have zero expectations of it staying this way.
In this drawer, we are using a mix of these Brightroom storage trays from Target.


Second Drawer
I sorted, decluttered, and brought in new washcloths and fresh hand towels. I rolled them and organized them using expandable bamboo dividers. This is how I store my kitchen towels, too!


Third Drawer
Travel toiletry bags, small boxes I need to hang on to, mouthwashh cups, and the bathroom trash bags

Bottom Drawer
This one drawer is deeper than the other three. I love it that I can fit up to four full-size bath towels inside.

It’s not Pinterest-perfect, but it’s functional—and that’s what this space needed.
I Left the Counter Alone (Mostly)
I am not going to pretend that my teenager will keep a tidy, minimalistic and aesthetic vanity. There’s a lineup of creams, meds, face washes, colognes, retainer cases, and scrubs across the countertop, and that’s okay.

That said, I did corral everything into two simple organizers:
- A small caddy that was already in place (similar here), and I added
- A small (8.5″ wide) divided lazy Susan (similar here) for rotating through products without knocking everything over
Before placing anything back, I decluttered and tossed anything that was nearly empty, expired, or just didn’t work for his skin. The result isn’t styled, but it’s streamlined, easy for him to maintain, and way better than scattered bottles all over the counter.
I still have to organize the mirror cabinet. But that’s a story (maybe) for another post.


Function Over Perfection
I chose not to label the drawers this time. Since they’re clear, the contents speak for themselves. It keeps things visually clean and makes it easy to switch things around later if needed. Plus, let’s be real—this is a teenager’s under-the-sink cabinet. Flexibility matters more than perfection here, and the system still works without extra labels.

The takeaway? You don’t need to organize everything to make a real difference. By focusing on the areas that matter most; under sink bathroom storage, a few reliable zones, and some intentional drawer systems, I was able to give this space a much-needed reset.

It’s not about creating a picture-perfect setup. It’s about making daily routines easier, reducing mental clutter, and creating habits that stick. And that’s why this works for us. Everything has a place, it’s easy to maintain, and even the small details (like upright asthma meds or contained retainers) make life a little smoother.
It’s not perfect. But it’s functional, and for a real home, with a real teen, that’s more than enough.