DIY Patriotic Bunting Banner
Last summer, I pulled out my sewing machine to make this patriotic bunting banner for a Stars and Stripes Baby Shower I had the pleasure to style and attend.
I must say, I am not the best at working with fabric and a sewing machine. But crafting comes naturally to me, and once I set my mind on a project and brainstorm (a lot!), I can make it happen.
If you have basic sewing skills, you can make this banner. Sewing the bunting flags is a little tedious, but you will have a banner that will last you forever to use on any patriotic holiday such as Memorial Day or 4th of July.
Here is the tutorial, and I also include the PDF pattern of the bunting flag for free download.

Every 4th of July, we literally whip up a last-minute cookout. What can I say? They’re called “lazy days of summer” for a reason! Whether it’s at home, at my sister’s, or at our friend’s, we make sure to have plenty of food and drinks. I bring the decor, and later that night, we head out to see fireworks. By the way, if you are local, make sure to check out this guide on where to watch the 4th of July fireworks in South Florida.
2022 Update: If you clicked on the link above, you received an error. Sadly, my friend Heather from Local Mom Scoop has passed away, and her site has been taken down. But her link to her amazing work will live forever in my blog. Rest in Peace, sweet Heather.
This year, I will be making these easy and beautiful DIY patriotic centerpieces and this red, white and blue sangria. A festive and refreshing cocktail to cool down on a 90+ degrees day!
Tools and Materials to Make a Patriotic Bunting Banner
For this project, I purchased 1 1/2 yards of fabric. It was more than enough to make 2, 5-foot long banners.
- Bunting banner pattern, PDF file. Download it here. It’s free!
- 1 to 1 1/2 yards of Kaufman Classic Seersucker Stripes Crimson Fabric
- Scissors
- Jute Rope spool, 0.1 in/3 mm
- Iron-on Denim Patches
- Single star stamp –> I found this one to be the perfect size for the denim patches. Star measures 1.25 inches from end to end.
- White inkpad
- White thread
- Sewing tools kit
- Basic sewing machine. If you don’t own one yet, you can get this Singer sewing machine for under $100. It includes free access to online class videos.
- Iron and ironing board/surface
Step 1: Cut The Fabric to Size
Here are some dimensions you need to know in order to cut the striped rectangles that later on will be your flag.
- The seersucker striped fabric is 57 inches wide.
- The bunting flag banner template (white paper) is 6-inch tall x 4.5-inch wide.
This means that in 57 inches, we can fit the pattern side to side, up to 12 times. 57/4.5 = 12.67 units
- Take the fabric and cut 12-inch long pieces. Fold it in half. Now you have a 6-inch x 57-inch piece. Place it on an ironing board and iron the crease.
- Pin the pattern to the fabric and cut the rectangles, as shown in the last frame of the picture below.
- Cut as many rectangles as needed. One (1) yard of fabric (36 inches) will yield (3) 12-inch pieces. This means that you can get approximately 36 flags with one yard of fabric.
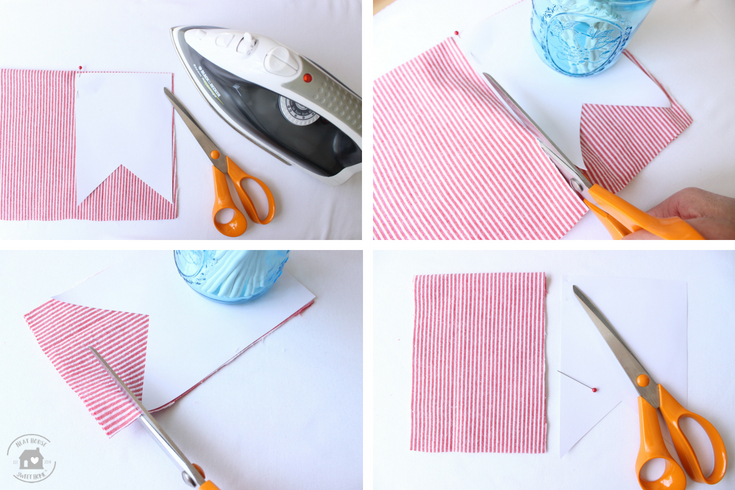
Note: on frame 3, you can see I am cutting a bit of a remnant. This is not necessary if you fold the fabric exactly to the pattern size. 6 inches x 2 = 12 inches
Step 2: Cut the Denim Patches to Size
I think that using these iron-on denim patches was the greatest idea. However, the rounded edges and length had to be adjusted. To have the perfect blue denim rectangle, just cut enough on each end to eliminate the rounded corners as seen in frame 3 in the picture below.
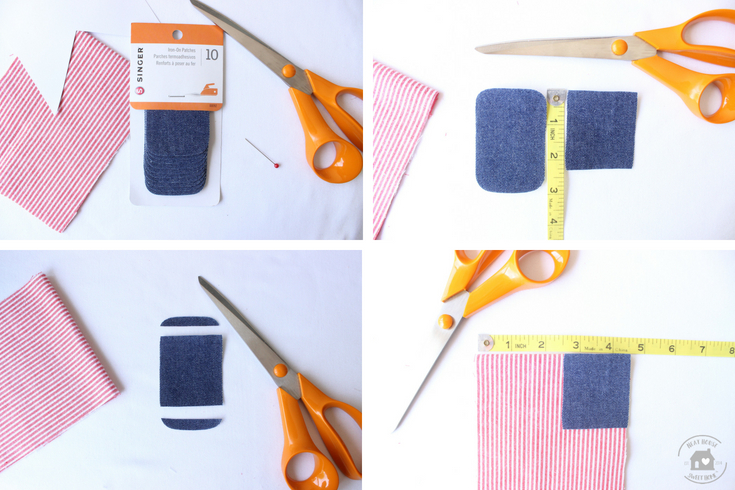
The patches measure 2×3 inches. The 2-inch width does not need to be adjusted, just the round corners. Align the patch with the upper right corner of a striped rectangle.
Step 3: Iron-on Denim Patch
In this easy step, all you have to do is iron the denim patches onto the striped fabric.

First, place the hot iron over the fabric (make sure you use the suggested setting), place the patch over the corner, and press again with the iron.
Step 3. Stamp the Patches
This step does not require much explanation. Know that there’s no right or wrong way to stamp the star on the patch. Some stars will come out perfectly filled; some others won’t. But that’s the beauty of a handmade item/banner.
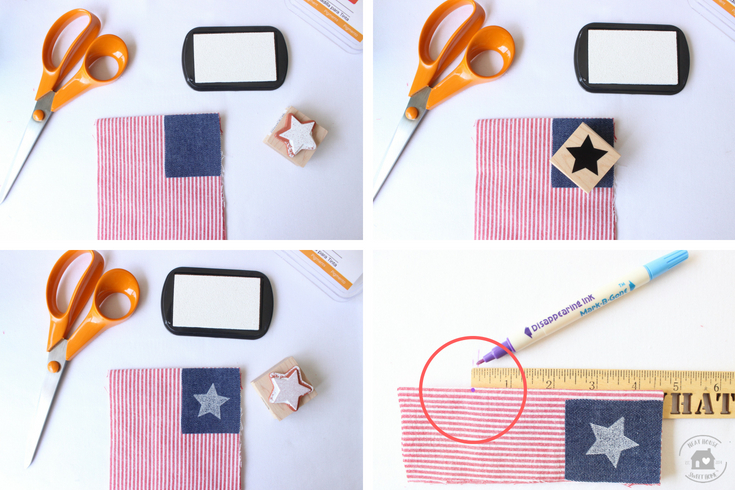
As per the picture on frame 4 (above), fold the flag lengthwise and slightly put a dot on the 4.75-inch mark. This is the point where the stitches will meet.
Step 4. Place the Jute Cord
Time to open up your flag and place the jute cord in the seam.

Fold back. Here, you can pin the flag to the string. I recommend pinning and sewing one flag at a time for easy handling while sewing.

Your banner is taking shape!
Step 5. Sewing the Banner
As I mentioned before, sewing the flags was my least favorite part because I don’t have much experience using the sewing machine. But if I can do it, you can too. Trust me; I am not too skilled with the sewing machine.
It is important you use this picture as a guide on how to stitch the banner.
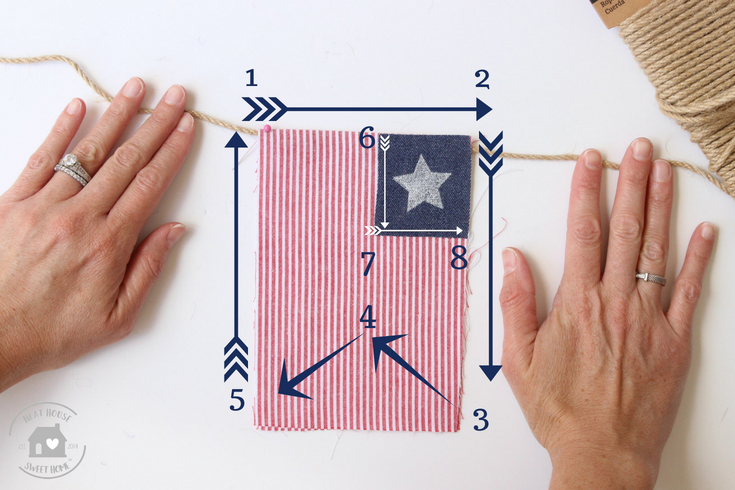
Thread the sewing machine with white thread and use the straight stitch setting.
- Starting at point 1, stitch a straight line to point 2.
- Lift the foot presser and turn the flag to stitch from point 2 to point 3. Set the foot down and stitch.
Continue lifting the foot presser at every turn, but never lift the needle off the fabric. Just turn the flag, and set the foot down again.
- Stitch from point 3 to point 4. Point 4 is the purple dot we marked in step 3.
- Stitch from point 4 to point 5.
- Stitch from point 5 back to point 1.
You can lift the needle at point 1 and place it on point 6. Later, you can cut the thread that hangs from one point to the other.
- Stitch from point 6 to point 7.
- Lift the foot presser, turn 90 degrees and stitch from point 7 to point 8.
Each frame in the picture below shows some of the turns and stitching.
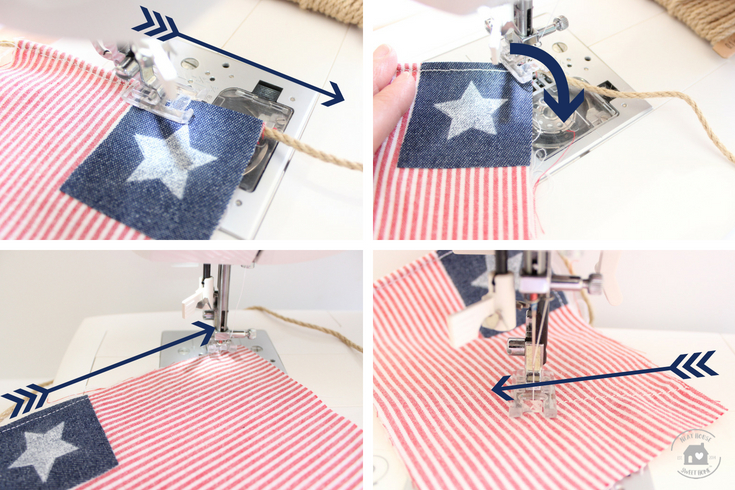
The picture below shows stitching from point 7 to point 8. Notice the diagonal stitching over the rectangle (left of the picture).

Step 6: Cut the Leftover Fabric
To give the rectangles their intended shape, you need to cut out the remnant fabric. To do this, just fold the flag in half, and cut it just under the diagonal stitching.

I suggest you do this once all flags have been sewn to the jute cord to avoid fraying during handling (although the fabric showed to be great and had minimal fraying!)
You can make the banner as long or as short as you want. I spaced the flags 4-inches apart.
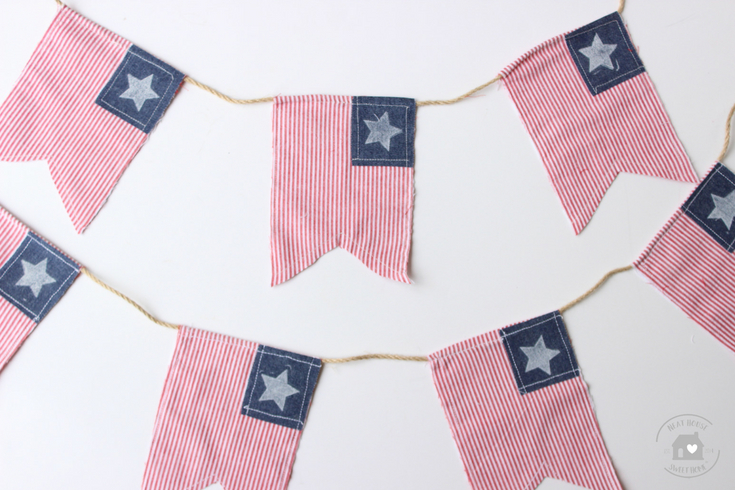
And there you have it. A beautiful patriotic bunting banner to display at your next patriotic celebration!
Pin it here!

Happy sewing,

